Achieving smooth image edges and seamless photo retouching in Photoshop is a fundamental skill for digital artists and photographers alike. This tutorial delves into the techniques that enhance clarity, integrate image content harmoniously, and transform portraits into polished masterpieces. We will explore how to effectively use selection tools, refine edges, and apply various blurring and smoothing filters to achieve professional-level results.
Precision Selections: The Foundation of Smooth Edges
The journey to smooth edges begins with accurate selections. Photoshop offers a variety of tools to isolate subjects or areas of interest, ensuring that subsequent refinements are applied precisely where needed.
Leveraging Smart Selection Tools
For initial selections, Photoshop's intelligent tools can significantly expedite the process. The Object Selection Tool, accessible by clicking it in the toolbar or pressing "W," is designed to recognize and select distinct objects within an image. Once an object or area is selected, the next crucial step is to refine its edges to prevent jagged or unnatural appearances.
The Art of Feathering for Soft Transitions
A primary method for softening selection edges is feathering. This technique creates a gradual transition between the selected area and its surroundings. To apply feathering, navigate to "Select" > "Modify" > "Feather." Alternatively, the keyboard shortcut Shift+F6 can be used. The Feather Radius is a critical parameter; a larger radius results in a smoother and broader edge transition. It is advisable to start with a low value, such as 1 or 2 pixels, and gradually increase it until the desired effect is achieved. This process gently fades between the pixels on the border and the pixels in the surrounding area. The Feather tool determines how many pixels away from the edge of your selection it will go before it starts smoothing and blending.
The "Smooth" Option for Enhanced Refinement
Beyond feathering, the "Smooth" option within the "Select" > "Modify" menu offers further refinement capabilities. This tool can further smooth the edges of a selection, contributing to a more natural integration of the subject into a new background or when applying effects.
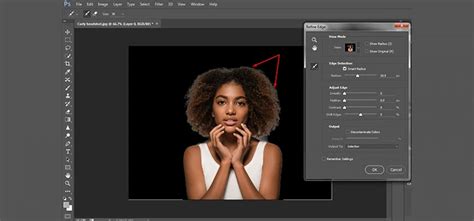
Advanced Edge Refinement with Select and Mask
For more complex selections and edge problems, the Select and Mask workspace provides a comprehensive suite of tools. This environment is specifically designed to address common issues like halos, jaggies, and blocky or smudgy edges that often arise when cutting out images.
Navigating the Select and Mask Workspace
The Select and Mask workspace offers a dedicated interface for fine-tuning selections. Here, various tools are available to tackle different edge challenges. The Refine Edge Tool is particularly useful for soft and semi-transparent areas, allowing for precise adjustments. The Brush Tool within this workspace enables direct painting to add or remove areas from the mask without algorithmic interference. Holding Alt/Option while using the brush allows for the removal of selected areas.
Global Refinements for Comprehensive Adjustments
The Select and Mask workspace also features Global Refinement tools that apply adjustments across the entire selection. Tools like Levels (accessible via Ctrl/Cmd+L) can be used to manipulate the mask directly, offering precise control over edge transitions. Additionally, settings exist to expand or shrink the edge, which are particularly effective after applying Decontaminate Colors to remove color fringing.
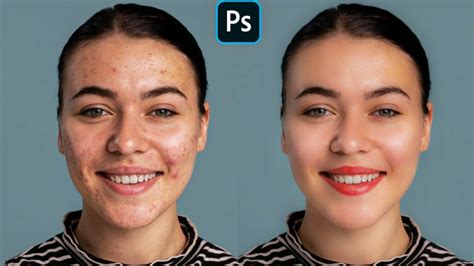
Achieving Flawless Skin and Natural Portraits
Smoothing and enhancing skin in portrait photography is an art form that requires patience, precision, and a keen eye for detail. Photoshop provides powerful tools and techniques to achieve natural-looking results without an over-airbrushed appearance.
Non-Destructive Editing with Smart Objects and Layers
A cornerstone of professional retouching is non-destructive editing. This is achieved by working with Smart Objects and maintaining a well-organized layer structure.
- Open your image in Photoshop.
- Right-click on the image layer and choose 'Convert to Smart Object'. This allows filters to be applied non-destructively.
- Duplicate the Smart Object layer twice (Ctrl/Command + J), resulting in three copies.
- Group the top two layers into a folder named 'Skin'.
Subtle Smoothing with Surface Blur and High Pass
Two effective techniques for skin smoothing involve the Surface Blur and High Pass filters, used in conjunction with layer masks.
- With the visible layer in the 'Skin' group selected, go to Filter > Blur > Surface Blur. Adjust the Radius and Threshold to soften skin texture without losing essential detail.
- Select the previously hidden layer within the 'Skin' group and make it visible.
- Go to Filter > Other > High Pass. A Radius of approximately 1.8 pixels is often a good starting point, but this can be adjusted based on image resolution and desired detail preservation.
- Set the blend mode of this High Pass layer to Linear Light.
Skin Softening with Beautiful Texture | 1-Minute Photoshop (Ep. 4)
Utilizing Layer Masks for Targeted Adjustments
Layer Masks are crucial for controlling where effects are applied. By creating a mask for the 'Skin' group and setting it to 'Hide All', you can then selectively reveal the smoothing effects.
- Select the Group layer ('Skin').
- Go to Layer > Layer Mask > Hide All.
- Select the Brush tool with a medium-sized, soft brush.
- With the mask still selected, carefully paint over the skin areas. Crucially, avoid painting over the eyes, nostrils, lips, and hair to maintain their definition and detail.
Enhancing Eyes and Lips for Vividness
To further enhance a portrait, specific attention to the eyes and lips can make a significant difference.
- Eyes: To make eyes more vivid, you can use a layer mask to isolate them. Within the Channels window, you might find options to show a red overlay. Set the foreground color to white and carefully paint over the pupils to subtly enhance their brightness and definition. This can make the eyes appear more striking and focused.
- Lips: For lips, use the Brush Tool with a soft round brush at low opacity. Select a shade slightly pinker or redder than the natural lip color and subtly enhance their natural color. A slight sharpening with the Sharpen Tool at a low strength can also bring out texture, making them appear more defined.
Neural Filters for Effortless Skin Smoothing
For an even more streamlined approach, Neural Filters offer a powerful way to smooth skin while retaining natural texture.
- Duplicate the original portrait layer (Ctrl J / Command J).
- Navigate to Filter > Neural Filters.
- Enable the Skin Smoothing option.
- Adjust the Blur Filter and Smooth Skin sliders until the desired smoothness is achieved.
Advanced Techniques and Workflow Optimization
Beyond basic smoothing, advanced techniques and workflow optimizations can elevate your Photoshop skills.
Frequency Separation for Texture and Tone Control
Frequency Separation is a technique that separates an image into its texture and color/tone components. This allows for independent adjustments, enabling you to smooth skin tones without affecting the fine texture, or vice versa.
- Duplicate the original layer twice.
- Apply a Gaussian Blur to the second layer to blur out fine details.
- On the top layer, use the High Pass Filter to isolate the texture.
- Set the blend mode of the top layer to Linear Light. This separation allows for independent adjustments to the color and texture layers.
Color Correction and Adjustment Layers
Adjustment Layers are indispensable for non-destructive color correction and tone modification in portraits.
- Selective Color: Access the Selective Color panel (Layer > New Adjustment Layer > Selective Color) to precisely tweak specific color ranges, such as skin tones.
- Color Balance: Effective for overall color temperature adjustments.
- Hue/Saturation: Allows control over the intensity and vibrancy of colors.
- Vivid Light Blending Mode: Sometimes, using blending modes like Vivid Light on an adjustment layer can enhance skin tones, with the opacity adjusted for seamless blending.
Smart Sharpening for Detail Preservation
Sharpening is essential for bringing out details, and using Smart Sharpen as a smart filter ensures this is done non-destructively.
- Ensure your layer is a Smart Object.
- Go to Filter > Sharpen > Smart Sharpen.
- Adjust the Amount, Radius, and Reduce Noise settings.
- Double-click the smart filter layer in the Layers panel to make real-time adjustments.
Optimizing for Web and Print
Saving your work correctly is vital for maintaining quality.
- For Web: Go to File > Export > Save for Web. Choose formats like JPEG or PNG, adjust quality settings, and resize if necessary.
- For Prints: Save your work as a TIFF or high-resolution JPEG via File > Save As.
- Cloud Storage: Use File > Save to Cloud for backups and easy access.
Common Questions and Best Practices
What are the best built-in tools for smoothing skin in Photoshop?
The Spot Healing Brush is excellent for removing blemishes. The Blur tool or Gaussian Blur filter can soften overall skin texture. The Camera Raw filter, particularly the Texture Slider, offers high-end skin softening techniques. Photoshop provides all necessary tools without additional plugins.
How can I achieve natural-looking skin smoothing?
To adjust settings for a natural look, lower the opacity of the smoothing layer and use a soft brush for blending. It's crucial to maintain a balance between smoothness and texture to avoid an unnatural, plastic-like appearance.
What is the high pass technique for skin smoothing?
The high pass technique involves duplicating the image layer, applying a High Pass filter, and setting the layerâs blend mode to Soft Light or Overlay. This method enhances texture while smoothing out blemishes.
How can I blend skin tones effectively?
The Mixer Brush tool blends colors smoothly. Alternatively, Frequency Separation allows for independent work on texture and color, creating a more seamless blend.
Enhancing Your Photoshop Workflow with Creative Tools
While Photoshop's native tools are powerful, specialized hardware can further streamline and enhance your creative process.
TourBox: A Creative Controller for Efficient Editing
TourBox is a creative tool beloved by digital artists and designers for its ergonomic design and customizable controls. Its built-in presets help users quickly master the controller, while advanced settings offer unlimited possibilities. TourBox is designed to fit comfortably in one hand, leaving the other hand free to use a graphics tablet or mouse. For those interested, the TourBox Lite offers a cost-effective entry point.
Skin Softening with Beautiful Texture | 1-Minute Photoshop (Ep. 4)
Conclusion: The Art of Subtlety and Patience
Mastering smooth edges and flawless retouching in Photoshop is a process that requires practice and attention to detail. By understanding and applying the techniques discussed â from precise selections and feathering to advanced layer masking and non-destructive filters â you can significantly enhance the clarity and aesthetic appeal of your images.
Subtlety is Key: Always start with lower settings for feathering or blur radii.Multiple Passes: Don't attempt to achieve perfection in a single step. Multiple subtle adjustments are often more effective than one drastic change.Zoom In: Regularly zoom in to inspect your work at a pixel level to catch any imperfections or unnatural transitions.
By combining these tips with the powerful tools available in Photoshop, and potentially exploring creative controllers like TourBox, you can elevate your image editing skills and achieve stunning, natural-looking results.