Are you tired of blemishes and wrinkles ruining your photos? Look no further, as this article will teach you the techniques for achieving smooth and flawless skin in Lightroom. Lightroom is a robust photo editing software developed by Adobe Systems that is widely utilized by photographers at all skill levels to enhance their images. With a variety of editing tools and features, Lightroom allows users to adjust various aspects of their photos, such as exposure, color, and sharpness. Photographers can also use Lightroom to organize their photo libraries, create collections, and apply presets for batch editing multiple images. The software also includes built-in tools for cropping, straightening, and removing blemishes.
Using Lightroom for skin smoothing offers a variety of benefits for photographers and photo editors. Targeted adjustments are possible, as Lightroom offers various tools, such as the Adjustment Brush and Graduated Filter, which allow for selective skin smoothing. Furthermore, presets and customizable settings are available; Lightroom provides a wide range of presets and customizable settings specifically designed for skin smoothing.
Preparing Your Image for Skin Smoothing
Before diving into the process of smoothing skin in Lightroom, it is important to prepare your image for the best results. In this section, we will discuss the essential steps to take before applying any skin smoothing techniques. These include adjusting the white balance to achieve accurate colors, adjusting the exposure to ensure proper brightness and contrast, and cropping and straightening the image to focus on the subject's skin.
When editing skin smoothing in Lightroom, adjusting the white balance is a crucial step in achieving accurate and natural-looking skin tones. To cool down the image, move the Temperature slider towards the blue side. Adjust the exposure slider to brighten or darken the image as needed. Use the histogram to guide your adjustments. Consider the overall desired look and mood of the image when making exposure adjustments. When it comes to skin smoothing in Lightroom, cropping and straightening your image plays a crucial role in achieving the desired result. To straighten the image, hover your cursor outside the crop box until it turns into a curved double-headed arrow.
Blemish Removal: The Foundation of Smooth Skin
To effectively remove blemishes and smooth skin in Lightroom, you can utilize the Spot Removal tool. Achieving smooth and flawless skin in photos can be a tedious and time-consuming task. However, with the right tools and techniques, you can easily achieve that desired smoothness in just a few simple steps.
A crucial step in the skin softening process is removing blemishes to create a smooth, even complexion. Lightroom’s Spot Removal tool makes this easy and efficient. Simply select the tool, adjust the brush size to match the blemish, and click on the area you want to correct. Lightroom will automatically sample nearby skin and blend the correction seamlessly, helping you eliminate acne, spots, or other imperfections. This targeted approach allows you to maintain a natural skin texture while enhancing the overall appearance of your portrait.
Previously, we talked about how to remove blemishes in Lightroom, which is a perfect lead-up to what we’re going to do in this issue, because you’d use those blemish-removal techniques before you do the skin-softening technique we’re going to learn today. One of the best things about applying this skin-softening technique is that it smooths the gradation of skin tones on your subject’s face, so don’t just think of it as a skin smoother; it’s for a better transition between skin tones, and it makes a huge difference (as you’ll see).
Utilizing the Spot Removal Tool for Imperfections
After you’ve selected your favorite preset and made tonal adjustments, zoom your subject’s face and press ‘q’ on the keyboard to open up your spot removal panel. Make sure to select a brush size slightly larger than any bump or imperfection that you’re trying to heal. Select the ‘Heal’ brush and set the Feather to 75 and the Opacity to 100. Generally, this works well in editing the specific portion of the image, but sometimes the auto-select function will select the wrong section of the image so what you’ll have to do is simply drag and manually adjust to make it look more natural. Always make sure to zoom out and check to see if the image looks okay in its original view.
For blemishes or spots, use the Spot Healing tool. This tool works by replacing the selected area with pixels from another area of the image.
Mastering the Adjustment Brush for Skin Smoothing
In this section, we’ll be discussing how to use the Adjustment Brush in Lightroom to smooth skin in your photos. We’ll cover tips on adjusting the brush size and feathering for precise application, as well as utilizing the skin smoothing effect and refining it with the Clarity and Sharpness sliders.
When it comes to skin smoothing in Lightroom, adjusting the brush size and feathering is a crucial step to achieve the desired effect. Adjust the feathering of the brush to control the softness of the edges. Start brushing over the areas of the skin that you want to smooth. After applying the brush strokes, adjust the smoothing effect by increasing or decreasing the clarity slider. Remember to experiment with the settings and practice to achieve the desired results.
Step-by-Step Adjustment Brush Application
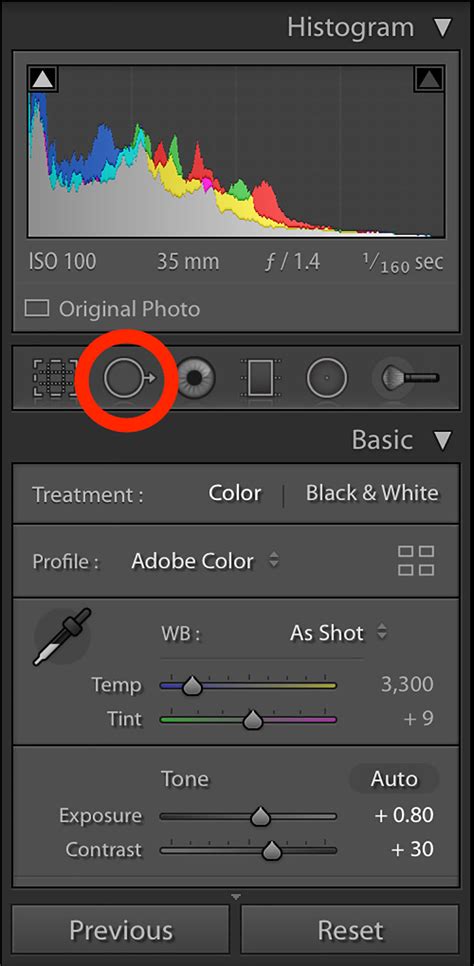
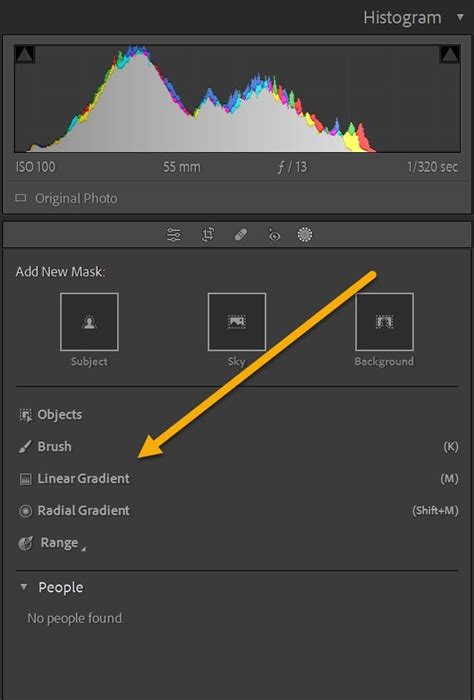
Here’s how it works: STEP ONE: Here’s our original image. Click on the Masking icon (gray circle with dotted outline) below the Histogram, and wait for a second or two for it to find the People in your shot as shown here. STEP TWO: Click on the thumbnail of your subject in the People section to bring up a list of areas you can mask for portraits. Click directly on Face Skin (as shown here), and a red tint appears over the area it has masked for you (notice how your eyes and lips are excluded from the mask). Click the Create Mask button at the bottom right. STEP THREE: At the top of the panel with the adjustment sliders, you’ll see the word “Effect,” and to the right of it, it says “Custom.” Click-and-hold on Custom to bring up the list of slider presets you see here. Choose Soften Skin. STEP FOUR: When you choose Soften Skin, it applies skin softening to the masked area of facial skin (as shown here). You don’t have to paint or do anything else; just choosing Soften Skin from the menu does the trick. You could also choose Skin Soften (Lite) from the preset menu, but I prefer to apply the full skin softening, and then choose the exact amount I want after seeing the results. STEP FIVE: The final step happens if you think the softening is a bit too much; just drag the Amount slider up at the top of the panel (right below that preset pop-up menu you used earlier) to the left to reduce the amount of softening so you can dial in just the right amount. STEP SIX: To see a side-by-side before/after, press the letter Y on your keyboard. Look at the difference in the smooth gradations on the face. That’s what I love about this technique. So don’t just think of it when you need skin softening, use it to smooth those tones.
In portrait photography, the subject’s skin is often a focal point. However, everyone has natural skin texture, including wrinkles, blemishes, acne, or uneven skin tone, which may be more apparent in high-resolution images. Lightroom’s Develop Module provides various tools for skin smoothing, primarily the Adjustment Brush, Spot Healing Tool, and Clarity and Sharpness sliders. The Adjustment Brush and Spot Healing tools are found in the Develop panel. You can choose from different skin softening presets or create your own for consistent results. Photoshop also offers alternative skin softening techniques for more advanced retouching.
Start by importing your portrait photo into Lightroom. Begin by clicking on the Adjustment Brush tool or pressing ‘K’ on your keyboard to open its options. You can find and select the Adjustment Brush from the panel. For skin smoothing, you will want to decrease the Clarity and increase the Sharpness slightly. A common starting point is to set Clarity to -25 and Sharpness to 25, but these values can be adjusted based on your specific image. You can drag the Amount slider to control the intensity of the effect-dragging to the left reduces the effect, while dragging to the right increases it. The kind of preset or adjustment you use matters; some presets can be heavy-handed, so subtle tweaks are preferable for a natural look. Ensure that your brush’s Feather and Flow are at a high setting (around 75-100) for a soft and natural effect. The brush size will depend on the area of the skin you’re working on. Start painting over the skin areas you want to smooth. Selecting the right area is important for a natural result. Be careful to avoid areas with sharp edges like the eyes, nose, and mouth, as the adjustment could make these areas look unnatural.
How To Easily Retouch Skin in Lightroom (Hidden Skin Smoothing Brush)
Refining Skin Smoothing with Clarity and Sharpness
Once you’ve applied the Adjustment Brush, you can fine-tune the skin smoothing effect by adjusting the Clarity and Sharpness sliders. You can soften the skin by adjusting these sliders. The 'Soften Skin' preset is available in Lightroom as a useful starting point, but you may need to adjust it for a more natural look. If the effect looks too strong, reduce the Clarity adjustment; if the skin looks too soft, reduce the Sharpness adjustment. The kind of adjustment you make will depend on the specific needs of your image. You can watch the effect change in real time as you drag the sliders left or right. Compare the edited image to the original image to see the difference the adjustments have made. You can see the difference between the original image and the edited version.
The Role of Clarity and Sharpness
When it comes to skin smoothing in Lightroom, adjusting the smoothing effect by increasing or decreasing the clarity slider is a crucial step. Start brushing over the areas of the skin that you want to smooth. After applying the brush strokes, adjust the smoothing effect by increasing or decreasing the clarity slider. The ‘Smooth Skin’ brush in our Retouching Toolkit allows users to use a local adjustment brush in Lightroom to do a quick skin retouch without overly taking away texture. Brush loosely over our subject’s skin as to not exaggerate the effect. Next, select Range Mask -> Color and then drag the dropper over your subject’s skin. What this will do is concentrate the brush effect to only areas shown in red and keep it off of objects near the skin (jewelry, clothing, etc.). You’ll notice in this particular example, the brush went over her eyes and teeth just a little bit. Simply select the Erase button and remove the effect from areas where we want to maintain sharpness.
Visual Flow Presets automatically apply overall sharpening to the image, but what if you wanted to pay attention to specific portions of the image? Hold down the Option key and grab the Masking slider now. Make sure that there’s no white portion on your subject’s skin. Areas of the image that show up in white are where sharpening is being applied, and the dark areas are showing where it isn’t applied, so we want to make sure that the skin is a dark portion of the area because we don’t want to undo anything that we just did as far as skin smoothing and adding artifacts.
Final Touches for Natural-Looking Skin
In this section, we'll discuss some final touches and tips for achieving natural looking skin smoothing results. We'll cover how to adjust overall image settings to enhance your subject's skin, using the graduated filter for a more gradual effect, and avoiding over-smoothing that can result in an artificial look.
When it comes to skin smoothing in Lightroom, adjusting the overall image settings is a crucial step in achieving the desired effect. Navigate to the Basic panel in the Develop module and make adjustments to the exposure, contrast, highlights, shadows, whites, and blacks. Next, move to the Tone Curve panel and make any necessary adjustments to the highlights, lights, darks, and shadows. Remember, the goal is to enhance the image while maintaining a natural and realistic look. Avoid over-editing or applying excessive skin smoothing, as it can result in an unnatural appearance. Experiment with the settings and find the right balance for each image.
Utilizing the Graduated Filter
Click and drag the Graduated Filter tool over the area where you want to apply the skin smoothing effect. Adjust the settings in the Graduated Filter panel to achieve the desired effect. By using the Graduated Filter in Lightroom, you can create a more gradual and subtle skin smoothing effect, giving your images a natural and polished appearance.
Avoiding Over-Smoothing
When it comes to skin smoothing in Lightroom, it's important to avoid over-smoothing to maintain a natural look. Use the graduated filter: Instead of applying skin smoothing uniformly, use the graduated filter tool to create a more gradual effect. Avoid over-smoothing: To prevent over-smoothing, be mindful of the strength and intensity of the skin smoothing effect.
Yes, it's important to use a light hand when smoothing skin in Lightroom. Too much smoothing can result in an unnatural, plastic-like appearance. Remember, subtlety is key when it comes to skin smoothing. Overdoing it can make skin appear unnatural or airbrushed. The best way to practice is by loading a few street portraits into your phone and trying these adjustments by hand. Skin smoothing in Lightroom isn’t just for glamour or studio work - it’s a creative refinement for photographers who want their portraits to look intentional while still grounded in reality.
Advanced Techniques and Presets
Yes, you can create a preset with your desired skin smoothing settings. This will allow you to easily apply the same adjustments to other images in the future. If you’re happy with your settings, you can save your custom skin smoothing settings as a preset for future use. Saving your settings as a preset allows you to quickly apply the same effect to other images.
Lightroom CC vs. Lightroom Classic
I've recently moved from Classic to Lightroom CC - the ability to edit on various devices really appeals to me. Whilst great, I have noticed the brush tool no longer has a 'soften skin' sub-tool. Is that the case or is it hidden elsewhere? Any help would be very much appreciated. Thank you and Merry Christmas! EM This topic has been closed for replies. The brush preset menu is not there yet. We maybe have to wait for a future update. Simply select the brush. Set clarity slider to -100 and sharpness slider to +25.
Understanding Skin Tones for Effective Smoothing
Understanding skin tones is a key factor in achieving effective skin softening in Lightroom. Every person’s skin is unique, with subtle variations in color, undertone, and texture. Recognizing these differences allows you to apply skin softening techniques that enhance the natural beauty of your subject without making the skin look flat or artificial. When working with skin tones, pay close attention to how the light interacts with the skin in your image and how different tones respond to adjustments. By carefully observing and respecting the natural tones, you can apply targeted edits that smooth imperfections while preserving the authentic look of the skin.
Street Portraits and Subtle Refinement
I don’t shoot in studios. My portraits happen on the street - in hard light, reflections, and weather that rarely cooperates. But even in those raw moments, sometimes a face needs a touch of refinement. That’s where Lightroom’s skin-smoothing tools come in handy. Street portraits aren’t about perfection - they’re about presence. But small distractions like harsh light, stray blemishes, or a shiny forehead can pull focus away from a subject’s character. The goal is subtlety. I use just enough adjustment to make the portrait feel intentional while keeping texture intact.
Frequently Asked Questions
Yes, you can use the "Adjustment Brush" tool to selectively smooth specific areas of skin. In addition to the "Skin Softening" and "Adjustment Brush" tools, you can also use the "Spot Removal" tool to remove any blemishes or imperfections on the skin. Yes, if you're not satisfied with your skin smoothing adjustments, you can simply click on the "Reset" button in the "Detail" panel to revert back to the original image.
Adobe Lightroom, a favorite amongst photographers for its impressive array of editing tools, can be a game-changer for portrait photography. Among its many powerful features, it can enhance portraits by smoothing skin, adding a professional touch to your photos. This comprehensive guide is an opportunity to learn how to smooth skin in Lightroom to enhance your portrait images.
This article originally published in the December, 2022 issue of Photoshop User magazine. About Photoshop User and KelbyOne: Photoshop User magazine comes out digitally 12 times a year and is part of KelbyOne, the leading educational resource for Photoshop, Lightroom, and photography. Pro members have access to more than 900 video courses and 100 back issues of Photoshop User.
There you have it - three tips for retouching skin in Lightroom! For more in-depth Lightroom education make sure you watch our Visual Flow tips & tutorials videos over on our YouTube channel and check out SLR Lounge Premium education for full editing courses.