The evolution of digital filmmaking has seen a remarkable surge in the quality and portability of cameras, especially within the consumer and prosumer markets, since the early 2000s. This reduction in size and weight, while beneficial for maneuverability, inherently makes handheld footage more susceptible to the subtle tremors and shakes that are amplified by the lack of mass. For standard content creation, this camera shake can quickly detract from the professionalism of a video, making it appear amateurish. Fortunately, DaVinci Resolve offers a suite of powerful stabilization tools designed to smooth out these unwanted movements. This article will guide you through the process of effectively stabilizing your footage within DaVinci Resolve, exploring various techniques and settings to achieve polished results.
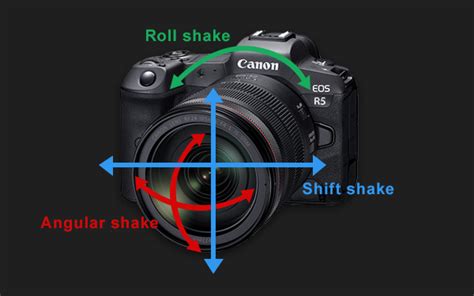
It is crucial to understand that stabilization is not a miraculous solution for extremely shaky footage. Its primary purpose is to refine minor jitters and correct incidental wobbles in shots intended to be steady. Attempting to stabilize footage that resembles a frantic chase scene captured with a lightweight, handheld mirrorless camera will not miraculously transform it into a gimbal-smooth shot. Furthermore, for optimal results when anticipating the need for post-production stabilization, it is highly recommended to frame your shots slightly wider than usual. This is because the stabilization process inherently crops into the footage to compensate for motion, and having extra room ensures that your intended composition remains intact.
To further enhance your stabilization efforts, consider exploring techniques for walking with a camera to minimize inherent bouncing motions. Pairing these filming techniques with DaVinci Resolve's stabilization tools will yield significantly superior outcomes.
Stabilizing Footage on the Edit Page
The Edit page in DaVinci Resolve offers a straightforward and accessible method for applying video stabilization. This is often the first point of call for many editors due to its intuitive interface.
Activating Stabilization
- Select your clip: In your timeline, highlight the clip you wish to stabilize.
- Open the Inspector: Navigate to the Inspector panel, typically located in the top right corner of the Edit page.
- Locate Stabilization: Scroll down the Inspector panel until you find the "Stabilization" section.
- Engage Stabilization: Click on the "Stabilize" button to initiate the analysis and stabilization process.
Once activated, DaVinci Resolve will meticulously analyze the movement within your footage to calculate and apply corrective measures. As noted earlier, this process is designed to reduce handheld motion and shakes, not to completely eliminate all discernible movement, particularly pronounced bounces from walking shots. The effectiveness of stabilization is also heavily influenced by the initial filming quality and preparation.
BEST way to STABILIZE your footage in DAVINCI RESOLVE 20 #davinciresolve20
Refining Stabilization with Parameters
While DaVinci Resolve's default stabilization settings can often yield impressive results quickly, some clips may require further fine-tuning. This is where the adjustable parameters within the Stabilization menu become essential, especially when dealing with artifacts like "jello" or excessive warping. "Jello" in video footage refers to a wobbly, distorted visual artifact where parts of the image appear to bend, ripple, or wobble unnaturally during stabilization.
Stabilization Mode Options
The Stabilization menu offers three distinct modes that alter how the stabilization algorithm processes the footage:
- Perspective: This is the default mode. It analyzes and corrects for pan, tilt, zoom, and rotation while attempting to maintain the original perspective of the scene. It is generally recommended for shots where the camera itself is physically moving.
- Similarity: If you encounter unwanted "jello" motion artifacts, switching to Similarity mode can be beneficial. This mode manipulates the footage in a way that aims to cancel out these specific distortion effects.
- Translation: This mode is best suited for addressing minor, linear movements, such as subtle pan and tilt jitters, without affecting the rotation of the image.
Note on Gyro Stabilization: A select number of Blackmagic cameras offer a specialized "Gyro" stabilization method. This advanced feature allows the software to extract movement data directly from the camera's internal gyroscope during recording. By utilizing this precise physical movement data, rather than solely relying on pixel analysis, Gyro stabilization can often provide superior and more accurate results.
Additional Settings and Parameters
Below the "Mode" dropdown, you will find checkboxes and sliders that offer granular control over the stabilization effect:
Checkboxes:
- Camera Lock: Enabling this option aims to eliminate all motion from the shot, effectively mimicking the steady perspective of a tripod. This is ideal when the intention is to achieve a completely static shot.
- Zoom: This setting instructs DaVinci Resolve that it is permissible to zoom into the footage to conceal any movement that might occur at the edges of the frame due to stabilization. It is generally recommended to leave this option enabled by default, unless a visual effects artist specifically requires the entire original frame.
Sliders:
- Cropping Ratio: This parameter is directly linked to the "Zoom" function. It dictates the maximum amount DaVinci Resolve is allowed to crop into the footage after stabilization. A higher ratio allows for more aggressive cropping to hide stabilization artifacts.
- Smooth: This slider controls the degree of motion smoothing. Increasing this value will result in a more fluid, gimbal-like movement, while lower values retain more of the natural handheld feel.
- Strength: This slider governs the overall intensity of the stabilization effect. It allows you to strike a balance between retaining some natural handheld motion and effectively cleaning up jittery movements.
While Resolve's stabilization can produce excellent results with default settings, the ability to fine-tune these parameters is crucial for achieving the best outcome for any given clip. The optimal values will vary significantly depending on the specific footage, so an iterative process of adjusting each setting incrementally and observing the results is necessary.
Stabilizing Footage on the Color Page
DaVinci Resolve also provides the capability to apply stabilization directly within the Color page, offering a more integrated workflow for those who primarily work within this powerful color grading environment.
Accessing Stabilization Tools
- Navigate to the Color Page: Select the Color page tab at the bottom of the DaVinci Resolve interface.
- Locate the Tracker Panel: In the center column, find the "Tracker" panel. This is typically where you would manage Power Windows and object tracking.
- Engage the Stabilizer: Click on the camera icon that features a wobble effect. This action will reveal the stabilization tools within the Tracker panel.
Interestingly, the stabilization modes, parameters, and functions available on the Color page are identical to those found on the Edit page. The reason for its inclusion here stems from DaVinci Resolve's origins as a dedicated color grading tool. Even as the Edit page has evolved significantly, many seasoned professionals continue to prefer working within the Color page, making the stabilization tool's presence there a logical and convenient feature.
Avoiding Conflicts with Color Grades
A critical consideration when applying stabilization on the Color page, especially if you also intend to apply color grades, is understanding how these effects interact. Color adjustments are typically applied to individual nodes, while stabilization is intrinsically linked to the clip itself, not a specific node. This can lead to complications where a pre-configured color grade, when applied to a clip that has already been stabilized on the Edit page, might overwrite the stabilization parameters.
To circumvent this issue, a workaround exists: navigate to Mark > Keyframe Timeline Mode and change the setting from "All" to "Color." This ensures that the stabilization data, applied in the Edit page, remains unaffected when copying or applying a grade. If you are already deeply involved in the color grading process, performing stabilization on the Color page might offer a more streamlined workflow.
Shooting for Optimal Stabilization
The effectiveness of any post-production stabilization technique is significantly enhanced by thoughtful shooting practices. When you know that stabilization will be a necessary step, keeping a few key principles in mind during filming can make a substantial difference.
Lighting Conditions
Stabilization software, while advanced, can become incredibly demanding and less effective under low-light conditions. In such scenarios, stabilization effects may falter, leading to the reappearance of jitters and the undesirable "jello" effect. Therefore, ensuring your shooting environment is well-lit is paramount for achieving clean and stable results.
Depth of Field Considerations
The choice of depth of field also plays a role in how well stabilization performs. While a shallow depth of field contributes to a desirable "cinematic" look, it can sometimes exacerbate stabilization issues by having less distinct reference points for the software to track. Conversely, shooting with a deeper depth of field provides more stable visual anchors, which can help prevent the footage from exhibiting the "jello" effect once stabilization is applied. This is a nuanced aspect, as an overly deep depth of field can sometimes lead to a flatter, less professional aesthetic if not managed carefully.
Advanced Stabilization Techniques: The Fusion Page
For users seeking the utmost control and the most robust stabilization results, particularly for challenging footage, exploring the Fusion page within DaVinci Resolve is highly recommended. While the Edit and Color pages offer user-friendly stabilization options, Fusion provides a node-based compositing environment that allows for more intricate manipulation.
Planar Tracking for Stabilization
A powerful method within Fusion for achieving professional-grade stabilization involves utilizing the Planar Tracker. This tool allows you to select a specific area within your footage that remains relatively consistent throughout the shot and track its movement.
- Access Fusion: Navigate to the Fusion page.
- Add a Planar Tracker: Between your MediaIn and MediaOut nodes, right-click on the connecting line, go to "Add Tool," then "Tracking," and select "Planar Tracker."
- Configure the Tracker: In the Inspector, under "Operation Mode," set it to "Track." A hybrid Point SL area is often preferred. Position the tracker's center point over a stable area in your footage â for instance, a background element that doesn't move erratically or go out of frame. Avoid tracking moving subjects or pure, featureless areas like a bright sky.
- Define the Tracking Region: Draw a selection around the chosen area. You can refine this selection to exclude areas that might exhibit unwanted movement, such as the ground that changes perspective as the camera moves forward.
- Set Tracking Parameters: Keep the "Motion Type" set to "Perspective" and "Output" to "Background." Crucially, set the "Reference Frame" to "Set."
- Execute the Track: With the playhead at the start of your clip, choose "Track to End" to analyze the footage and gather motion data.
- Apply Stabilization: Once tracking is complete, return to the "Operation Mode" and switch it to "Stabilize."
- Compute Stabilization: Click "Compute Stabilization." This will apply the tracked motion data to stabilize your footage.
- Adjust for Cropping: You may notice cropping is necessary to hide any remaining black bars. Within the frame settings, adjust the "Crop" and "Scale" parameters until the desired result is achieved.
While this method requires more steps, it offers a significantly higher degree of accuracy and control, especially for complex camera movements. Learning to leverage the tools within Fusion can dramatically enhance your editing capabilities and lead to more polished final products.
Conclusion: The Power of Post-Production Stabilization
Post-production video stabilization has evolved remarkably, saving creators considerable time and resources that might otherwise be invested in expensive stabilization equipment like gimbals. Under the right shooting conditions, digital stabilization can rival, and in some cases even surpass, the quality of physical stabilization. DaVinci Resolve stands out in the Non-Linear Editing (NLE) landscape with its robust and versatile stabilization tools, accessible across its Edit, Color, and Fusion pages.
The key to successful stabilization, regardless of the chosen method, lies in understanding its limitations and employing best practices during filming. By shooting with stabilization in mind â ensuring adequate lighting, considering depth of field, and framing wider shots â you provide the software with the best possible foundation to work with. While DaVinci Resolve's tools are exceptionally powerful, they are most effective when complementing, rather than compensating for, poor initial footage. Experimentation with the various modes and parameters is essential, as each clip presents a unique set of challenges. With practice and a nuanced understanding of the tools available, you can transform shaky handheld footage into smooth, professional-looking sequences.
For further exploration into DaVinci Resolve's capabilities, a wealth of tutorials are available, covering a wide array of tips and tricks to enhance your video production workflow. Additionally, resources like Storyblocks offer subscriptions for high-quality stock footage, music, sound effects, and pre-made templates that can significantly aid in creating compelling video content.
tags: #stabilizer #davinci #resolve