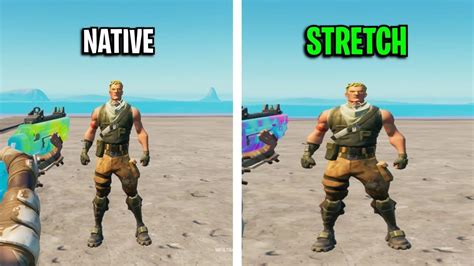
Photoshop offers a versatile array of tools and techniques for manipulating image dimensions, a process commonly referred to as stretching. Whether you aim to fill a specific layout, create artistic distortions, or extend backgrounds, understanding how to stretch an image in Photoshop is a fundamental skill for designers, photographers, and digital artists alike. This tutorial delves into various methods, from straightforward transformations to advanced, distortion-minimizing techniques, ensuring you can achieve professional results.
Understanding the Fundamentals of Image Stretching
Before diving into specific tools, it's crucial to grasp some core concepts. Image stretching, in essence, involves changing the size or extending parts or the whole of an image to fit a certain dimension, arrangement, or visual effect. It's a typical approach among graphic designers, photographers, and content creators to quickly and easily fill backgrounds, extend scenes, and creatively reshape objects, all while maintaining the original visual quality.
One of the most crucial concepts to grasp when stretching an image is the aspect ratio. Preserving this ratio while stretching an image ensures that the image does not become distorted. However, there are also instances where disproportionate stretching is desired for artistic effect. When resizing images, Photoshop offers a feature called 'Resampling'. This feature changes the number of pixels in the image, which can impact quality if not managed carefully.
When you import a single image into Photoshop, by default, the image is set as a background layer. This can be done by double-clicking the thumbnail of the layer in the Layers panel. It's always advisable to duplicate your layer before making significant edits. This can be done by right-clicking on the image layer in the Layers panel and selecting "Duplicate Layer." Layers in Photoshop help you come back to the original photo when needed. You'll need to assess the quality of the picture before trying to stretch it. A low-resolution photo doesn't yield optimal results when stretched extensively. Consider starting with high-resolution shots for better outcomes. Perform the adjustments. It includes correcting exposure, color balance, or other enhancements on the picture you want to resize. Use "Save As" to create a new file, a separate copy of your photo, so you can keep your picture after changing.
Types of Image Stretching in Photoshop
Photoshop has various types of image stretching to customize your edits:
- Global Stretch: This involves changing the size of the whole image, either proportionally or disproportionately.
- Selective Stretch: With selective stretch, you can choose the part of the image that you want to stretch. For instance, if you're going to stretch a product or a design element, doing so will not change the rest of the image.
- Content-Aware or Smart Stretch: This feature exploits Photoshop's technology for seamless filling or background expansion operations.
- Freeform Stretch Tools: Tools such as "Liquify" or "Puppet Warp" enable users to creatively modify image areas by simply dragging or warping them with the greatest flexibility.
Every single one of these methods characterises a specific purpose depending on the context and the desired result.
Common Applications of Image Stretching
Image stretching is employed for several practical and creative purposes:
- Fit an image to a custom layout or canvas: Stretching helps adjust an image to match specific dimensions without cropping or leaving blank spaces.
- Extend backgrounds for banner or social content: It allows designers to widen scenes or add empty space for text in headers, posts, or thumbnails.
- Manipulate specific features: Parts of an image, like clothing, buildings, or limbs, can be stretched for dramatic or stylistic effects.
- Correct proportions or artistic enhancements: Stretching can subtly adjust image balance or enhance features for a more polished and creative result.
Core Photoshop Tools for Image Stretching
Photoshop provides several powerful tools to achieve image stretching. The choice of tool often depends on the desired outcome and the specific elements within the image.
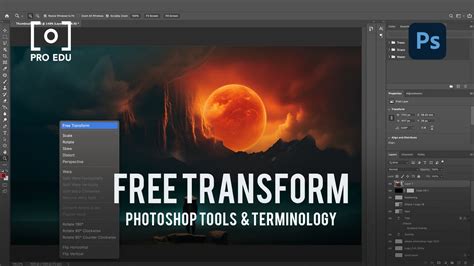
Method 1: Using the Free Transform Tool
The Free Transform tool is by far the most straightforward way of stretching a whole image in Photoshop. It enables you to adjust the image either freely or proportionally by moving the corner or side handles. This technique is ideal for resizing jobs that can be done quickly; however, be cautious if you stretch the image too much, as it can cause distortion and a decrease in quality.
- Launch Photoshop and open your image.
- Go to "Edit" in the top menu and choose "Free Transform" or use the shortcut
Ctrl+T(Windows) /Cmd+T(Mac). - You'll see a transform box appear around your image. Drag the corner or side handles to stretch the image. To maintain the aspect ratio, hold down the
Shiftkey while dragging. If you wish to maintain the aspect ratio while stretching, simply drag the image. Stretch freely without holdingShift. - Press
Enter/Returnto apply the transformation.
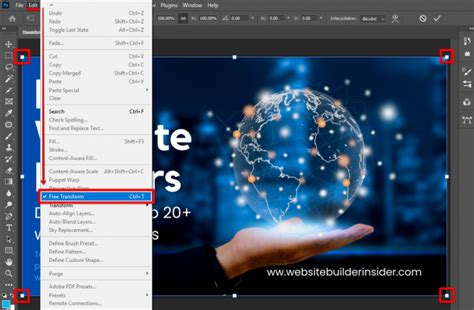
Please be aware that the Free Transform operation was updated in versions of Photoshop after CC 2019. When you stretch the image, it's the Smart Object being resized, not the original image. If you're trying to stretch a Smart Object directly, Photoshop won't allow freeform editing unless the object is rasterized first. To unlock full transform capabilities, right-click the image layer and choose "Rasterize Layer."
Method 2: Utilizing the Image Size Command
The Image Size command offers a more precise way to alter an image's dimensions, allowing you to specify exact pixel dimensions or print sizes.
- Open your file and go to the top menu.
- Select "Image" and choose "Image Size" from the dropdown.
- In the Image Size dialog box, you'll find the current width and height of the image dimensions. If you want to adjust them independently, uncheck the "Constrain Proportions" box.
- Enter the new values for width and height.
- Check the "Resample" option to allow Photoshop to adapt pixel dimensions accordingly. This feature changes the number of pixels in the image.
- After setting the new dimensions, click "OK" to implement the changes.
- Review the edited image and save it as necessary.
In the dialog box that opens, you'll see fields for width and height. To maintain the aspect ratio, ensure that the chain icon, labeled as "Constrain Aspect Ratio," is selected next to the "Width" and "Height" options.
Method 3: Utilizing Canvas Size
The Canvas Size command is useful when you want to extend the canvas beyond the image borders, effectively adding space around your existing image that you can then fill or leave blank. This is particularly helpful for creating space for text or expanding a background.
- Begin by opening your file and navigating to the top menu.
- Select "Image" and choose "Canvas Size" from the dropdown.
- You'll notice options for adjusting width and height. Ensure the "Relative" checkbox is activated, allowing you to modify the canvas edges independently.
- Enter your desired width and height values to extend the canvas accordingly.
- Adjacent to the width and height options, you can choose anchor points from the dropdown menu to dictate the direction of the canvas extension. For example, selecting an anchor point on the left will extend the canvas to the right.
- Apply these changes, and save your image.
Advanced Techniques for Distortion-Free Stretching
While basic tools are effective for simple stretching, achieving professional results, especially with complex images, often requires more advanced techniques to minimize distortion and preserve image quality.
Content-Aware Scale
The "Content-Aware Scale" tool is perfect if you want to elongate your backgrounds without losing important elements such as people or objects. This stretch tool in Photoshop achieves this by cleverly filling and stretching areas with less visual information, such as the sky or walls, while simultaneously protecting the subject. This technique is particularly effective for increasing the size of images for banners or social media posts, as it does not cause the main focus to become distorted.
- Select the image layer you want to stretch.
- Go to "Edit" > "Content-Aware Scale" from the top menu to activate the tool.
- Click and drag the side or corner handles outward to stretch the image. Photoshop will intelligently expand the background while maintaining the shape of important elements.
- Press
Enter/Returnto apply.
When stretching an image, one of the challenges is maintaining image quality. Use the Content-Aware Scaling feature to keep essential details. Consider the web and print size of an image while working on it. Work with a resolution of no less than 300 pixels per inch.
Displacement Maps
Utilizing the Displacement Map feature in Photoshop allows for intricate adjustments to images, minimizing distortions and preserving image quality even during substantial stretching. This technique uses displacement maps to modify an image's appearance, enabling precise and controlled stretching while maintaining image fidelity. It's a more advanced method, often used for creating specific warping or undulating effects.
BETTER way to make displacement maps in photoshop
Puppet Warp
Puppet Warp gives you pinpoint control over specific parts of an image by placing "pins" along the structure you want to alter. It's especially useful for manipulating joints, bending shapes, or subtly stretching objects with realistic results. Unlike basic transforms, Puppet Warp maintains the surrounding pixel structure for smoother transitions.
- Select the layer and go to "Edit" > "Puppet Warp."
- Click on the image to place pins on the areas you want to lock or move.
- Drag the pins to stretch and reshape the selected portion with precision.
- Press
Enter/Returnto apply.
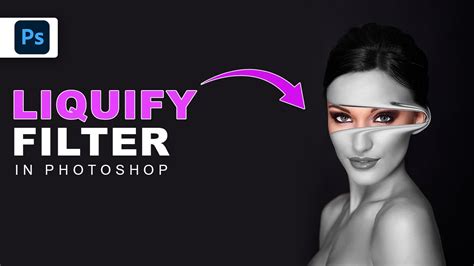
Liquify Filter
The Liquify filter makes it easy to perform brush-based warping, which is remarkably smooth, perfect for replicating flowing fabric, altering a person's face shape, or creating abstract designs. With the "Forward Warp Tool," you can move the pixels in any direction, like a natural movement or a fluid that is being extended. This technique is the most liberating for creating or applying soft distortion effects.
- Go to "Filter" > "Liquify" to open the "Liquify" workspace.
- Choose the "Forward Warp Tool" (shortcut
W) from the toolbar on the left. - Adjust your brush size, then click and drag over the area you want to stretch.
Stretching Specific Parts of an Image
When you want to stretch only a portion of an image, such as an object, shape, or background element, you need to create a precise selection first.
- Use selection tools like the Lasso Tool (
L) or the Marquee Tool from the toolbar to outline the part of the image you want to stretch. Make a selection and create another copy usingCtrl+J(Windows) /Cmd+J(Mac), and move this new layer to the left if you're isolating it for a specific effect. Refine the selection using the Lasso Tool. - Once your selection is ready, press
Ctrl+T(Windows) /Cmd+T(Mac) to transform and stretch the selected region. You can then apply Free Transform or Content-Aware Scale only to that part, giving you control without affecting the rest of the image. - Finally, select the third bottom point and drag it down to refine the stretch within the selected area.
In this section, we'll create a pixel stretch effect. You need to find the Single Column Marquee Tool in the Tools panel. Now you know how to stretch an image in Photoshop, but let's make our effect even better.
Avoiding Common Mistakes When Stretching Images
Stretching images can sometimes lead to undesirable outcomes if not done carefully. Being aware of common pitfalls can help you achieve better results.
- Overstretching: Stretching the image far beyond its original resolution or intended proportions can lead to significant loss of quality.
- Pixelation or Blurriness: When you stretch a low-resolution image beyond its native size, it loses detail and sharpness, resulting in pixelation or blur.
- Fix: Upscale the image first by going to "Image" > "Image Size" and enabling "Preserve Details 2.0" to maintain clarity during stretching.
- Distorted Subjects: Stretching an image without protecting key elements like people, buildings, or logos can lead to awkward distortions.
- Fix: Use "Content-Aware Scale" with "Protect Skin Tones" enabled, or create alpha channel selections to shield specific areas during stretching.
- Adjustments in One Go: Making drastic adjustments without intermediate checks can lead to irreversible errors.
- No Backups: Not duplicating your layer before making significant edits means you lose the ability to revert to the original if something goes wrong.
- Liquify Warping Errors: Applying too much brush pressure or working too quickly in the Liquify tool can cause unnatural warps and uneven edits.
- Fix: Lower the "Brush Density" and apply changes gradually to keep distortions controlled and realistic.
Alternative Tools and Plugins
While Photoshop is the industry standard, other tools and plugins can also facilitate image stretching, sometimes offering simpler workflows or unique features.
StretchMatic Plugin
If you are looking for a pixel stretch plugin, take a look at StretchMatic on Envato Elementsâit's a great tool with endless creative possibilities. Wondering how to stretch an image in Photoshop? Use StretchMatic! This creative add-on will give you infinite possibilities for creating pixel stretch effects. Creating this kind of effect has never been so easy.
Luminar Neo
The Luminar Neo plugin for Photoshop enhances the editing capabilities of this already powerful software with AI. The software's intuitive design allows users to efficiently stretch images while maintaining quality, all within a well-organized and accessible workspace. Luminar Neo offers numerous photo manipulation tools, including its ability to remove people from photos, relighting, retouch portraits, change backgrounds, crop images, or increase resolution.
CapCut Desktop Video Editor
If you're looking for a simpler, more accessible alternative to Photoshop, CapCut desktop video editor is a fantastic option, especially for beginners or casual creators. This free video and image editor provides an intuitive interface and easy drag-and-stretch functionality, enabling users to stretch, reposition, or resize images with ease. Whether you're adjusting dimensions for social media, extending backgrounds for banners, or creating stylized content, CapCut streamlines the process without the steep learning curve or cost of professional tools.
- Open your image in CapCut.
- Use the Ratio tool: Click the "Ratio" button located below the preview window. From the dropdown list, choose a new ratio like 16:9, 2:1, or Custom to stretch the image horizontally or vertically.
- Export the stretched image: Click the three-line button on the video player window, and select "Export still frames." Finally, pick the image format and resolution and click "Export."
Beyond image editing, CapCut also shines as a full-featured video editor. You can enhance your clips with smooth transitions, dynamic animations, cinematic filters, and trendy visual effects.
Creative Applications and Further Enhancements
Once you've mastered the techniques for stretching images, you can explore creative avenues to enhance your artwork.
Glitch Aesthetics and Distorted Effects
Do you like glitch aesthetics? Try these amazing effects to create distorted posters, flyers, and artworks. This is another amazing action with really impressive results! Save your time and choose one of four different actions with a great variety of glitch effects. Try different color options to get the result you like more.
Glitch Brushes
Once you've created your artwork by following our pixel stretch Photoshop tutorial, you might want to add more creative elements to your composition. Check out this amazing collection of glitch brushes! All the brushes are in high resolution (up to 2500 pixels) and work in any version of Photoshop.
Liquid Melting Effects
Liquid melting effects are still a big trend! This PSD effect is extremely easy to use and will create impressive results in a few simple clicks.
Workflow Enhancement with TourBox
While we are on the subject of enhancing our Photoshop skills and workflow, we would love to introduce you to a game-changer in the world of digital photo editing - the TourBox. Imagine this: you're tasked with a large number of image stretching or resizing operations in Photoshop. Spending excessive time on such repetitive and tedious tasks isn't feasible. Through the TourBox Console software, you can set up macro commands that allow you to complete complex tasks, such as image stretching or color adjustment, in Photoshop at the click of a button. It is compatible with a wide range of post-production editing software, digital painting applications, and even 3D modeling and game editing tools.
Frequently Asked Questions on Image Stretching in Photoshop
What Is the Easiest Method to Stretch in Photoshop?
The Free Transform tool (Ctrl+T/Cmd+T) is generally considered the easiest method for stretching an entire image quickly.
What Is the Best Stretch Tool in Photoshop?
The "best" tool depends on your goal. For proportional resizing, Free Transform is excellent. For extending backgrounds while preserving subjects, Content-Aware Scale is ideal. For precise, localized warping, Puppet Warp or Liquify are superior.
How to Stretch Objects in Photoshop without Altering their Dimensions?
Holding the Shift key while using Free Transform ensures you don't change the image aspect ratio; the image's size changes, and its original proportions are kept. However, this is scaling, not stretching in the sense of distorting proportions. To stretch without altering dimensions implies maintaining the original pixel count, which is usually not the goal of stretching.
How to Stretch a Part of an Image or a Particular Object in Photoshop?
Use selection tools like the Lasso or Marquee tool to isolate the area you want to stretch. Then, use Free Transform (Ctrl+T/Cmd+T) on the selection.
What Are the Differences between Stretching and Scaling?
Stretching involves adjusting an image or object's dimensions disproportionately, potentially leading to distortion. Scaling, on the other hand, maintains the image's proportions while adjusting its overall size.
Can I Stretch Multiple Layers in Photoshop at Once?
Yes! All you have to do is hold Shift or Ctrl/Cmd and click on all the layers that you want to stretch, then use Free Transform (Ctrl+T/Cmd+T) for scaling or stretching them together. Only be careful that they are unlocked, or there are no groups that are not proper.
How to Determine if a Picture is Suitable for Stretching Without Distortion?
Check the image resolution and quality firstâhigh-resolution images handle stretching better. Avoid stretching images with key visual elements near the edges, as these are most likely to become distorted.
Today you've learned how to pixel stretch in Photoshop using simple tools. Try the method we used in this pixel stretch Photoshop tutorial on other images to create more amazing artworks. Armed with this knowledge, you're now ready to embark on your journey of mastering image stretching in Photoshop. You've successfully navigated through our step-by-step guide on how to stretch an image in Photoshop.