In the realm of digital art and photo manipulation, Adobe Photoshop stands as a titan, and at its core lies the powerful concept of layers. Think of layers as individual, transparent sheets stacked upon one another, each containing a distinct element of your image or design. This fundamental structure empowers you to build complex compositions, make precise edits, and experiment with creative ideas without permanently altering your original artwork. However, a crucial aspect of working with these layers is understanding how to lock and unlock them, a process that safeguards your work and streamlines your workflow.
The Fundamental Concept of Layers
At its most basic, a layer in Photoshop is an independent component of your project. This separation is what makes Photoshop so versatile. You can adjust the opacity of a single layer, apply blending modes to see how it interacts with layers below, or even mask out specific areas without affecting the rest of the image. This granular control is essential for both novice users and seasoned professionals.
When you create a new Photoshop document, especially one with an opaque background-be it a solid color, a texture, or an existing image-the bottommost layer is automatically designated as the "Background layer." This default layer comes with certain restrictions. It is partially locked, meaning you cannot alter its opacity or reposition it within the stacking order of your layers. This is a protective measure to ensure a foundational element remains stable.
Understanding Layer Locks: Protection and Control
The ability to lock a layer is a vital feature for protecting specific aspects of your work from accidental modification. When a layer is locked, it becomes immutable; you cannot edit its pixels, delete the layer itself, or paint directly onto it. This is particularly useful when you've achieved a desired effect or composition and want to prevent any further changes to that particular element.
Photoshop offers several types of locks, allowing for nuanced control:
- Full Layer Lock: This is the most comprehensive lock. When a layer is fully locked, all editing capabilities are disabled. You'll typically see a padlock icon directly next to the layer's name in the Layers panel.
- Partial Locks: Photoshop also allows for partial locking, enabling you to protect specific properties of a layer while leaving others editable. This provides a finer degree of control over your workflow. The primary types of partial locks include:
- Lock Transparent Pixels: This lock, often represented by a tiny checkerboard icon, ensures that transparent areas of a layer remain transparent. Any painting or editing actions will only affect the opaque areas of the layer. This is invaluable when you want to maintain clean edges or add detail to existing content without inadvertently filling in transparent space.
- Lock Image Pixels: This lock, symbolized by a paintbrush icon, is the inverse of locking transparent pixels. It prevents any modifications to the actual pixels of the layer, effectively freezing its content.
- Lock Position: When this lock is activated, it prevents the layer from being moved on the canvas. This is useful when you have an element perfectly positioned and want to avoid accidentally shifting it while working on other parts of your composition.
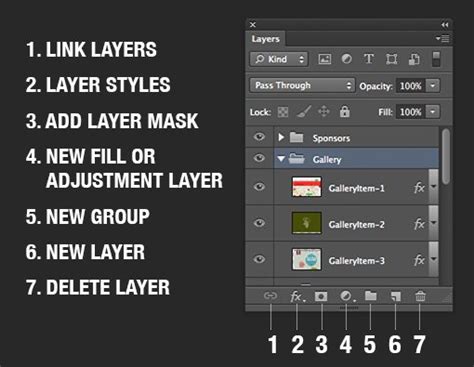
The Layers Panel: Your Command Center
The key to managing layers, including unlocking them, resides within Photoshop's Layers panel. If this panel is not visible on your screen, you can easily bring it up by navigating to Window > Layers from the top menu bar.
Once the Layers panel is open, you can interact with your layers:
- Selecting a Layer: To unlock a layer, you first need to select it. Click on the layer's name in the Layers panel.
- Identifying Locked Layers: A locked layer will be visually indicated by a padlock symbol next to its name.
- Unlocking a Layer: To unlock a fully locked layer, simply click on the padlock icon located to the right of the layer's name. This action will toggle off the lock, allowing you to edit, move, or delete the layer as needed. The same principle applies to partially locked layers; clicking the padlock icon will unlock all its properties.

Addressing Specific Scenarios and Common Issues
Users often encounter situations where layers are locked, sometimes unexpectedly, and they need to regain editing control.
The "Background Layer" Conundrum:
A frequent point of confusion arises with the default "Background layer." As mentioned, it's partially locked by design. If you encounter a locked Background layer and need to edit it freely, there are a couple of standard methods:
- Double-Click and Rename: The most common method to "unlock" a Background layer is to double-click directly on its name in the Layers panel. This will bring up a dialog box prompting you to rename the layer. Once renamed (e.g., to "Layer 0"), it will transform into a regular, fully editable layer, and the padlock icon will disappear.
- Layer > Layer from Background: Another effective method is to select the Background layer and then go to
Layer > Layer from Backgroundin the menu bar. This action also converts the Background layer into a standard, unlocked layer. - Keyboard Shortcut (with a caveat): While there's a general shortcut for toggling locks, it often doesn't apply directly to the default Background layer in the same way it does for other layers. However, using
Ctrl + J(Windows) orCmd + J(macOS) on a selected Background layer will create a duplicate of it above the original, which will be an unlocked layer. You can then delete the original Background layer if desired.
Imported Files and Pre-Locked Layers:
Sometimes, you might receive a Photoshop file (PSD) from a client or colleague where layers have been intentionally locked by the previous creator. This is often done to protect specific design elements or to simplify the file for the end-user.
If you need to work with these pre-locked layers for a new project, such as incorporating them into an animated banner, you will need to unlock them. The process remains the same: access the Layers panel, select the locked layer, and click the padlock icon next to its name.
There was an instance where a user was unable to unlock a layer and add a new one, suspecting a terminology mix-up. It's important to differentiate between "locked" layers and "merged" layers. Merged layers are combined into a single layer and lose their individual editability. If a layer is truly locked, the padlock icon will be present. If it appears as a single, uneditable entity without a padlock, it might have been merged.
Regarding the question of whether locked layers can be sold in a package: yes, you can indeed lock layers in a PSD file that you intend to sell. This is a common practice to protect your intellectual property or to prevent users from inadvertently breaking the design. However, if you want the buyers to be able to unlock and modify these layers, you simply need to ensure they are not permanently merged or flattened. By leaving them as individual, albeit locked, layers, the buyer can then unlock them using the methods described above.
How to Lock Layers in Photoshop
File Format Considerations
It's worth noting that certain file formats are not fully compatible with Photoshop's layer system. For instance, files saved in "Indexed Color" mode may have limitations on layer functionality. If you're encountering persistent issues with layers, especially after importing an image, checking the Image > Mode setting can sometimes reveal compatibility problems. Converting the image to RGB Color mode (Image > Mode > RGB Color) is often a necessary step to regain full layer control.
Advanced Layer Locking: Fine-Tuning Your Workflow
The ability to partially lock layers is a powerful tool for advanced users. By selectively locking transparent pixels, image pixels, or position, you can create a highly controlled editing environment. This is especially useful in complex projects where you might be making numerous adjustments across different parts of the image. For example, if you're painting details onto a character's clothing but want to ensure you don't accidentally alter the character's outline, locking the image pixels of the outline layer while painting on a separate detail layer provides that safety net.
Mastering the art of unlocking and locking layers in Photoshop is fundamental to efficient and error-free digital creation. By understanding the different types of locks and how to manage them through the Layers panel, you can protect your work, streamline your editing process, and unlock the full creative potential of this indispensable software.