Applying patterns is a fundamental technique in Substance Painter, allowing artists to add intricate details and realistic textures to their 3D models. This guide delves into the various methods and best practices for effectively incorporating patterns, from basic layer masking to the advanced use of smart materials and procedural effects. Understanding these tools is crucial for achieving professional-grade texturing results.
The Foundation: Understanding Layers and Masks
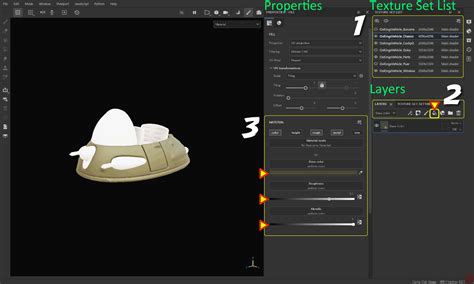
At its core, Substance Painter's texturing workflow revolves around layers, which act as containers for your texture information. To control where these textures are applied, masking is indispensable. Layers can be masked in order to display/apply their content only on specific parts of the texture. The mask operates as an intensity parameter over the content of the layer, dictating the opacity or influence of the layer's effects.
Visualizing the mask is a key step in understanding its impact. You can visualize the mask itself by doing ALT + Left mouse click on its thumbnail. This action will switch the viewport to an isolated view of the mask from that specific layer, allowing you to see exactly where the layer's content is being applied. To temporarily disable a mask, you can perform a SHIFT + Left mouse click on its thumbnail. Performing the same operation again will enable it. Furthermore, you can invert the background of the mask by performing a Right-click and selecting “Invert mask background.” This is particularly useful for quickly switching between applying a pattern to a surface and applying it to the surrounding areas.
Harnessing the Power of Effects
Effects are special operations within Substance Painter that can be edited at any time, offering a high degree of flexibility. The effects can be placed either on a mask or on the content of a layer, though they are often more appropriate for one or the other depending on their function. A visual indicator on each layer's thumbnail signifies the presence of effects. A grey line under the thumbnail indicates no effects are present, while a red line signifies that at least one effect has been applied.
Effects can range from procedural noise generators to grunge maps and custom brushes. When applied to a mask, they dynamically generate areas of opacity, allowing for complex and non-destructive masking. For instance, you could use a procedural noise effect to create a weathered or chipped paint look, and then apply that effect to a mask on a paint layer. This means the chipped paint will only appear where the noise effect dictates.
Smart Masks: Reusability and Efficiency
Smart masks are a powerful feature that allows you to save a mask and its associated effects to easily re-use them on other layers or even in other projects. This significantly streamlines the texturing process, especially when working with recurring patterns or surface imperfections. To create a smart mask, simply right-click over an existing mask and choose “Create smart mask.” Substance Painter will then save this mask configuration for future use.
When you drag and drop a smart mask onto a layer, a black mask will be created if the layer doesn’t already have one. If a mask already exists on the layer, the effects from the smart mask will be merged with the existing mask's effects list. This merging behavior is crucial to understand, as it can either add to or complement your existing mask setup. Smart masks are invaluable for quickly applying complex wear patterns, dirt accumulation, or subtle surface variations across different parts of a model or even across multiple assets.
Applying Patterns with Fill Layers and Generators
One of the most straightforward ways to apply a pattern is by using a Fill layer. A Fill layer allows you to define a base color, material properties, or, crucially, a pattern. You can load a texture or a procedural generator into the Fill layer's properties. For example, to apply a fabric pattern, you would create a Fill layer, assign your fabric texture to the Base Color channel, and then use a black mask with a specific alpha or procedural effect to define where the fabric should be visible.
Generators are particularly useful for procedural pattern application. When added to a mask, generators can create complex, tileable patterns based on mathematical algorithms. This is ideal for generating repeating textures like bricks, tiles, or even stylized geometric designs. You can control the scale, rotation, tiling, and other parameters of these procedural patterns to achieve the desired look.
Utilizing Alpha and Brush Presets for Pattern Detail
For more direct control over pattern placement and detail, Substance Painter allows the use of alpha maps and custom brush presets. When using a brush tool, you can load an alpha map as the brush's shape. This alpha map, typically a grayscale image, defines the brush's opacity. By selecting a detailed alpha, such as a stencil of a logo or a decorative motif, and painting with it on a mask, you can precisely place intricate patterns onto your model.
The workflow here often involves creating a black mask, then using a white brush with your chosen alpha to "paint in" the pattern where you want it to appear. You can adjust brush size, flow, and spacing to control the density and sharpness of the pattern. This method is excellent for adding unique decals, grates, or specific surface markings that require precise manual control.
Procedural Texturing for Dynamic Patterns
Substance Painter's strength lies in its procedural capabilities. Beyond simple generators, you can build complex procedural networks using the Graph view or leverage pre-made Substance (.sbsar) files. These procedural textures can generate a vast array of patterns with countless customizable parameters.
When you load a Substance file into a Fill layer or as an effect, it often comes with exposed parameters that you can tweak directly in the Properties panel. This allows you to dynamically alter aspects like the color, scale, roughness, or even the underlying structure of the pattern without needing to re-import or re-create the texture. This is incredibly powerful for creating variations of a pattern or for generating unique, non-repeating textures that still adhere to a defined style.
For example, a procedural wood generator might have parameters for grain direction, knot density, and wood type. By adjusting these, you can create anything from smooth maple to rough oak.
Your Own Smart Materials - Beginner Substance Painter Tutorial
Layer Masks and Effects: A Deeper Dive into Control
The interplay between layer masks and effects is where true artistic control emerges. Effects can be applied not only to masks but also directly to the content of a layer. However, effects are more appropriate for masks when the goal is to dynamically define where a layer’s properties are applied.
Consider a scenario where you want to apply a metal material but have rust only appear in crevices. You would:
- Create a Fill layer for the base metal.
- Add another Fill layer for the rust color.
- Create a black mask for the rust layer.
- Add a Generator effect to the rust layer's mask.
- Choose a "Metal Edge Wear" or a similar generator that simulates dirt accumulating in crevices. Adjust its parameters to control the distribution and intensity of the rust.
This non-destructive workflow means you can go back at any time to tweak the generator’s settings, change the rust color, or even replace the base metal material without redoing hours of work. The line under each thumbnail on a layer indicates if effects exist. Grey equals no effects, red equals at least one effect. This visual cue is a constant reminder of the dynamic nature of your layers.
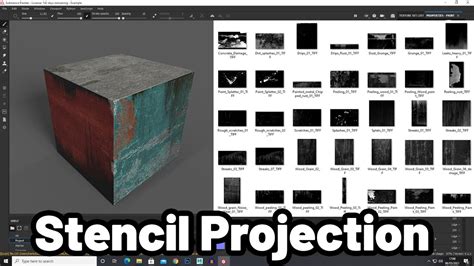
Advanced Techniques: Stencils and Triplanar Mapping
For applying patterns to complex geometry that might otherwise suffer from UV stretching or tiling issues, stencils and triplanar mapping are invaluable.
A stencil is essentially an alpha map applied to your brush that dictates where paint is applied, but it works in screen space rather than UV space. When painting with a stencil, the pattern is projected onto your model from the camera's perspective. This is perfect for applying things like graffiti, logos, or specific decals that you don't want to be distorted by UV seams. You can control the position, scale, and rotation of the stencil directly in the viewport.
Triplanar mapping is a procedural mapping technique that projects textures from three axes (X, Y, Z) and blends them together. This method bypasses the need for UV unwrapping entirely for certain types of textures, making it ideal for complex organic shapes or hard-surface models where UVs are difficult to manage. When using a Fill layer with triplanar mapping enabled, the pattern will be applied uniformly across the surface, regardless of UV layout. This is exceptionally useful for large-scale patterns or procedural noise that needs to look consistent everywhere.
Combining Techniques for Richness and Realism
The most compelling patterns and textures are often achieved by combining multiple techniques. You might start with a procedural generator for a base pattern, then add a grunge map to break up its uniformity, and finally use a hand-painted alpha to add specific details or wear.
For instance, to create a weathered leather texture:
- Start with a Fill layer for the base leather color and material properties.
- Add a procedural noise generator to the mask of this layer to create subtle variations in texture.
- Add another Fill layer with a darker brown color and a grunge map applied to its mask. This layer can simulate dirt or darker grain areas.
- Introduce a Fill layer with a reddish-brown color and a "Metal Edge Wear" generator, but adjust its parameters to simulate scuff marks or worn edges on the leather.
- Finally, use a custom alpha brush with a subtle crackle pattern to paint fine cracks onto specific areas of the mask on a separate layer, adding a high level of detail.
The key is to think in terms of additive or subtractive elements. Each layer and mask combination builds upon the previous one, creating depth and complexity.
Workflow Considerations and Best Practices
When applying patterns, always consider the scale and context of your model. A pattern that looks good on a small prop might appear too repetitive or too small on a large character. Substance Painter's ability to adjust scale and tiling parameters is crucial here.
Always work non-destructively. Utilize Fill layers, masks, and effects as much as possible. This allows for easy iteration and modification. Avoid painting directly onto a Fill layer's base color or material properties if you intend to use patterns or masks, as this will bake those changes in.
Organize your layers. Use meaningful names and group related layers together (e.g., group all layers contributing to a specific material like "Leather," "Metal," or "Fabric"). This will make your project manageable, especially as it grows in complexity.
Remember that patterns are not just about visual appearance; they also contribute to the material definition. Ensure that your patterns are accompanied by appropriate roughness, metallic, and normal map details to create a convincing PBR (Physically Based Rendering) material. For example, a rough fabric pattern should have corresponding roughness variations to match its visual texture.
By mastering these techniques, from the fundamental understanding of layers and masks to the advanced application of procedural generators and stencils, artists can elevate their texturing work in Substance Painter, creating highly detailed and believable surfaces for their 3D models.