Substance Painter is an indispensable tool for 3D artists, offering a powerful and intuitive way to texture models. While its core painting capabilities are widely recognized, understanding and utilizing its shader system is crucial for achieving realistic and visually compelling results. This guide will delve into the intricacies of Substance Painter shaders, from fundamental concepts to advanced customization, empowering you to elevate your 3D material workflow.
Understanding the Core of Shaders in Substance Painter
At its heart, a shader is a function that dictates how a 3D object interacts with light and shadows within the viewport. It defines the surface properties, influencing how light reflects, refracts, and is absorbed, ultimately determining the object's visual appearance. In Substance Painter, shaders are the engine behind material rendering, transforming flat geometry into visually rich and detailed assets.
The software utilizes a shader system that allows for a high degree of control over material properties. When working with shaders, you might encounter shader files marked as “Outdated.” In such cases, it is strongly recommended to update them whenever possible to ensure compatibility and access to the latest features and optimizations. A clear indicator within the software, often a button or an icon, shows the current shader file being used, providing immediate feedback on your active material setup.
Shader Instances: Customization and Flexibility
A key concept within Substance Painter's shader system is the "Shader Instance." A Shader Instance is essentially a customized version of an original shader file. While it inherits the foundational logic from its parent shader, it allows for a unique set of parameters to be defined and tweaked. This means you can take a standard shader, like the default Metal Roughness shader, and modify specific aspects such as its base color, roughness, metallic values, or even more complex properties, creating a unique material without altering the original shader file itself. This approach promotes reusability and efficient workflow management, as you can derive numerous variations from a single base shader.
Substance Painter Beginner Tutorial | 2026 | Complete Guide for Game Developers & Artists
Navigating Substance Painter's Shader Settings
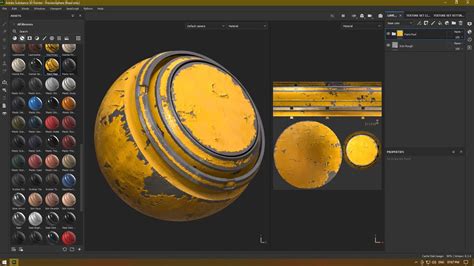
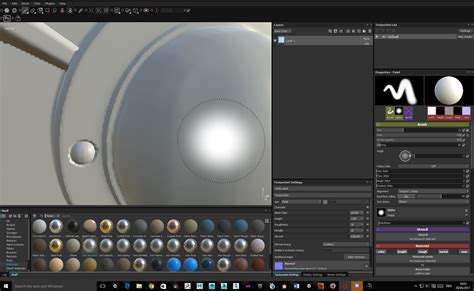
Accessing and modifying shader settings is a straightforward process. Typically, you'll find a dedicated area within the Substance Painter interface for managing these parameters. Often, this is represented by a visual cue like a "shader ball with a gear icon." Clicking on this icon will open a panel or window displaying the shader settings.
Within this settings panel, you'll often find a mini-shelf or filter that allows you to browse and select from a variety of available shaders. For instance, Substance Painter supports shaders that utilize "alpha blending," which is essential for creating transparent or translucent materials. You might also find shaders like "PBR Coded," offering different rendering approaches. However, for beginners and for the essential workflows in Substance Painter, sticking with the default "Metal Rough" shaders is a common and effective starting point. These default shaders are designed to work seamlessly with the industry-standard Physically Based Rendering (PBR) workflow, providing a solid foundation for creating realistic materials.
Tesselation and Mesh Deformation
Beyond standard material properties, Substance Painter offers advanced features like Tesselation. Tesselation is a technique used to subdivide the geometry of a mesh, effectively densifying it. This process can be crucial for adding fine surface details that would be impossible to achieve with the original polygon count. The mesh deformation can then be based on a specific channel, allowing for dynamic changes to the object's form driven by texture data. It's important to note that for these advanced features, particularly those related to physical size measurements, both the "Scene" and "Physical size (cm)" scale unit settings require that the imported model has been prepared accordingly. This ensures accurate representation and interaction of the model within the software's environment.
Substance Painter as a Universal Material Editor
One of the significant advantages of Substance Painter is its role as a universal material editor. Many 3D render engines have their own distinct methods for achieving similar material effects. This can lead to inconsistencies and a steep learning curve when moving between different software. Substance Painter bridges this gap by allowing you to create materials that will look identical across various render engines. Whether you've crafted an exceptional material in Octane, you can easily convert and utilize it in Standard Render, Redshift, or even game engines like Unreal Engine.
This versatility streamlines the 3D artist's workflow, as the software handles the complex technical aspects of texture conversion. This frees up artists to concentrate on their creative endeavors, focusing on designing unique and compelling materials without being bogged down by engine-specific requirements.
Preparing Your Model for Substance Painter
Before diving into Substance Painter, proper model preparation is key. A crucial step is UV unwrapping, which essentially flattens the 3D model's surface into a 2D map. If you're unfamiliar with this process, numerous tutorials are available. However, for ease of following along with this guide, a pre-UV unwrapped 3D model is often provided.
Cinema 4D Model Preparation Workflow
Let's consider a workflow using Cinema 4D as an example for preparing a model. The goal is to consolidate materials and leverage vertex colors for efficient texturing in Substance Painter.
- Create a Single Material: Begin by creating a new material for your object. Using just one material for the entire object significantly saves time when you import it into Substance Painter.
- Apply Vertex Colors: Select your object and navigate to the polygon selection mode. Use the Fill Selection Tool to select each individual polygon (e.g., each pyramid). Then, select the corresponding vertices.
- Drop in Vertex Color: Access the Commander (Shift+C) and type "Vertex" to bring up the vertex color options. Applying vertex colors will initially turn your object black.
- Color Picking and Application: To ensure color accuracy, you can color-pick a reference logo or color scheme within your software. Select a pyramid, sample the desired color, and then apply it to the selected polygons. Repeat this process for all parts of your model that require distinct colors.
- Export as FBX: Ensure your model has a UV tag containing all UV information. Then, go to
File > Export > FBX. In the export window, make sure the "Vertex Colors" box is selected. Save your FBX file.
This preparation ensures that your model is ready to receive distinct color information within Substance Painter, which will be instrumental in utilizing masks and generators effectively.
Baking Mesh Maps in Substance Painter
Once your model is imported into Substance Painter, the next critical step is baking mesh maps. This process generates essential texture maps that provide the software with detailed information about your model's surface, which is vital for procedural texturing and effects.
The Baking Process Explained
- Import FBX: Open your prepared FBX file in Substance Painter. Ensure "Auto-Unwrap" is deactivated and set your template to "Metallic Roughness" before clicking "OK." You should see your model and its UV map.
- Access Texture Set Settings: Navigate to the "Texture Set Settings" panel.
- Bake Mesh Maps: Scroll down to find the "Bake Mesh Maps" option and click it. A small window will appear.
- Utilize Vertex Colors: For baking, instead of bringing in a high-poly mesh (which is common for detailed sculpting), you'll utilize the vertex colors you prepared. In the "ID" section of the bake settings, change the color source to "Vertex Color."
- Adjust Resolution: In the "Common" tab, increase the resolution to your desired setting (e.g., 2K).
- Bake: Click "Bake Selected Textures."
These baked maps - such as Normal, Ambient Occlusion, and Curvature - act as utility passes. They provide crucial data that generators and procedural effects will use to create realistic wear, dirt, and other surface details. Without these maps, generators would lack the necessary information to function accurately.
Mastering Masks and Generators for Dynamic Texturing
Masks and generators are the powerhouse features of Substance Painter, enabling non-destructive, procedural texturing workflows. They allow you to dynamically control where and how materials are applied to your model.
Applying Materials and Masking
- Project Tab: In the "Project" tab, you'll find the UV map colors that were imported from Cinema 4D. Dragging these colors into the "Fill" option can serve as a base.
- Shelf Exploration: Browse the "Shelf" for materials. You can use multiple materials to layer effects. For example, you might start with a plastic base and then add a metallic surface.
- Layering Materials: Drag a material (e.g., plastic) onto your object. If it overrides your vertex colors, deselect the color option within that layer's properties. This ensures Substance Painter respects your base color scheme. Repeat this for other materials like Aluminum.
- Creating a Black Mask: To isolate where a material appears, right-click on the layer and select "Add Black Mask." A black mask hides the physical characteristics of the layer. You can then "paint away" the black to reveal the layer's material, much like in Photoshop.
Leveraging Generators
- Adding a Generator: With the Black Mask selected, click the "Wand" icon and choose "Add Generator."
- Generator Selection: A selection of Generators will appear. For instance, "Metal Edge Wear" is a popular choice for simulating worn metal on edges.
- Procedural Effects: Applying a generator like "Metal Edge Wear" will analyze the baked mesh maps (like curvature) and automatically apply the underlying material (e.g., aluminum) to the edges of your object. This creates realistic wear and tear without manual painting.
- Parameter Tweaking: Generators offer numerous parameters that can be tweaked to fine-tune the effect, allowing for precise control over the generated details.
The power of generators lies in their reliance on the baked mesh maps. This dependency ensures that the generated details are contextually accurate and physically plausible, leading to highly impressive and realistic results.
Substance Painter Beginner Tutorial | 2026 | Complete Guide for Game Developers & Artists
Exporting Textures and Building Shaders in Cinema 4D
Once you've achieved your desired look in Substance Painter, you'll need to export the textures and set up a compatible shader in your target 3D software, such as Cinema 4D.
Exporting Textures
- Export Textures: Go to
File > Export Textures. - Texture Files: You'll see a list of all the texture files that will be exported. You may not need all of them, but including them won't harm your setup.
- Destination and Preset: Select your file destination and set the "Texture" export preset. "Metallic Roughness" is highly recommended for Cinema 4D and works well for engines like Redshift and Octane. The default preset is suitable for standard Cinema 4D materials.
Building Shaders in Cinema 4D
- Select Material: Back in Cinema 4D, select the material you initially created for your object.
- Basic Menu Options: In the "Basic" menu of the material, you'll find options for creating shaders. You can achieve a lot within the "Reflectance" channel, but we'll focus on the "Color" channel for this example.
- Activate Channels: Activate "Normal" (for Bump Map) and "Displacement."
- Color Channel: Under "Color," navigate to "Texture" and drag and drop your exported "Base Color" map. This will bring back the colors you defined earlier.
- Reflectance Channel:
- Remove the "Default Specular" layer.
- Add a new layer and select "GGX" for a nice, shiny reflection.
- Under "Roughness," open "Textures" and drag in your exported "Roughness Map."
- Under "Reflection Strength," add your exported "Metallic Map."
This setup begins to create a more complex and interesting material. However, simply rendering at this stage might only show reflections. To incorporate all your textures correctly:
- Layer Color: Go to "Layer Color" and drop your "Base Color" texture inside.
- Normal Map: Navigate to the "Normal" tab and drag in your exported "Normal Map."
- Displacement: Go to "Displacement" and add your exported displacement map. Crucially, set your "Height" value low initially. A high value can distort and blow out your model. Activate "Sub Polygon Displacement" to ensure there are enough polygons for the displacement to work effectively.
With your model added to an environment and lit appropriately, you'll see how well your textures have transferred over, bringing your Substance Painter work to life within Cinema 4D.
Advanced Shader Concepts and Customization
Substance Painter's shader system extends beyond basic material properties, offering advanced customization for those who wish to delve deeper.
Writing Custom Shaders in GLSL
For advanced users, Substance Painter allows for the creation of custom shaders using GLSL (OpenGL Shading Language). You can write a portion of the fragment shader, often referred to as a "surface shader." This grants you direct access to rendering engine parameters, including document channels, additional textures, and camera data.
When developing custom shaders, you may need to configure specific rendering states like culling, blending, and sampling locality. These can often be set directly within the shader code. To streamline this process and avoid repetitive boilerplate code, Substance Painter provides a library of useful functions.
Shader Customization Options
- Custom UI (
custom-ui): This option allows you to replace the standard shader parameters user interface with a custom view created as a QML module. This provides greater control over how users interact with your shader's parameters. - MDL Materials (
mdl): You can define an Iray MDL (Material Definition Language) material to be used with your shader. The syntax for specifying the MDL material path ismdl::material_name, where the path points to an MDL file within your Substance Painter shelf folders, andmaterial_nameis the name of a material declared within that file.
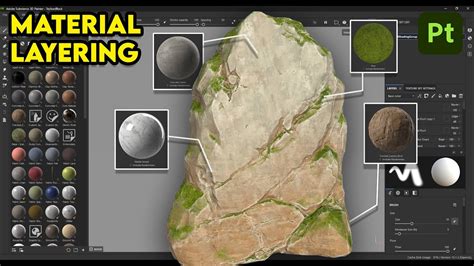
Dynamic Material Layering
A particularly powerful workflow is "Dynamic Material Layering." This technique involves mixing materials directly within a shader, and then allowing the user to dynamically edit the blending masks in Substance Painter. This offers an incredibly flexible way to create complex materials where different material properties can be blended and controlled in real-time.
Blender Cycles Shader Setup
Translating Substance Painter shaders to other software like Blender's Cycles engine involves a similar process of connecting exported texture maps to the appropriate nodes in the shader editor.
- Base Color: Connect the "Base Color" map directly.
- Roughness Map: Connect the "Roughness" map to the roughness inputs of the relevant nodes (e.g., diffuse and glossy). Crucially, ensure the Roughness map is set to "Non-Color Data" in Blender's image texture node. You may also need to "square" the roughness value to match the range between Substance Painter and Cycles. Any channel not set to "sRGB" in Substance Painter should be loaded as non-color data.
- Normal Map: Utilize the "Normal OpenGL" channel exported from Substance Painter. Connect this to a "Normal Map" node in Blender, and then plug that into the Normal input of your shader.
- Metallic Map: This is where the shader becomes more complex. You'll need to blend between a dielectric (non-metal) shader and a metallic shader using the "Metallic Map." Areas dark in the metallic map will use the dielectric shader, while bright areas will switch to a glossy-only shader. Since metals have colored reflections, the "Base Color" map is connected to the metallic shader's color input.
Advanced Considerations for Cycles:
- Layer Weight Node vs. Fresnel: Some artists prefer using the "Layer Weight" node instead of the "Fresnel" node for controlling reflections.
- Roughness Blending: For even more nuanced metal shaders, you can blend two glossy BSDFs at slightly different roughness values, often using an extra math node to scale the roughness map.
By understanding and implementing these shader techniques, you can unlock the full potential of Substance Painter, creating sophisticated and visually stunning materials that enhance your 3D assets across a wide range of applications.