The Texture Set List window in Substance Painter serves as the central hub for managing materials applied to your 3D models. It displays all the material IDs present in a project, allowing artists to organize and edit textures for different parts of their mesh. However, users sometimes encounter a frustrating issue where the Texture Set List, or specific entries within it, appear greyed out. This article will delve into the reasons behind this phenomenon and provide comprehensive explanations and solutions, drawing upon the functionalities and settings within Substance Painter.
The Anatomy of the Texture Set List
Before addressing the greyed out issue, it's crucial to understand the components of the Texture Set List. Each entry represents a distinct material applied to your model, identified by its material ID.
- Selected: This highlights the current Texture Set being actively edited. When you are painting or modifying layers, the "Selected" Texture Set is the one you are directly interacting with.
- Disabled: This is a key indicator. When a Texture Set is "Disabled," it signifies that its associated layer stack cannot be directly attached to a material on the mesh. This often means that the material ID assigned in your 3D modeling software is not recognized or is incorrectly set up for Substance Painter.
- Isolate: This mode is invaluable for focusing on a specific part of your model. When active, it hides all other Texture Sets, allowing you to concentrate solely on the currently active one. By default, only the selected Texture Set is displayed when painting, which is a form of isolation.
- Edit Name: This functionality allows you to rename a Texture Set. This renaming is not merely cosmetic; the edited name will be used during the texture export process, ensuring clarity and organization in your final exported assets.
Managing Shader Assignments within Texture Sets
The button located to the right of each Texture Set name is essential for managing shader assignments. By default, multiple Texture Sets might share the same shader instance. This is efficient for many workflows. However, there are scenarios where having a unique shader for a specific part of the mesh can be beneficial. This is achieved by clicking the button and selecting "New shader instance." This allows for more granular control over material properties for individual parts of your model.
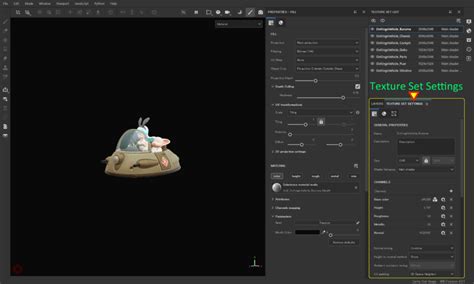
Texture Set Settings: Fine-Tuning Your Materials
The Texture Set settings panel provides a wealth of options for controlling the parameters of the currently selected Texture Set.
Name of the Texture Set: This is the primary identifier for your material group.
Text Field for Information: This dedicated text field allows you to add descriptive information or notes about a specific Texture Set. This can be extremely helpful for complex projects or when collaborating with others, providing context for the material.
Channel Resolution Controls: These settings manage the resolution of channels within a Texture Set. You can adjust the resolution in pixels for height, width, or both. To utilize non-square resolutions (e.g., 2048x1024 pixels), you need to disable the lock button that typically links the width and height dropdowns.
Dynamic Texture Set Resolutions: Substance Painter's non-destructive workflow allows for dynamic texture set resolutions. This means you can initially work at a lower resolution to maintain good performance during the texturing process and then increase the resolution later to achieve higher visual quality in your final exports. This flexibility is a cornerstone of efficient 3D texturing.
Maximum Resolution: Within the application, the maximum resolution for any channel is 4096x4096 pixels. However, when exporting textures, this limit can increase to 8192x8192 pixels, provided your GPU supports it. This allows for extremely high-fidelity textures.
Removing Channels: You have the ability to remove specific channels from the list within a Texture Set. This can be useful for optimizing your project or if a particular channel is no longer needed.
Storage Type: It's important to note that the "storage type" of a channel (e.g., sRGB8 or L32F) is not a color space or gamma control. It refers to the data format used for storing the information. Substance Painter interprets channels based on their intended purpose (e.g., Roughness as data/raw, Base Color as gamma-corrected) regardless of the underlying storage type.
Understanding Color Management and Normal Map Integration
Color Channel Management: If the "Color channel" option is enabled, it indicates that the channel is color-managed. The presence of this indicator signifies that color management is active for that specific channel.
Normal Map Integration: The way a "baked normal map" is combined with the "Normal" channel offers crucial control:
- Replace: This option instructs Substance Painter to ignore the baked normal map entirely and exclusively use the data within the "Normal" channel. This is particularly useful if you intend to paint over an existing baked normal map to add custom details or corrections. For more in-depth information, refer to the advanced channel painting documentation.
- Note: This setting might be unavailable if the "Normal" channel is not present in the channels' list for that Texture Set.
Height to Normal Map Conversion Methods
Substance Painter provides options for converting height information into a normal map:
- Sharp: This method aims to produce a more defined normal map. However, it carries the risk of introducing noise and aliasing artifacts due to the aggressive detail enhancement.
- Smooth (Sobel) (default): This is the default method, utilizing a Sobel filter to generate a smoother normal map. While it results in a cleaner output, it may sometimes lead to a loss of finer details compared to the "Sharp" method.
Ambient Occlusion and UV Padding
Ambient Occlusion Integration: Similar to normal maps, the "baked ambient occlusion" can be combined with the "Ambient Occlusion" channel:
- Replace: This setting overrides the baked ambient occlusion, using only the data present in the "Ambient Occlusion" channel. This is beneficial when you want to paint custom AO effects or refine existing ones.
- Note: This option may be disabled if the "Ambient Occlusion" channel is missing from the Texture Set's channel list.
UV Padding: This setting controls how pixels outside the UV island are generated. Proper padding is essential to prevent visible seams and artifacts, especially when textures are applied to a 3D model and viewed at different angles or resolutions.
The "Greyed Out" Phenomenon: Causes and Solutions
The primary reason for a Texture Set appearing greyed out in the list is often a mismatch or misconfiguration of material IDs between your 3D modeling software and Substance Painter. When you export your model from software like 3ds Max, Maya, Blender, or others, you assign material IDs to different parts of the mesh. These IDs are then read by Substance Painter to create the individual Texture Sets.
Scenario: A user builds a basic wooden hut in 3ds Max, preparing it for texturing in Substance Painter. To create distinct texturing areas, they utilize color IDs for different sides of the wooden planks (front/back, up/down, left/right). This allows for tileable textures to be applied separately to each side.
The issue arises because "the issue is of course that i can only paint at one texture set at a time." This indicates that while the material IDs might be set up correctly to create the Texture Sets, the workflow or settings might be preventing simultaneous painting or the expected behavior.
Common Causes for Greyed Out Texture Sets:
Incorrect Material ID Assignment in 3D Software:
- Problem: The material IDs assigned in your 3D modeling software are not unique, are not correctly named, or are not being properly interpreted by Substance Painter during the import process. For instance, if you have multiple parts of your mesh assigned to the same material ID, Substance Painter might consolidate them into a single Texture Set, or one might be ignored.
- Solution: Double-check your material ID assignments in your 3D software. Ensure each distinct area you want to texture separately has a unique material ID. Verify that these IDs are simple and do not contain special characters that might cause parsing issues. When exporting, ensure the correct material ID export options are selected in your 3D software's exporter.
Import Settings in Substance Painter:
- Problem: When importing your model into Substance Painter, specific settings can affect how Texture Sets are generated. For example, the "Group by Material" or "Group by Object" options play a crucial role. If these are not set up as intended, you might not get the desired Texture Set breakdown.
- Solution: During the import process in Substance Painter, pay close attention to the "File > Import Resources" settings. Ensure that "Group by Material" is enabled if you are using material IDs for your Texture Sets. Experiment with "Group by Object" if your model is structured with separate objects for different material parts.
27 | Substance 3D Painter Course - Texture Set Settings
Shader Instance Issues:
- Problem: While less common for the entire Texture Set to be greyed out, an incorrectly assigned or duplicated shader instance could theoretically lead to unexpected behavior or display issues.
- Solution: Review the shader assignments for your Texture Sets. If you suspect an issue, try resetting the shader to the default or creating a "New shader instance" for the problematic Texture Set to see if it resolves the problem.
Corrupted Project or Resources:
- Problem: In rare cases, the Substance Painter project file itself or associated resources might become corrupted, leading to display errors like greyed out elements.
- Solution: Try re-importing your mesh and textures into a new Substance Painter project. If the issue persists, consider re-exporting your model from your 3D software.
"Disabled" State Explained:
- Problem: The "Disabled" state specifically means the Texture Set and its layer stack cannot be directly attached to a material in on the mesh. This is the most direct indication of a problem with how the material ID is being recognized or applied to the mesh geometry.
- Solution: This often points back to issues with the material ID setup in the 3D software or how Substance Painter is interpreting those IDs during import. Ensure the material names in your 3D software precisely match what Substance Painter is expecting, or that the workflow for assigning material IDs is robust. If you're using color IDs, ensure they are consistently applied and that Substance Painter is configured to recognize them.
Workflow Limitations:
- Problem: The user's statement, "Now the issue is of course that i can only paint at one texture set at a time. So apparently there is no way around with this setup to paint on all layers at once," highlights a fundamental aspect of Substance Painter's workflow. You can only actively paint on one Texture Set at a time. The "greyed out" status might be a symptom of the system indicating that a Texture Set is not the active one for painting, rather than being fundamentally broken.
- Solution: Understand that Substance Painter is designed to work on one Texture Set at a time for direct painting. To work on multiple Texture Sets efficiently, you would typically switch between them using the Texture Set List. If you need to apply similar effects across multiple Texture Sets, consider using layer masks, generators, or baking effects that can be applied globally or to specific selections. For instance, if you have identical wood grain on multiple sides, you might texture one side thoroughly, then use a mask to copy or adapt that texturing to other sides, or use a master material setup in your 3D software that Substance Painter can interpret.
Advanced Considerations and Best Practices
- Consistent Naming Conventions: Employ clear and consistent naming conventions for your material IDs in your 3D software. This will directly translate to organized Texture Set names in Substance Painter, reducing confusion.
- UV Unwrapping: Ensure your UVs are properly unwrapped and that there is sufficient spacing between UV islands to avoid texture bleeding. While not directly causing greyed out Texture Sets, poor UVs can exacerbate issues with texture application.
- Exporting from 3D Software: Understand the export options specific to your 3D modeling software. For example, when exporting FBX files, there are often specific settings related to material export and naming that can impact how Substance Painter reads your model.
- Re-baking Maps: If you've made significant changes to your model's geometry or material assignments, you may need to re-bake your mesh maps (Normal, AO, Curvature, etc.) in Substance Painter to ensure they accurately reflect the updated mesh and material setup.
By systematically checking these potential causes and understanding the intended functionality of the Texture Set List and its associated settings, users can effectively troubleshoot and resolve the issue of greyed out Texture Sets in Substance Painter, leading to a smoother and more productive texturing workflow.