Creating compelling t-shirt mockups is an essential skill for designers, offering a significant advantage in various professional contexts. Whether you're participating in a shirt design competition, preparing an advertisement for selling printed shirts, or simply aiming to visualize your creative concepts with greater impact, a well-crafted mockup can elevate your presentation. This tutorial will guide you through the process of generating realistic and versatile t-shirt mockups using Adobe Photoshop, transforming a plain garment image into a dynamic showcase for your designs.
Preparing Your Base T-Shirt Image
The foundation of any effective mockup is a high-quality base image of a t-shirt. For beginners, it is often preferable to start with a white t-shirt, as it offers the most flexibility for color changes and design application.
To begin, locate a suitable t-shirt image online or from your own photography. Once you have your chosen image open in Photoshop, the first step is to refine its appearance to better isolate the fabric's texture and form. Press Ctrl+L on your keyboard to access the Levels adjustment. You'll want to adjust the input level sliders subtly. The goal here is not to drastically alter the image, but rather to enhance the existing details within the fabric, making the creases, folds, and texture more pronounced. This subtle enhancement will later contribute to a more realistic final mockup.
Following the Levels adjustment, navigate to Filter > Blur > Gaussian Blur. Here, the objective is to apply just enough blur to soften minor, distracting details or imperfections on the t-shirt. Be cautious not to over-blur, as this can lead to a loss of the fabric's natural texture. The ideal blur radius will erase small blemishes while preserving the overall form and texture of the garment.

Isolating the T-Shirt: Creating a Selection Path
Accurate isolation of the t-shirt from its background is crucial for applying designs and manipulating colors effectively. Photoshop offers several tools for this, but creating a path provides a precise and editable selection.
With your prepared t-shirt image on Layer 1, you'll need to create a precise path around its outline. Use the Pen Tool (P) to carefully trace the edges of the t-shirt. Click to create anchor points and drag to curve the lines, ensuring you capture all the nuances of the garment's shape, including sleeves and collar. Once you have completed the path, navigate to the Paths tab, typically located alongside the Layers tab in the right-hand toolbar.
Within the Paths panel, you will see your newly created Work Path. Right-click on the thumbnail of this path and select "Make Selection." This will transform your path into a marching ants selection.
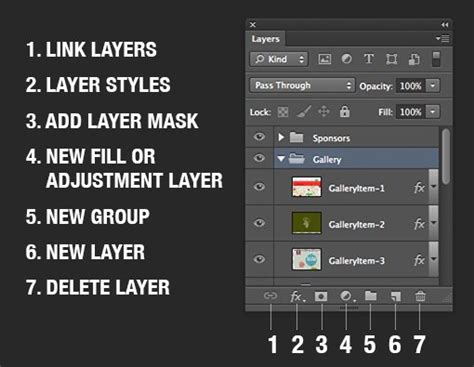
Generating a Color Fill for Dynamic Color Changes
To enable easy color modification of the t-shirt, we will create a color fill layer that acts as a mask. With the t-shirt still selected (marching ants around it), navigate to the Layers tab. Click on the contrast icon, which appears as a circle divided into black and white halves, located at the bottom of the Layers toolbar. Select "Color Fill." This action generates a new layer that is a solid color, clipped to your selection of the t-shirt.
Ensure that your original t-shirt layer (Layer 1) is positioned directly above this newly created Color Fill layer. This layering is essential for the subsequent steps where we will apply your design.
Applying Your T-Shirt Design
Now comes the exciting part: integrating your unique t-shirt design. Copy the image of your design, whether it's saved locally on your computer or sourced from the web. Paste this design into your Photoshop workspace.
The positioning of this design layer is critical. Within the Layers panel, drag the design layer so that it is positioned between the original t-shirt layer (Layer 1) and the Color Fill layer. This arrangement ensures that your design will appear on the t-shirt and be affected by the color changes you make to the fill layer.
The Magic of Color Manipulation
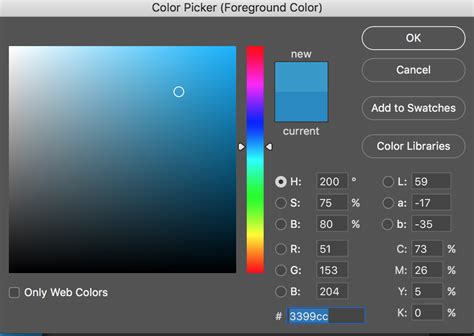
This is where the flexibility of the mockup truly shines. We can effortlessly change the color of the t-shirt by interacting with the Color Fill layer we created earlier. Navigate to the Color Fill layer in your Layers panel. Double-click on the thumbnail of this layer. A Color Picker window will immediately pop up.
Within the Color Picker, you have the freedom to select any desired shirt color. Experiment with different shades and hues. As you adjust the color, you will see the t-shirt in your mockup instantly update to reflect your chosen color. This allows for rapid iteration and the creation of multiple color variations of your design on the same mockup template.
Refining the Mockup for Realism
While the basic color and design application are complete, a few additional steps can significantly enhance the realism of your t-shirt mockup.
Adjusting Design Placement and Scale: Use the Free Transform tool (Ctrl+T) on your design layer to resize, rotate, or reposition your design on the t-shirt. Pay attention to how the design drapes and conforms to the fabric's folds.
Adding Texture and Depth: To make the design appear more integrated with the fabric, consider applying blending modes to the design layer. Experiment with modes like "Multiply," "Overlay," or "Soft Light." You might also consider adding a subtle texture overlay or using a displacement map to make the design conform more realistically to the t-shirt's wrinkles.
Creating Shadows and Highlights: For an even more polished look, you can add subtle shadows and highlights to the design layer. This can be done by creating new layers above the design layer, setting them to "Multiply" for shadows and "Screen" or "Overlay" for highlights, and then painting with a soft brush.
Advanced Techniques and Considerations
The process outlined above provides a solid foundation for creating t-shirt mockups. However, depending on the complexity of the original t-shirt image and the desired level of realism, some variations in these steps may be necessary.
For instance, if your base t-shirt image has significant wrinkles or folds that you want the design to perfectly adhere to, you might explore using a displacement map. This involves creating a grayscale version of your t-shirt's texture and then using it to distort your design layer, making it wrap around the fabric's contours.
Photoshop T-Shirt Mockup Tutorial – Start to Finish in 2 Minutes
When working with t-shirts that are not white, the process of color changing can be more nuanced. You may need to adjust not only the Color Fill layer but also potentially the blending modes and opacity of the design layer itself to ensure it appears correctly on darker or colored fabrics.
Furthermore, consider the lighting conditions of your base image. If the t-shirt is lit from one side, your design should ideally mimic that lighting to maintain consistency. This might involve adding subtle gradients or highlights to the design layer.
The resolution of your base t-shirt image and your design are also paramount. Always aim to work with high-resolution assets to ensure a crisp and professional-looking final mockup, especially if it's intended for print or large-scale advertising.
Conclusion: Elevating Your Design Presentation
Mastering t-shirt mockups in Photoshop is an investment that pays significant dividends for any designer. The ability to present your work on a realistic garment allows clients and collaborators to visualize the final product with clarity and confidence. By following these steps, from preparing your base image and creating precise selections to applying your designs and refining the details, you can produce professional-grade mockups that effectively communicate your creative vision and enhance your overall design portfolio. The flexibility offered by tools like color fill layers and blending modes ensures that your mockups are not just static images, but dynamic representations of your design potential.