Procreate, an iPad-exclusive drawing application, has revolutionized digital art creation, making sophisticated tools accessible to everyone from seasoned professionals to absolute beginners. Its intuitive interface and powerful features have cemented its status as a go-to app for digital painting, illustration, calligraphy, and even animation. While the name might initially suggest a connection to fertility apps, Procreate is, in fact, a robust platform for unleashing creative potential. This guide aims to demystify the app, offering a thorough exploration of its functionalities and empowering users to embark on their digital art journey.
Getting Started: The Gallery and Your First Canvas
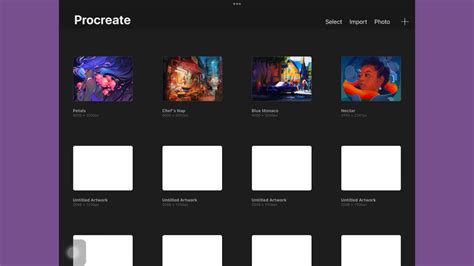
Upon launching Procreate, you are greeted by the Gallery page, your central hub for managing all your projects. This is where you can organize your artwork into "stacks" for better management, group related illustrations, or keep different canvases for pattern making neatly together. Within the gallery, you'll find essential functions like "delete" for removing unwanted projects and "duplicate" for creating exact replicas, invaluable for making modifications without altering the original or for generating elements for repeat patterns. To open an existing project, simply tap on its thumbnail. Procreate automatically saves your work, offering peace of mind as you create.
To begin a new artistic endeavor, tap the plus icon located at the top right of the Gallery page. Procreate offers several default canvas size options. For those eager to explore and experiment without immediate project constraints, selecting "Screen Size" is an excellent starting point. This creates a canvas precisely matching your iPad's display dimensions, perfect for doodles and familiarizing yourself with the app's core features.
However, for artwork intended for larger-scale products like tapestries or bedding, or when maintaining high resolution is paramount, creating a custom canvas is recommended. This ensures the integrity of your artwork remains intact even when scaled up. To do this, tap the black icon at the top right of the canvas menu. From this screen, you can define your custom canvas dimensions. For maximum resolution, you can set your canvas to the largest available size on your iPad, which can be up to 27 inches by 27 inches. It's important to note that larger canvases may limit the number of layers available, so if you find yourself needing more layers, starting with a smaller canvas size might be a better option.
Procreate Beginners Series: Part One | The Fundamentals
Navigating the Procreate Interface and Tools
Once your canvas is open, the main drawing tools are conveniently located in the top right corner of the screen.
The Toolbar and Its Essential Instruments
- Brush Tool (Brush Icon): This is your primary tool for drawing, inking, and painting. Procreate boasts a vast library of impressive default brushes, negating the immediate need to purchase additional ones. You can easily adjust the size and opacity of your brush using the sliders located on the left side of your screen.
- Smudge Tool: While not used by all artists for every type of illustration, the smudge tool functions similarly to the paintbrush and can be used to blend colors and textures.
- Eraser Tool: As its name suggests, this tool allows you to erase elements from your canvas. You can select different eraser types to match the texture of your brushes. However, it's generally advisable to use the eraser sparingly and explore Procreate's non-destructive editing capabilities for more flexible corrections.
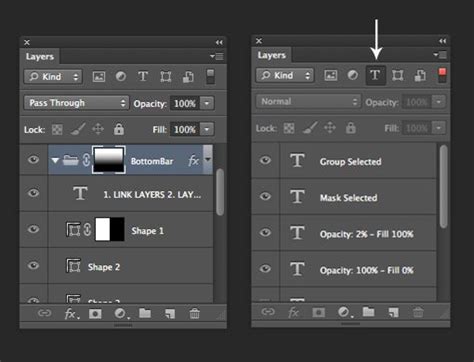
- Layers Panel: For those familiar with Adobe Creative Suite, the concept of layers will be intuitive. Layers are akin to transparent sheets stacked upon each other, allowing you to build your artwork in distinct segments. This provides immense flexibility: you can reposition layers, move elements forward or backward within the composition, hide layers to focus on specific parts, and even trace from imported images.
- Color Tool: Located as the last icon in the top right row, the color tool opens up a spectrum of possibilities for selecting and managing your hues. Within this menu, you'll find various options for choosing colors. The default screen presents the color palettes menu, a favorite for many, allowing you to curate custom color sets for each illustration. The "Values" menu offers another method for picking custom colors, while the "Classic" menu is frequently used for its straightforward color selection. Once you've chosen a color, you can easily add it to your active palette by returning to the palettes menu and tapping an empty slot. This ensures quick access to your chosen colors throughout your creative process.
Enhancing Your Workflow with Color Palettes and Pickers
The color tool offers a robust system for managing your palette. Beyond the default options, you can create and save custom color palettes, essential for maintaining consistency in your artwork or for specific projects. A particularly useful feature is the color picker, represented by a small box in the middle of the horizontal tool on the far left of the screen. This allows you to sample colors directly from your artwork or an imported image, making it effortless to match existing tones or extract a color scheme from a reference.
Mastering Procreate's Gestures and Quick Tools
Procreate's efficiency is significantly boosted by its intuitive gesture controls and specialized tools, which streamline the creative process and make complex tasks remarkably simple.
Essential Gestures for Seamless Editing
Gesture controls are a cornerstone of Procreate's user-friendliness. The most frequently used gestures are:
- Undo: A simple two-finger tap on the screen will revert your last action, acting as a crucial "undo" function. This is a lifesaver for correcting mistakes.
- Redo: To reverse an undo action, a three-finger tap on the screen will bring back your last undone action.
These fundamental gestures are indispensable for a smooth workflow, allowing for quick corrections and experimentation without fear of permanent errors.
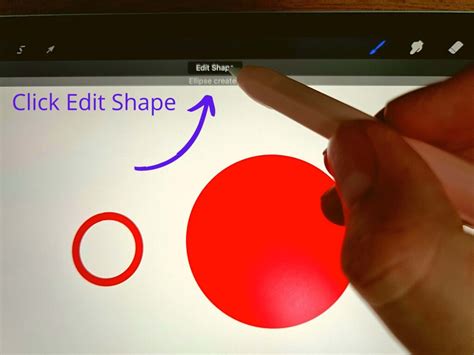
QuickShape: Precision for Lines and Forms
Procreate's QuickShape feature is a game-changer for creating precise lines and geometric forms. To utilize it, draw a shape, whether it's a line, circle, or square, and then hold your stylus or finger steady at the end of the stroke. Procreate will automatically snap the shape into a perfect line, circle, or square. This feature is incredibly useful for architectural drawing, creating logos, or simply ensuring clean, professional-looking elements in your artwork.
The "QuickLine" feature, a specific application of QuickShape, is particularly handy for drawing straight lines. Draw a line and pause with your pen held steady at the end. The line will automatically straighten out, providing a perfect, crisp edge. This was instrumental in drafting the gallery wall concept for "The Calligraphy Book," showcasing its practical application.
AlphaLock: Controlled Coloring and Shading
AlphaLock is a powerful layer-locking feature that prevents you from painting outside the existing lines of your artwork on a specific layer. Once a layer has AlphaLock enabled, any marks you make with your brush will only appear within the boundaries of the content already present on that layer. This is incredibly useful for adding color to a sketch without going outside the lines, or for applying shading and highlights precisely where they belong on your base colors. To activate AlphaLock, navigate to the Layers panel, tap on the desired layer, and then tap the AlphaLock icon that appears.
ColorDrop: Efficiently Filling Areas
ColorDrop is another time-saving feature that allows for the rapid filling of closed shapes with color. To use it, select your desired color from the color wheel, then tap and drag the color swatch from the small circle at the top of the screen down onto the area you wish to fill. This is exceptionally useful for quickly coloring in sketches or creating solid blocks of color in your designs.
Working with Layers: Building Depth and Complexity
Layers are fundamental to digital art, and Procreate offers a robust and user-friendly system for managing them. Think of layers as transparent sheets that you can stack, reorder, and manipulate independently.
Creating and Managing Layers
- Creating a New Layer: To add a new layer, simply tap the '+' icon within the Layers panel. This new layer will appear above the currently selected layer.
- Moving Layers: You can reorder layers by tapping and holding on a layer in the Layers panel and then dragging it up or down to your desired position. This is crucial for controlling which elements appear in front of or behind others in your composition.
- Layer Visibility: Each layer has a checkbox next to it in the Layers panel. Tapping this checkbox will toggle the layer's visibility on or off, allowing you to hide or show specific elements of your artwork without deleting them.
- Layer Blending Modes: Procreate offers various blending modes for layers, which determine how the colors of one layer interact with the colors of the layers beneath it. Experimenting with these modes (e.g., Multiply, Screen, Overlay) can create sophisticated lighting and color effects.
Adding Color Under Your Sketch
A common workflow in digital art is to sketch on one layer and then add color on layers beneath it. To do this, create a new layer and drag it below your sketch layer in the Layers panel. Then, select your desired colors and begin painting on this lower layer. This keeps your sketch lines clean and allows for easy color adjustments without affecting the linework.
Procreate Beginners Series: Part One | The Fundamentals
Adding Text and Exporting Your Artwork
Procreate isn't just for drawing and painting; it also offers capabilities for incorporating text and sharing your creations with the world.
Incorporating Text
While Procreate doesn't have a dedicated text tool in the same way a graphic design program might, you can still add text to your artwork. One common method is to use the "Insert File" or "Insert Photo" option within the Wrench (Actions Menu) to import text created in another application, or to hand-letter text directly onto a new layer using Procreate's brushes. For more advanced text manipulation, it's often recommended to create text in a vector-based program and then import it into Procreate.
Exporting Your Procreate Artwork
Sharing your finished pieces is an essential part of the creative process. Procreate makes exporting your artwork straightforward. Navigate to the Wrench (Actions Menu) and select "Share." You'll be presented with a variety of file formats suitable for different purposes:
- JPEG (.jpg): A common format for web use and general sharing, offering good compression with minimal quality loss.
- PNG (.png): Ideal for graphics that require transparency, such as logos or elements that need to be placed over other backgrounds.
- PSD (.psd): This format preserves Procreate's layers, allowing you to further edit your artwork in compatible programs like Adobe Photoshop.
- TIFF (.tiff): A high-quality format often used for print.
- PDF (.pdf): Suitable for documents and professional printing.
When exporting, consider the intended use of your artwork to choose the most appropriate file format.
Saving for Specific Uses (e.g., Cricut)
For projects intended for machines like Cricut or Silhouette, understanding the difference between raster and vector designs is crucial. Procreate is a raster-based program, meaning it creates images using pixels. This is excellent for digital painting and detailed artwork. However, for cutting machines, vector-based designs (like SVGs) are often preferred because they can be scaled infinitely without losing quality.
While Procreate itself does not export directly to SVG, you can still create designs for Cricut using Procreate. The key is to design with high resolution and export as a PNG with a transparent background. You can then import this PNG into Cricut Design Space. For more intricate designs or those requiring precise cuts, you might need to convert your Procreate artwork to a vector format in a separate program, or create the design directly in a vector-based app.
Frequently Asked Questions About Procreate
What is Procreate?
Procreate is a powerful and intuitive digital art application designed exclusively for the iPad. It allows users to create digital paintings, illustrations, sketches, calligraphy, and more, using a wide array of brushes and tools.
How Much Does Procreate Cost? And Are There In-App Purchases?
Procreate for iPad is typically a one-time purchase, usually around $9.99 USD in the Apple App Store. Procreate Pocket, a version for iPhone, is usually priced around $4.99 USD. While Procreate itself doesn't offer in-app purchases for additional content, users can purchase custom brushes, stamp sets, paper textures, and color palettes from various online marketplaces such as Etsy, Design Bundles, and Design Cuts.
What's the Best iPad for Procreate?
The best iPad for Procreate is generally one that supports the Apple Pencil (2nd generation) for the most seamless experience, although older models compatible with the Apple Pencil (1st generation) also work well. Factors like screen size, processing power, and display quality contribute to the overall experience. Many resources and articles are dedicated to helping users choose the right iPad for their Procreate needs, detailing compatibility and accessory recommendations.
Do You Need an Apple Pencil to Use Procreate?
No, you do not strictly need an Apple Pencil to use Procreate. You can use your finger to draw and create. However, for a more natural drawing experience and to take full advantage of Procreate's pressure sensitivity and tilt features, an Apple Pencil or a compatible third-party stylus is highly recommended. Procreate was designed with the Apple Pencil's capabilities in mind.
Can I Make SVG Designs with Procreate?
Procreate is a raster-based program, meaning it works with pixels. It does not natively export to SVG (Scalable Vector Graphics) format, which is vector-based. While you can create designs in Procreate that can be used with SVG workflows (e.g., by exporting high-resolution PNGs for import into vector software), Procreate itself is not a vector design tool.
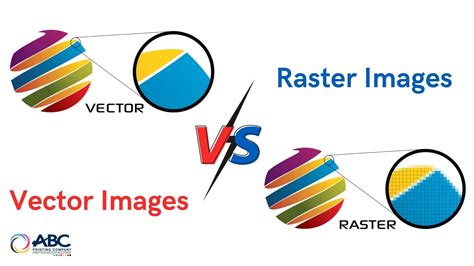
What is a Raster vs. Vector Design?
- Raster Designs: Composed of a grid of tiny squares called pixels. They are excellent for detailed artwork, digital painting, and photography. When raster images are scaled up significantly, they can appear pixelated or blurry. Common file formats include PNG, JPEG, TIFF, and PSD.
- Vector Designs: Created using mathematical equations that define points, lines, and curves. They are resolution-independent, meaning they can be scaled infinitely larger or smaller without any loss of quality. Vector graphics are ideal for logos, illustrations, and designs intended for cutting machines like Cricut. Common file formats include SVG and AI.
What Can You Make with Procreate?
The possibilities are vast! You can create digital paintings, illustrations, concept art, character designs, hand-lettered pieces, calligraphy, comics, animated GIFs, patterns for textiles, designs for print-on-demand products, and much more. Many users create artwork specifically for use with crafting machines like Cricut, for social media graphics, or for personal projects.
Do You Have to Be a Digital Artist to Use Procreate?
Absolutely not! Procreate is celebrated for its user-friendly interface and features like QuickShape and drawing guides that assist users who may not consider themselves traditional artists. It lowers the barrier to entry for digital art creation, making it accessible and enjoyable for beginners.
How Do You Learn the Gestures Procreate Artists Always Use?
The most fundamental gestures include the two-finger tap to undo and the three-finger tap to redo. Other useful gestures involve using two fingers to scrub the screen to clear a layer, or using a two-finger pinch to zoom and rotate the canvas. Familiarizing yourself with these shortcuts significantly speeds up your workflow.
Can You Use Cricut Design Space with Procreate?
Yes, you can use Procreate in conjunction with Cricut Design Space. You can create designs in Procreate and then export them as PNG files (often with transparent backgrounds) to import into Cricut Design Space for cutting. While Procreate doesn't create native SVG files, its raster output can be effectively utilized for many Cricut projects.
How Do You Get Started with Procreate?
The best way to get started is to dive in! Download the app, open a new canvas (a "Screen Size" canvas is great for beginners), and start experimenting with the brush tool, color selection, and layers. Utilize the undo/redo gestures liberally. Watching introductory video tutorials and exploring the features at your own pace will build confidence. Don't be afraid to play around and make mistakes â that's how you learn!
Beyond the Beginner's Guide: Continuous Learning and Exploration
The journey into digital art with Procreate is one of continuous discovery. While this guide provides a solid foundation, the app's depth allows for endless exploration. Many artists find value in utilizing Procreate downloads from free libraries, experimenting with different brush sets, and engaging with online communities.
Connecting with other Procreate beginners and experienced artists can provide inspiration, feedback, and new techniques. Resources like Skillshare courses, YouTube tutorials, and dedicated blogs offer advanced tips and step-by-step project guides.
For those who find the glossy screen of an iPad distracting, consider a paper-like screen protector. Many artists find this texture enhances the drawing feel, making it more akin to sketching on traditional paper.
Ultimately, the most important aspect of using Procreate is to make it work for your personal style and preferences. Whether you use it for quick sketches, detailed illustrations, or hand lettering, Procreate is a versatile tool designed to empower your creativity. Embrace the learning process, experiment with its features, and most importantly, have fun creating!