Adobe InDesign offers powerful tools for creating sophisticated visual designs, and one of its most versatile features is the ability to implement transparent gradients. This technique allows for seamless blending of objects, images, and text, creating a more fluid and professional aesthetic within your layouts. Whether you're aiming to subtly integrate a photograph into a background or create complex layered effects, understanding transparent gradients is key to elevating your InDesign projects.
Understanding Transparency and Blending in InDesign
By default, any object, stroke, fill, or text you create in InDesign possesses an opacity of 100%, meaning it is completely solid and opaque. However, InDesign provides a robust system for manipulating this opacity, allowing you to vary it from 100% (fully opaque) down to 0% (completely transparent). This control is primarily managed through the Effects panel.
The Effects panel is your central hub for managing transparency attributes. Here, you can specify not only the opacity of an object, its stroke, fill, or text but also how these elements blend with the objects positioned beneath them. This blending capability is crucial for achieving nuanced visual interactions.
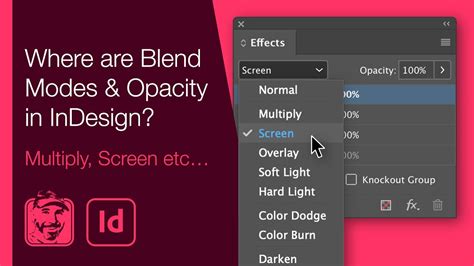
Within the Effects panel, you'll encounter several key areas:
- Opacity: This setting directly controls the transparency level, ranging from 0% to 100%.
- Blending Mode: This determines how the colors of a transparent object interact with the colors of the objects behind it. InDesign offers a variety of blending modes, each producing a unique visual outcome.
- FX Icon: This icon, often found next to object names in panels, signifies that transparency effects have been applied. Clicking the triangle next to "Object," "Group," or "Graphic" in the Effects panel can reveal these detailed settings.
You can apply transparency effects to individual objects, strokes, fills, or text. For instance, if you select an object and then navigate to the Effects panel, you can choose to apply an effect to the "Object" itself, its "Stroke," its "Fill," or its "Text."
Applying Transparency Effects: A Deeper Dive
InDesign offers a suite of nine distinct transparency effects that can be applied to your objects. These include:
- Drop Shadow: Creates a shadow behind an object, giving it depth and making it appear to lift off the page. You can control the distance, angle, size, noise, and choke of the shadow, as well as its opacity. The drop shadow can also factor in other transparency effects, adding complexity.
- Outer Glow: Makes an object appear to glow from the outside. Similar to drop shadows, you can adjust opacity, size, and other parameters.
- Glow: A more general term that can encompass both inner and outer glows, providing a luminous effect.
- Bevel and Emboss: Creates the illusion of a three-dimensional surface by adding highlights and shadows to the edges of an object.
- Satin: Applies a satin-like finish to an object, creating a smooth, lustrous appearance.
- Feather: Softens the edges of an object by fading them to transparency. This is a fundamental tool for creating smooth transitions.
- Directional Feather: Similar to feathering, but allows you to specify the direction in which the feathering occurs, enabling more controlled fades.
- Inner Glow: Makes an object appear to glow from the inside out.
When adjusting these effects, you'll often find that increasing the opacity and decreasing small settings can enhance transparency. Conversely, effects like Shadow, Inner Glow, and Feather can be manipulated to increase transparency as their settings are adjusted. The Size setting for glows or shadows directly influences the extent of the glow or shadow effect.

The Power of Gradient Feather
One of the most sought-after transparent gradient effects in InDesign is the Gradient Feather. This feature, particularly prominent in versions like CS3 and later, allows you to create a smooth transition from a solid color to complete transparency.
To implement a gradient feather:
- Create an Object: Start by placing an image or drawing a shape (like a rectangle or ellipse) on your InDesign page. You can place an image using
Control + D(Windows) orCommand + D(Mac). - Apply the Gradient Feather Effect: Navigate to
Object > Effects > Gradient Feather. This will open the Gradient Feather dialog box. - Define the Gradient: Within the dialog box, you can define the gradient itself. This involves setting color stops and their positions. For a gradient from a color to transparent, you'll typically set your desired color as one stop and then adjust the opacity of the other stops to 0%.
- Control the Fade: The Gradient Feather tool allows you to draw a line on your object to define the direction and extent of the gradient. The point you click on and everything before it will remain opaque, and the line you draw dictates where the fade into transparency begins and ends. You can repeat this step, drawing the gradient line again, to refine the fade until it achieves the desired effect.
This technique is incredibly useful for blending elements seamlessly. For example, you can fade an image into the background color of your layout or soften the edges of a graphic element to make it less visually jarring.
Working with Gradients in the Swatches Panel
Beyond the Gradient Feather effect, InDesign also offers robust tools for creating and applying gradient fills directly through the Swatches panel. This allows for more complex gradients with multiple color stops.
To create a gradient fill:
- Open the Swatches Panel: Go to
Window > Color > Swatches. - Create a New Gradient Swatch: Click the "New Gradient Swatch" button at the bottom of the panel.
- Define Gradient Type: Choose between "Linear" and "Radial" gradients.
- Add Color Stops: The gradient bar displays color stops, which are essentially points where a specific color is applied. You can add new color stops by clicking below the gradient bar.
- Assign Colors: Select a color stop and then choose a color from the Swatches panel or the color bar. For transparency, you can apply the "Paper" swatch to a color stop, which effectively makes it transparent.
- Adjust Stop Location and Midpoints: You can drag color stops to change their position along the gradient bar, and adjust the midpoint between stops to control how abrupt or gradual the transition is.
- Reverse Gradient: The "Reverse Gradient" option flips the direction of the color gradations.
- Opacity Control: Crucially, you can specify the opacity between gradient points by selecting a color stop and adjusting its opacity using the slider.
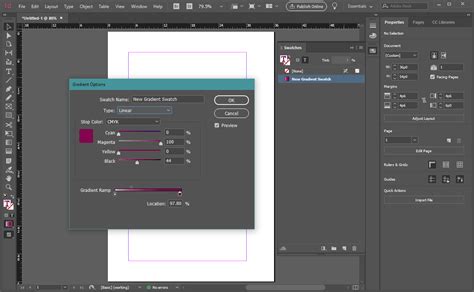
It's important to note that when working with gradients intended for print, it's best practice to specify them using CMYK colors to avoid unexpected shifts during the printing process.
Transparency and Text
Transparency effects can also be applied to text. You can control the opacity of the entire text frame or individual text elements. However, it's important to be aware that applying transparency effects to individual text characters or entire layers is not directly supported. When working with text, you can select the "Text" option in the Effects panel to apply opacity and blending modes specifically to the text content.
Applying a gradient to text can be achieved by converting the text to outlines first (Type > Create Outlines) and then applying a gradient fill to the resulting vector shapes. However, this means the text will no longer be editable as text. Alternatively, you can apply a gradient fill to the text frame and control its transparency.
Transparency and Print Production
When preparing documents with transparency for print, several considerations are vital:
- Overprinting: Transparency can interact with spot colors in complex ways. You can choose to turn on overprinting to control how these interactions occur. In Acrobat, you can enable "Simulate Overprint" for previewing, and at the RIP (Raster Image Processor) level, overprinting is handled during the final output.
- Resolution Settings: InDesign's transparency flattener settings determine how complex transparency effects are rendered into a format that printers can process. You can adjust settings for rasterization resolution (e.g., 72 dpi for screen, 144 dpi for PDF/EPS, or higher for specific print needs) to balance visual quality with file size.
- Previewing Transparency: Use the Overprint Preview feature (
Window > Output > Overprint Preview) to get an accurate representation of how transparency and overprinting will appear in the final output.
How to Make a Gradient in InDesign
Troubleshooting and Best Practices
- Conflicting Opacity Settings: If you select multiple objects with different opacity settings, InDesign might display conflicts. You may need to choose a dominant opacity setting or adjust them individually.
- Performance: Complex transparency effects can impact display performance. InDesign allows you to turn off the display of transparency effects in the document to improve screen redraw speed.
- Consistency: For consistent results, especially when exporting to PDF or EPS, ensure your transparency flattener settings are appropriately configured.
- Gradient Feather vs. Gradient Swatch: Understand when to use the Gradient Feather effect (for fading to transparency) versus a standard gradient swatch (for multi-color blends).
By mastering the transparent gradient tools within InDesign, you gain the ability to create visually dynamic and sophisticated designs. Whether you're a beginner exploring basic fades or an advanced user crafting intricate layered effects, these features offer a powerful pathway to professional-quality results.
tags: #transparent #gradient #in #indesign