The world of digital art and graphic design is constantly evolving, with new tools and techniques emerging to empower creators. Among these, the ability to create intricate and dynamic brush strokes is paramount. One such technique that has gained significant traction, particularly for its ability to generate detailed textures and patterns with a single stroke, is the creation and application of multiple line brushes in Adobe Photoshop. This guide delves into the intricacies of this powerful tool, exploring its creation, customization, and application, drawing upon the foundational principles and user experiences shared by those who have navigated this creative path.
Understanding the Core Concept: Beyond a Single Stroke
At its heart, a multiple line brush in Photoshop is not a single, monolithic entity but rather a composite effect. It leverages the program's sophisticated brush engine to simulate the appearance of multiple parallel lines or distinct textural elements appearing simultaneously as a single brush stroke. This is achieved through various mechanisms within Photoshop's brush settings, primarily the "Dual Brush" mode and the creation of custom brush tips from patterned artwork. The visual effect, as observed in tutorials, often involves a single circular brush instantly transforming into two overlapping brushes, suggesting a layered or combined application of brush tip shapes.
The user's observation of a "double brush" appearing from a single one points directly to the "Dual Brush" mode within Photoshop's brush settings. This mode allows for the combination of two distinct brush tip shapes to create a single, more complex brush. The primary brush tip forms the base of the stroke, while a secondary brush tip is applied within that stroke, creating an overlaid or integrated effect. The areas where both brushstrokes intersect are where the painting occurs, leading to unique textural outcomes. The size of the brush, and indeed the characteristics of both the primary and secondary tips, significantly influence the final shape and appearance of the brush marks.
Crafting Your Custom Multiple Line Brush: From Concept to Canvas
The journey to creating a custom multiple line brush often begins with a clear vision of the desired outcome. Whether aiming for a consistent pattern of parallel lines, a textured effect, or something more abstract, the process involves defining the individual elements that will form the brush.
Step 1: Designing the Brush Tip Element
A common and effective method for creating the foundational elements of a multiple line brush is to start with a new document in Photoshop. A square canvas, such as 2000x2000 pixels, is recommended to ensure sufficient resolution for creating a versatile brush that can be scaled without significant quality loss.
The initial artwork for the line brush can be created using Photoshop's shape tools, most notably the rectangle tool. For a multi-line effect, one would begin by setting the color to black (though grayscale is also permissible and offers more flexibility) and defining the shape layer. A thin rectangle can be drawn from the top of the document to the bottom. This initial line can then be positioned on the far left of the canvas. To create a multi-line brush, this rectangle is duplicated and placed a few pixels away, leaving a white gap. This process is repeated to build a series of parallel lines across a portion of the document. While it's possible to fill the entire document, creating around 100 or so lines and then repeating them is often a more efficient approach.

It's important to remember that Photoshop's brushes operate on a grayscale model. This means that not only black lines but also various shades of gray can be used to create the brush. Different widths of lines can also be incorporated, and even color variations can be introduced, although the direct color randomization seen in "color dynamics" is not inherent to custom shape-based brushes. To achieve variations in color quickly, keeping the swatches panel open and selecting grayscale colors can streamline the process of applying different shades to the rectangles before combining them.
Step 2: Assembling and Refining the Brush Tip Artwork
Once the individual line elements are created, they need to be combined into a cohesive unit that Photoshop can recognize as a brush tip. This involves selecting the rectangle layers and using Photoshop's layer menu commands. The "Combine Shapes" command, particularly "Unite," can merge these shapes into a single layer. However, it's crucial to note that using "Unite" will result in all lines adopting the same color. To preserve distinct colors within the composite shape, converting the combined shapes into a "Smart Object" via the layer menu is a preferred alternative, as it retains individual color information.
Further refinement can be achieved by duplicating the combined shapes multiple times, changing their fill colors, and arranging them to fill the entire document or to create multiple copies of the line artwork. Additional lines can be added with varying widths, opacities, and blending modes (such as "Difference") to introduce more complexity and unusual combinations. For a line brush, the primary focus is on the linear elements, but incorporating a few horizontal lines can also be beneficial for certain applications. Alternatively, a horizontal line brush can be created by drawing rectangles horizontally or by rotating a vertical design.
Layer styles can also be applied to the artwork for the lines, such as adding a shadow or a gradient overlay, to enhance their visual depth and character before defining them as a brush.
Step 3: Defining the Brush Preset
The final step in creating the custom brush is to "Define Brush Preset." This is done by flattening the layers of your artwork and then navigating to Edit > Define Brush Preset. This command captures the composite artwork as a new brush tip.
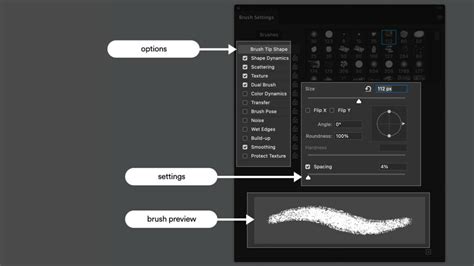
Once defined, this new brush tip can be accessed and further customized within the "Brush Settings" panel (Window > Brush). Here, a multitude of additional settings can be applied to control the brush stroke's behavior. These include:
- Shape Dynamics: Controls variations in size, angle, and roundness.
- Scattering: Distributes brush marks randomly.
- Texture: Applies a pattern to the brush stroke.
- Dual Brush: This is where the magic of combining two brush tips truly comes into play. You can select a secondary brush tip and adjust its size, spacing, and blending mode relative to the primary tip. The blending mode used to combine the brush and the pattern is critical here.
- Color Dynamics: Introduces variations in hue, saturation, and brightness.
- Transfer: Controls opacity and flow jitter.
- Other settings: Such as noise, wet edges, build-up, and smoothing, allow for even finer control over the brush's appearance and behavior.
The "Dual Brush" mode, specifically, allows for the combination of two brush tips. The second brush texture is applied within the brush stroke of the primary brush. Only the areas where both brushstrokes intersect are painted. Options for the primary tip are set in the "Brush Tip Shape" section, and then a secondary tip is chosen and configured. The blending mode used to combine the brush marks from the primary and dual tip is also a key setting. Parameters like the size of the dual tip, the distance between dual tip brush marks in a stroke, and the spacing interval of the tip diameter can be adjusted to fine-tune the effect.
Applying the Multiple Line Brush: Unleashing Creative Potential
Once your custom multiple line brush is created and configured, its application in Photoshop is straightforward. Select the Brush Tool (B), choose your newly created brush from the brush presets, and begin painting. The magic lies in how Photoshop renders the complex brush tip with each stroke.
The ability to alter numerous options for your brushâwhether it repeats itself, is pressure-sensitive to a pen tablet, scatters, or employs dual brush modeâoffers immense creative freedom. For instance, using a tablet or another pressure-sensitive device can introduce further dynamism, with the brush's behavior responding to the applied pressure. Some devices even support various functionalities based on the pressure on the pen, allowing for a more nuanced and expressive application of the multiple line brush.
Easy Floral Illustration Tips - Expressive Tulips - GLITCH Brushes with Soft WATERCOLOR Effect 😱
The "Dual Brush" mode, when used effectively, can create fascinating textures. For example, combining a hard round brush as the primary tip with a "grass" brush as the secondary tip, and then adjusting their blending modes and spacing, can result in strokes that appear to have a natural, textured edge or a dispersed pattern. The scale of the pattern, the depth variance of brush marks, and how the depth varies when "Texture Each Tip" is selected are all parameters that contribute to the final aesthetic.
The user's initial confusion stemmed from seeing a single brush instantly transform into two overlapping ones. This is precisely the visual manifestation of a well-configured dual brush or a brush tip created from a pattern that inherently suggests multiple lines. The key takeaway is that Photoshop's brush engine is incredibly flexible, allowing for the simulation of complex artistic tools and techniques through the combination of basic elements and advanced settings.
Beyond Dual Brush: Exploring Other Facets of Multi-Line Effects
While "Dual Brush" is a prominent feature for creating multi-line effects, other aspects of Photoshop's brush engine can contribute to similar outcomes.
Texture and Pattern Application
The "Texture" setting within the Brush Settings panel allows you to apply a pattern to your brush stroke. This pattern can be scaled and offset, and its blending mode can be controlled. When combined with a suitable brush tip shape, this can effectively create a multi-line appearance. For example, a pattern consisting of parallel lines applied to a simple circular brush can mimic a multi-line brush. The "Scale" of the pattern dictates how large or small the repeating elements appear within the brush stroke.
Brush Tip Shape Variations
The very nature of the brush tip shape itself can imply multiple lines. Instead of a single solid shape, a brush tip can be designed to consist of multiple elements. For instance, if you were to create a brush tip that is a series of dots arranged in a line, the resulting brush would appear as a dotted line. Similarly, a brush tip designed as a cluster of small shapes could, when painted, create a textured band that resembles multiple lines. The "Spacing" parameter in the "Brush Tip Shape" section of the Brush Settings panel is crucial here, as it determines the distance between each instance of the brush tip as you drag your cursor. Adjusting this spacing can transform a series of individual elements into a continuous or semi-continuous line.
Scatter and Jitter for Organic Multi-Line Effects
The "Scattering" and "Jitter" options can also contribute to multi-line effects, particularly when aiming for a more organic or stylized look. By scattering brush marks and introducing jitter in their position, size, or angle, you can create strokes that appear to be composed of multiple dispersed elements. This is less about precise parallel lines and more about a textured band of marks that collectively suggest a multi-line form. For instance, if you set the "maximum percentage of jitter" to a certain value, the brush marks will have a greater degree of randomness in their placement.
Considerations for Different Audiences and Applications
The creation and application of multiple line brushes in Photoshop can be approached with varying levels of complexity, catering to a wide range of users.
For beginners, understanding the "Dual Brush" mode and experimenting with pre-made brushes or simple custom brush creation (like a basic striped pattern) is a good starting point. Focusing on how the primary and secondary tips interact and how basic settings like size and spacing affect the outcome will build a solid foundation.
More advanced users can delve into creating intricate custom brush tips from scanned textures, complex vector artwork, or even photographic elements. They can leverage the full spectrum of brush settings, including advanced texture application, color dynamics, and transfer options, to create highly specialized brushes for specific artistic needs, such as creating realistic hair, intricate foliage, or unique decorative borders.
The ability to create custom brushes also means that these tools can be shared and utilized across different projects and by different artists. This fosters a collaborative environment and allows for the development of specialized brush libraries for various industries, from comic book art and illustration to graphic design and architectural visualization.
Advanced Techniques and Potential Pitfalls
While Photoshop's brush engine is powerful, there are nuances to consider. The performance of complex brushes can sometimes be affected by the user's hardware, especially when using very high-resolution brush tips or numerous scattering and jitter settings. It's also important to ensure that the artwork used for defining brushes is created with appropriate resolution to avoid pixelation when the brush is scaled up.
The concept of "pulling a GIF of it in use painting" highlights the dynamic nature of these brushes. Seeing them in action provides invaluable insight into their behavior and the subtle variations that can be achieved. The responsiveness of a brush to pen pressure, for example, is something that can only be truly appreciated when observed visually.
Finally, the user's mention of creating a brush by drawing a circle and positioning it on a square canvas, then using a three-finger swipe to bring up the copy and paste menu, points towards a workflow that might be more common in mobile art applications like Procreate. While Photoshop has its own robust methods for brush creation, understanding these cross-platform inspirations can broaden one's perspective on brush design. The core principle remains the same: defining a repeatable element and then controlling how it's rendered.
In essence, the multiple line brush in Photoshop is a testament to the software's depth and flexibility. By understanding the foundational tools like "Dual Brush" and the process of defining custom brush presets, artists can unlock a vast array of creative possibilities, transforming simple strokes into complex, textured, and dynamic artistic expressions.