The allure of light, wonder, and a touch of magic is a universal human fascination. Whether it's the ephemeral dance of fireflies on a country evening, the silent spectacle of shooting stars streaking across a wintry night sky, the explosive joy of fireworks on a summer holiday, or the whimsical charm of unicorns gracing a middle-school binder, these elements share a common thread: they all emit a luminous glow. Capturing this inherent radiance in digital art, particularly within Adobe Photoshop, can be a rewarding yet sometimes elusive endeavor. While Photoshop offers a vast array of tools and functionalities, there isn't a pre-built "sparkle" or "glitter" brush readily available. However, this absence presents an opportunity for creativity, allowing artists to forge their own unique tools. This comprehensive tutorial will guide you through the intricate process of creating custom Photoshop sparkle brushes from scratch, enabling you to infuse your images with flares, lights, and an atmospheric quality that breathes life and enchantment into your digital creations.
The Foundation of Photoshop Brushes: Understanding Grayscale and Opacity
Before diving into the practical steps of brush creation, it's essential to grasp the fundamental principles that govern how Photoshop defines brushes. Photoshop brushes are intrinsically based on grayscale values. This means that the use of color during the brush creation process is not only unnecessary but can be counterproductive. Instead, the magic lies in the interplay of black, white, and the myriad of gray tones in between.
The rules are straightforward yet powerful:
- White areas: These are rendered as completely transparent, meaning they have 0% opacity and will not be visible when the brush is applied.
- Black areas: These are rendered as fully opaque, possessing 100% visibility and thus maximum opacity.
- Tones of gray: These occupy the spectrum between pure white and pure black, oscillating between 2% and 99% opacity. The lighter the gray, the more transparent the brush stroke will appear, and the darker the gray, the more opaque it will be.
By manipulating these grayscale values, you can meticulously control the density, intensity, and overall form of your custom brush. This foundational understanding is crucial for designing brushes that produce the desired visual effects, from subtle glimmers to explosive bursts of light.
Crafting Your First Sparkle Brush: A Simple Star
To begin your journey into custom brush creation, we'll start with a foundational element: a simple star sparkle brush. This process involves creating a new document, defining the basic shape, and then converting it into a usable brush preset.
Initiate a New Document: Start by creating a new PSD file in Photoshop. For this initial brush, a canvas size of 200 pixels wide by 200 pixels high is sufficient. It's important to fill the background layer with white color. This is a critical step because, as established, white areas are invisible in brushes. By having a white background, you ensure that it will not become part of your brush definition, leaving only the intended design elements to be rendered.
Drawing the Basic Structure: Select the Line Tool from the toolbar. With the SHIFT key pressed down, draw a horizontal line across your canvas. Holding SHIFT ensures that the line is perfectly straight. Once drawn, you'll need to rasterize this line shape. Right-click on the line layer in the Layers panel and select "Rasterize Layer." If you created multiple line segments, you might need to merge them into a single layer.
Adding the Core Sparkle: Create a new layer above the rasterized line layer. With the Brush Tool selected, choose a soft round brush (hardness 0%). Set your foreground color to black. Carefully draw in the center of the sparkle shape, creating a small, dense point of black. This central point, combined with the surrounding lines, forms the basis of your first star sparkle.
Defining the Brush Preset: With your star shape complete on its layer, you can now define it as a brush preset. Navigate to the "Edit" menu at the top of the screen and select "Define Brush Preset." A dialog box will appear, prompting you to name your new brush. Type in a descriptive name, such as "Simple Star Sparkle," and click "OK." Your first custom sparkle brush is now created and ready to be used from the Brushes palette.
This initial brush, while simple, serves as a crucial building block. You can close out of this document as you no longer need it open, but your new brush is now permanently available in your Photoshop brush library.
Elevating the Sparkle: Creating More Detailed and Complex Brushes
Once you have a basic understanding of creating a simple brush, the next logical step is to build upon that foundation and create more intricate and visually appealing sparkle brushes. This involves layering shapes, utilizing layer styles, and combining different elements to achieve a richer effect.
Building on the Foundation: To create a more detailed sparkle brush, we can leverage the simple star brush we just created. The principle remains the same: design your desired shape on a grayscale canvas and then define it as a brush preset.
Incorporating Geometric Elements: Let's create a new PSD document (again, 200x200 pixels with a white background). Use the Ellipse Tool to draw a circle and center it precisely on your canvas. Now, reduce the "Fill" of this layer to 0%. This makes the circle itself invisible, but its properties will be retained for layer styles.
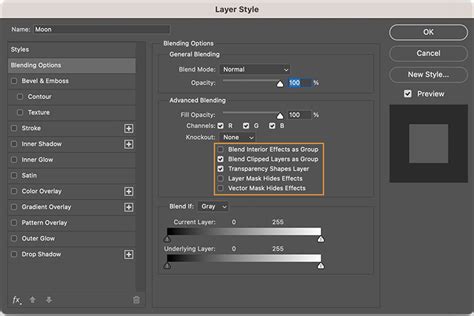
Applying Layer Styles: Open the Layer Style window for this circle layer (double-click on the layer or go to Layer > Layer Style). Apply the following styles:
- Outer Glow: This will create a luminous halo around the circle. Adjust the color, size, and spread to achieve the desired glow effect.
- Inner Glow: This will create a glow emanating from within the circle's edge, adding depth.
- Stroke: This will add a defined outline to the circle.
Adding Complexity and Variation: Duplicate the circle layer. Resize this duplicated layer to approximately 210% of its original size using the Free Transform tool (Ctrl+T or Cmd+T). Make subtle changes to the color of the layer styles on this larger circle. You can also introduce additional rays or elements by creating new shapes with varying sizes and opacities, or even incorporating other pre-existing light brushes. The key is to think about how these elements will translate into grayscale values when defining the brush.
Defining the New Brush: Once you are satisfied with the complex design, ensure all elements are on separate layers or grouped appropriately. Select the area you want to define as your brush (or ensure there are no stray white areas that would be part of the brush). Go to "Edit" > "Define Brush Preset" and name your new, more elaborate sparkle brush.
These more detailed brushes can be combined with your simpler ones to create dynamic and layered sparkle effects. For instance, you might use a large, soft glow brush as a base and then overlay smaller, sharper star brushes for added definition.
Applying Your Custom Sparkle Brushes: Beyond the Basics
With your custom sparkle brushes created and saved, the true artistry begins when you apply them to your images. This involves not just selecting the brush but also understanding how to adjust its settings for maximum impact and how to integrate it seamlessly into your overall design.
Transforming Images with Sparkle Trails
One of the most captivating uses of custom sparkle brushes is the creation of "sparkle trails," evocative streaks of light that suggest movement and magic. This technique is particularly effective for adding a touch of enchantment to photographs.
Prepare Your Image: Open the photograph you wish to enhance in Photoshop. Ensure it's on the "Background" layer and is in RGB Color mode, 8 Bits/Channel. For optimal results, aim for an image size between 2000â3000 pixels wide/high.
Create a New Layer for Sparkles: Add a new blank layer above your background image layer. Rename this layer to "Sparkles."
Set Your Foreground Color: Select the Brush Tool (B). To create visible sparkles, your foreground color needs to be white. If black is currently your foreground color, press the 'X' key on your keyboard to swap foreground and background colors, setting white as your foreground.
Select Your Custom Sparkle Brush: Open the Brushes palette. Scroll down to the bottom of the preset brushes list and select the custom sparkle brush you created earlier.
Adjust Brush Dynamics: This is where you fine-tune the brush's behavior. Click on "Shape Dynamics" in the left-hand panel of the Brushes palette.
- Size Jitter: Adjust this to create variation in the size of your sparkles as you paint.
- Control (Size Control): Set this to "Fade" and enter a value (e.g., 25). This will cause the brush stroke to gradually fade to zero size over the specified number of steps, creating a natural tapering effect for your sparkle trail.
Configure Scattering: Click on "Scattering" in the left-hand panel. Increase the "Scatter" and "Count" values to spread out the individual sparkle elements within the brush stroke, giving it a more dispersed and dynamic appearance.
Painting the Sparkle Trail: With your brush selected and settings configured, begin painting on the "Sparkles" layer. Click and drag your brush to create the trail. Use the left and right bracket keys ([ and ]) on your keyboard to resize the brush on the fly, allowing you to create trails of varying thickness and intensity. Imagine the direction and flow of the magical energy you want to depict.
Adding Glow and Depth: To enhance the sparkle trail, you can add a subtle blur effect. Duplicate the "Sparkles" layer (Ctrl+J or Cmd+J). Go to Filter > Blur > Gaussian Blur. Adjust the radius to achieve a soft glow around the sparkles. You can experiment with different blur values. To add color to this glow, double-click the duplicated layer to open the Layer Style dialog and select "Outer Glow." Choose a color for your glow and adjust its opacity to control the intensity.
MAGIC Trails Effect in Photoshop!
Adding Color and Dynamic Effects to Sparkles
While brushes are defined by grayscale, the final application of these brushes in your artwork allows for vibrant color and dynamic effects.
Coloring Sparkles: To add color to your sparkle brushes, you have a couple of excellent options.
- Hue/Saturation Adjustment: You can apply a Hue/Saturation adjustment layer, ensuring "Colorize" is checked. This allows you to tint your white or gray brush strokes with any color you desire.
- Gradient Fill Layers: A more sophisticated and often more visually appealing method is to use a Gradient Fill layer. Click the "Create new fill or adjustment layer" button in the Layers panel and choose "Gradient Fill." This allows you to apply complex Photoshop gradients, creating multi-tonal and iridescent sparkle effects. You can then clip this gradient layer to your sparkle layer (Ctrl+Alt+G or Cmd+Option+G) to confine the color to the brush strokes.
Creating Bokeh Effects: Sparkles often work in conjunction with bokeh, the aesthetic quality of the blur produced in the out-of-focus parts of an image. You can create a bokeh effect by taking a focused image, duplicating it, and applying a significant Gaussian Blur to the duplicate. Then, using a selection tool, isolate areas where you want the bokeh to appear and apply a layer mask. This creates soft, luminous circles of light that complement your sparkle effects.
Utilizing Actions for Efficiency: For repetitive tasks or to achieve specific pre-defined looks, Photoshop Actions can be invaluable. You can record a series of steps, such as creating a brush, applying specific layer styles, and adjusting blending modes, into an action. This allows you to apply a complex sparkle effect to any image with a single click. There are many pre-made sparkle overlay actions available that can provide amazing results in seconds, offering different styles of sparkles, from realistic to more stylized.
Advanced Techniques and Creative Exploration
The journey of creating Photoshop brushes extends beyond simple stars and trails. Advanced users can delve into more complex techniques to generate unique and dynamic effects.
Noise and Filter Galley Approaches: For a more organic and randomized sparkle appearance, consider starting with a black canvas and applying noise. Go to Filter > Noise > Add Noise. You can then experiment with various filter gallery effects, such as "Watercolor," to break down the noise into interesting patterns. Duplicating these layers and applying different blurs (Gaussian Blur and Motion Blur at opposing angles) can create a subtle, shimmering texture that can be defined as a brush. The "Screen" blending mode is often effective for combining these noisy layers, as it makes black transparent and allows lighter pixels to show through.
Combining and Flattening for Brush Definition: When creating complex brushes from multiple layers, it's often necessary to group or flatten them to define the final brush preset. Ensure that your design elements are arranged in a way that represents the desired brush shape. Remember that only the opaque (black and dark gray) areas will be part of the brush. Flattening the image or selected layers can consolidate these elements into a single layer that can then be used with "Define Brush Preset."
Fine-Tuning Brush Settings: The true power of custom brushes lies in the extensive settings available in the Brushes palette. Beyond Shape Dynamics and Scattering, explore:
- Brush Tip Shape: Adjust spacing to control how close together individual brush marks appear.
- Dual Brush: Combine two brush tips for more complex textures.
- Color Dynamics: While brushes are defined by grayscale, Color Dynamics allows you to introduce variations in hue, saturation, and brightness within a single brush stroke, adding life and realism.
- Transfer: Control opacity and flow jitter for more organic stroke variations.
Beyond Static Sparkles: Animated GIFs: Sparkles inherently suggest movement. For truly dynamic visuals, consider creating animated GIFs. This involves creating multiple frames of your sparkle effect, perhaps with subtle shifts in position, size, or color, and then exporting them as an animated GIF. This is particularly effective for web design or social media content.
Exploring Thematic Brush Sets: The concept of custom brushes extends to various thematic elements. If you're interested in creating more than just sparkles, consider exploring other light effects like "real sparks" or "glows." The principles of grayscale design and brush definition remain consistent, allowing you to build a comprehensive toolkit for digital illustration.
The Art of Light and Illusion
Creating custom sparkle brushes in Photoshop is more than just a technical process; it's an exploration of light, magic, and artistic expression. By understanding the fundamental principles of grayscale, leveraging Photoshop's powerful tools, and dedicating time to creative experimentation, you can craft brushes that elevate your artwork from the ordinary to the extraordinary. These custom tools empower you to add that intangible glow, that sense of wonder, and that touch of magic that can transform a simple image into a captivating visual narrative. Whether you're aiming for subtle atmospheric enhancements or dramatic, eye-catching effects, the ability to create your own sparkle brushes opens up a universe of creative possibilities.