Creating a dynamic particle explosion in Photoshop is an effect that can add significant visual impact to your designs, from abstract art to motion graphics elements. This tutorial will guide you through the process, breaking down the techniques to achieve a convincing and visually striking explosion of particles. We'll explore how to leverage custom brushes, layer masks, displacement maps, and color adjustments to build a complex effect from relatively simple components. The beauty of this method lies in its flexibility, allowing for easy adjustments and even adaptation for animated sequences.
Setting the Stage: Document and Initial Elements
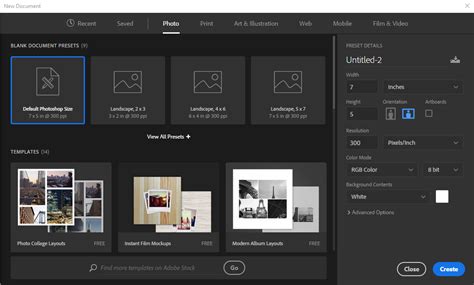
To begin crafting your particle explosion, the first step involves setting up the digital canvas. Open Adobe Photoshop and create a new document. For this tutorial, a canvas size of 2400 pixels by 1200 pixels at a resolution of 300 DPI is recommended. This generous size provides ample room for detail and subsequent scaling. Once the document is created, set the background color to a deep, dark shade by inputting the hex code #191919. This dark backdrop will make the subsequent bright particles and effects pop with greater intensity.
To ensure you're working with default color settings, press the 'D' key on your keyboard. This action will reset your foreground and background colors to their default values, which are black and white, respectively. This is crucial for the next steps involving brushwork.
Introducing the Particles: Custom Brushes and Placement
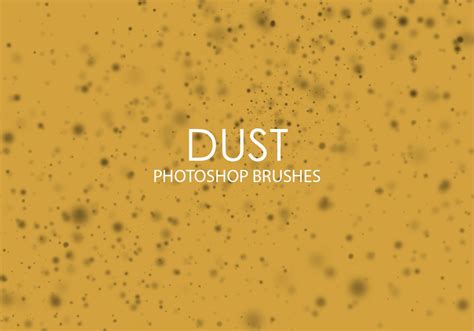
The core of our explosion effect will be composed of particles. Photoshop's brush engine is incredibly powerful, and for this tutorial, we will be utilizing a specialized brush set. You will need to download the "Dust Particles" brush set, which is provided for free. Once downloaded, load these brushes into your brush palette within Photoshop.
With the Dust Particle brushes loaded, create a new layer above your background layer. Select a white brush from your loaded set. Begin by clicking around the central area of your canvas, strategically placing some of these dust particles. The design of this brush set makes this initial step remarkably straightforward, allowing you to quickly populate your canvas with the foundational elements of the explosion.
Text Integration and Initial Lighting
For those looking to integrate text into the explosion, now is the time. Type out your desired text onto a new layer. Once your text is in place, you'll want to prepare it for further manipulation. Right-click on the text layer in the Layers palette and select "Rasterize Type" from the dropdown menu. This converts the editable text into pixels, allowing for more complex filtering and blending.
Following the rasterization of your text, create a new layer and position it directly below your text layer. Select a large, soft white brush. Set its opacity to a low value, around 10-20%. Using this brush, gently paint a subtle glow or light source behind the text. This will help to integrate the text into the explosion effect and give it a sense of emanating light.
Crafting the Displacement Map: Simulating Fluidity
To achieve a realistic, organic explosion, we'll employ a displacement map. This technique uses one image to distort another, mimicking how forces might warp or stretch elements in an explosion.
First, open a water ripple photograph into Photoshop. This image will serve as our displacement map. Navigate to Image > Mode > Grayscale to convert the photo into black and white. This is essential as displacement maps work by interpreting luminance values.
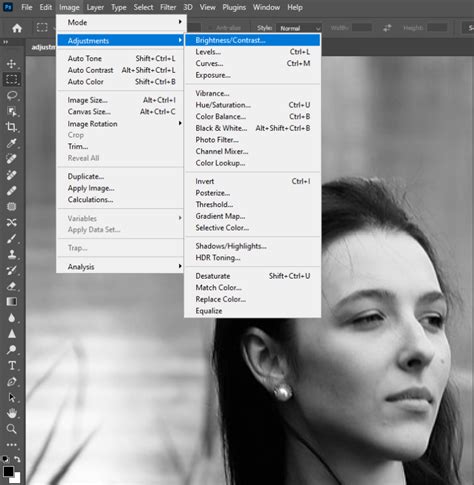
Next, increase the contrast of this grayscale image. Go to Image > Adjustments > Levels. In the Levels adjustment dialog box, you'll see a histogram representing the tonal range of your image. To boost the contrast, slide the black point (dark point) slider inwards from the left and the white point (light point) slider inwards from the right, moving them closer to the center of the curve. This will create sharper distinctions between light and dark areas, which will translate into more pronounced distortion when applied. Save this modified image as your displacement map.
Building the "Balloon" and Initial Distortion
Now, let's create the central form that will appear to be expanding or exploding. Open a photograph of a hand into Photoshop. Create a new layer and name it "balloon," placing it above your background layer. Using either the Elliptical Marquee Tool or the Lasso Tool, create a circular selection on the hand, roughly where a balloon might be held.
To make this circle fit the context of the hand, you can use the Pen Tool to trace around the hand, creating a path. Once the path is complete, right-click on the path and select "Make Selection" to convert the path into a selection. You can then refine this selection to ensure the circle element is neatly positioned within the hand's grip.
Create a new layer and change its blending mode to "Soft Light." This layer will be used to paint highlights and shadows to give the "balloon" form depth. After this, merge the highlights/shadows layer with the "balloon" layer. Duplicate this merged layer by pressing Ctrl+J (Windows) or Command+J (Mac) and then hide the duplicate layer for now.
With the original "balloon" layer active, apply the Displace filter. Go to Filter > Distort > Displace. In the Displace dialog box, set both the Horizontal Scale and Vertical Scale to 50. Click OK. You will then be prompted to locate your saved displacement map (the water ripple image). Select it and click OK. This will distort the "balloon" layer based on the water ripple's patterns.
Beginners' Guide to Photoshop Displacement Maps!
Refining the Explosion: Rotation and Secondary Distortion
The "balloon" layer has now been distorted. To add to the dynamism, we'll rotate it. Select the Free Transform Tool by pressing Ctrl+T (Windows) or Command+T (Mac). In the options bar at the top of the screen, set the angle to -90 degrees. Click the checkmark to commit the transformation.
Now, unhide the duplicate "balloon" layer that we previously saved. With this duplicate layer active, apply the Displace filter again, following the same steps: Filter > Distort > Displace. This time, set both the Horizontal Scale and Vertical Scale to a larger value, such as 250. Locate and select your displacement map again. This larger displacement value will create a more extreme distortion, contributing to the explosive feel.
Finally, use a layer mask on this second, highly distorted "balloon" layer. Select the layer mask thumbnail in the Layers palette. Using a soft black brush, paint over the areas of the mask where you want to remove parts of the distorted balloon. This allows you to selectively reveal the underlying layers and refine the shape of the explosion, removing any unwanted artifacts and shaping the outward burst.
Advanced Techniques: Clouds and Abstraction
Beyond particle placement and displacement, other methods can contribute to a complex explosion effect. One approach involves creating abstract cloud-like forms.
Open a new, blank document. Set the foreground color to black and the background color to white. Select the Brush Tool. Begin by painting a random shape with red as your foreground color. Then, change your foreground color to white and paint some white shapes within or around the red form.
Now, apply a blur to this image. Go to Filter > Blur > Gaussian Blur. The radius will depend on the size of your canvas and the desired effect, but experiment with values that soften the edges considerably.
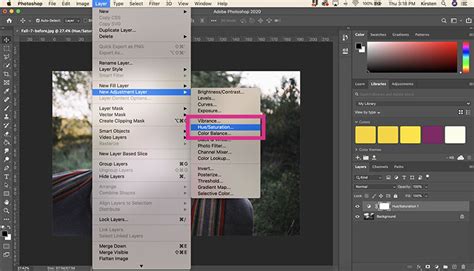
Next, adjust the color. Select the Hue/Saturation adjustment layer from the Layers palette. You can also use the shortcut Ctrl+Alt+G (Windows) or Command+Option+G (Mac) if you are using Photoshop CS2 to create a clipping mask for this adjustment, ensuring it only affects the layer below. Within the Hue/Saturation dialog, you can adjust the Hue, Saturation, and Lightness sliders to achieve a wide range of colors for your explosion elements.
To further enhance the chaotic and explosive nature, you can apply the "Wind" filter. Go to Filter > Stylize > Wind. Experiment with different directions, such as "From the Left" or "From the Right." To create a more intense wind effect, you can duplicate the layer (Ctrl+J or Command+J) and apply the Wind filter again. Then, merge the duplicated layer with the original (Ctrl+E or Command+E).
For creating a full circular effect, you can copy the current layer (Ctrl+J or Command+J), then merge the copied layer with the original (Ctrl+E or Command+E). This can help in creating radial patterns.
Layering and Color Grading for Impact
The power of Photoshop lies in its layering capabilities. To create a rich and complex explosion, you can combine various elements and effects. For instance, you might create a background layer filled with a radial gradient, ranging from dark to lighter shades, to give the impression of an expanding light source.
Consider using the "Render Clouds" filter (Filter > Render > Clouds) on a new layer, then applying a Hue/Saturation adjustment to colorize these clouds. This can create wispy, ethereal elements that complement the sharper particle effects.
To achieve a specific look, you might need to experiment with multiple adjustment layers. For example, a Levels adjustment layer can be used to fine-tune the overall contrast and brightness of your explosion. Dragging the sliders to the left or right will dramatically alter the tonal range.
Beginners' Guide to Photoshop Displacement Maps!
Preparing for Animation: Frames and Sequence
The techniques discussed are not only suitable for static images but can also be the foundation for animated explosion effects, particularly within Adobe ImageReady or Photoshop's timeline features. If you intend to animate your explosion, it's beneficial to think in terms of frames.
You can save individual elements or stages of your explosion as separate files, perhaps numbered sequentially (e.g., 01, 02, 03…). These can then be imported into the timeline as frames. For example, if you have a series of cloud renders or particle bursts, each can be a frame in your animation.
When preparing files for animation, ensure consistent dimensions and resolution. You might export different versions of your explosion effect with slight variations in color, opacity, or particle density to create a sense of movement and evolution over time.
Final Touches and Creative Exploration
The beauty of creating a particle explosion effect in Photoshop is the sheer amount of creative freedom it offers. Don't be afraid to experiment with different brush types, blending modes, and filter combinations. For instance, using a "Difference" blending mode with a colored layer over your explosion can create interesting chromatic aberration effects.
You can also use the Liquify filter (Filter > Liquify) to further warp and distort elements, adding a more organic, fluid quality to the explosion. The key is to build up layers of detail and complexity, gradually refining the overall composition. Remember to save your work frequently and consider saving different versions as you progress, allowing you to backtrack if a particular effect doesn't turn out as expected. The last example to get the effect that I wanted, sure that the last effect you used was Render/Clouds, that was used, separate file, the numbers should be 09,10,11, etc. as Frames… files as frames. Again, like always; have fun!
This comprehensive approach, from basic document setup and brushwork to advanced distortion and color grading, empowers you to create truly captivating particle explosion effects in Photoshop. The adaptability of these techniques means you can tailor the explosion to perfectly suit your project's needs, whether it's a subtle burst of energy or a cataclysmic event.