Editing your photography with vintage effects can add a unique touch to your work, infusing modern images with a sense of nostalgia and timelessness. The vintage aesthetic adds a nostalgic vibe to contemporary photos by using digital filters to give them an antique look and feel. These effects are now trendy because of the nostalgic look and sense of timelessness they bring to photos. Great retro effects can make modern photos feel like they’re from a whole different time period by conjuring up a mood, setting a tone, or evoking different emotions. This post will guide you through creating vintage Photoshop actions, a powerful tool for both efficiency and stylistic consistency in your photo editing workflow. By mastering these techniques, you can take your photo editing skills to the next level.
Understanding Photoshop Actions for Vintage Effects
Let’s be honest - photo editing can be a tedious process, especially if you have dozens of photos to edit at once. Photoshop actions work by recording all of the steps you take to edit your photos. These actions will not only save you time but will keep your photos looking consistent in your desired vintage aesthetic. You can use them to batch edit your photos easily and quickly.
The Anatomy of a Vintage Aesthetic
The term vintage photography covers a range of photographic styles that includes film photography, tintypes, black-and-white images, and more. A vintage aesthetic is when you take a modern digital photo and give it an aged look and feel. When it comes to vintage photography, there’s no single approach.
- Black and White Conversion: A simple way to give your photos an antique look is to transfer them into black and white. Since camera film was initially available only in black and white, this automatically gives your photo a retro vibe.
- Sepia Toning: The soft, reddish-brown tint you see in vintage photos is called sepia. The effect is a result of an older developing process for black-and-white film that helped prevent photo decay.
- Tintypes: One of the oldest kinds of photography, tintypes are made from thin sheets of metal coated in photosensitive chemicals and developed in a darkroom. These plates produce distinct black-and-white images with a darkening vignette around the edges and a metallic tint.
- Polaroid Charm: Polaroid cameras capture and print photos very quickly with special film. Originally popular in the 1970s, these instant photos have a distinctive white border. Since the camera has fewer settings to adjust, the photographer has less control over the aperture, shutter speed, and depth of field. This gives photos a more spontaneous, less-perfect feel.
- Imperfections and Randomness: Photo scans and prints weren’t always as perfect as they typically are now. Whether it was camera scanning or tracking errors - or even degraded film that wasn’t shot or developed properly - old-school photographs used to have an element of visual randomness to them with scratches and imperfections.
Creating Your Own Vintage Photoshop Action: A Step-by-Step Guide
We are going to start by recording our editing actions to create a vintage effect. Be sure to have your Actions window open.
Setting Up Your Action
- Create a New Action Folder: We are going to create our own new folder by clicking the folder icon below in the Actions window. This is the 4th icon from the left at the bottom. This brings up a window where we are going to name our new set. I am going to name this set “vintage effect”.
- Start Recording: Now we are going to start recording our steps. Click the new icon (it’s in between the folder we just worked with and the trash can icon). Let’s name our new action - “adjustments” and press record.
Applying Vintage Adjustments
With our record button still on, let’s begin applying the adjustments that will give our photo a vintage feel.
- Add Noise: Go to Filter, Noise, Add Noise. Set it to 13% with uniform distribution selected. This mimics the grain found in older film photography.
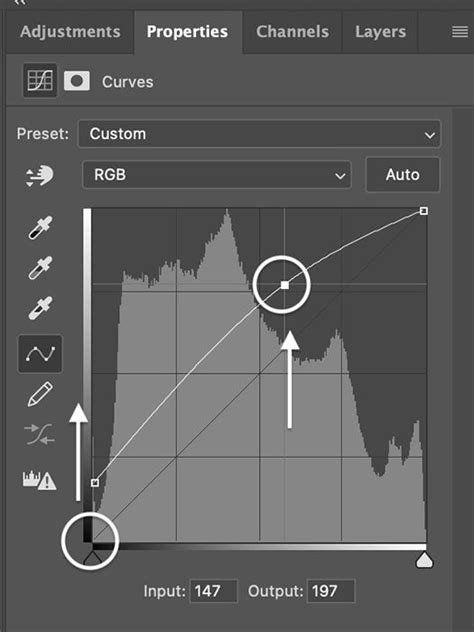
- Curves Adjustment: Next, let’s add our first adjustment layer: Curves. Move the bottom curve up slightly, and make an “S” curve like the example provided. This helps to adjust the tonal range and add a specific mood.
- Saturation Adjustment: Our next adjustment layer is Saturation. Set the saturation to -45. This desaturation is characteristic of older prints where colors tended to be less vibrant.
- Color Balance: Our final adjustment layer will be Color Balance. You can play around with each adjustment layer to reach your own unique vintage look you want for your own photos. These are simply suggestions.
Saving and Stopping the Action
When you are done with your photo edits (with the record button still on), you can optionally save your photo in your desired photo format if you want Photoshop to save your photos when it’s finished with these actions. This is useful if you want to batch edit your photos later on.
When you are finished with each step, be sure to press the stop button. If you need to add more steps, you can always go back, delete the step where you saved the file (if you included it) and press the record button again.
Here is what your steps should look like before you click stop:

Utilizing Your Vintage Photoshop Actions
Now you are ready to use your Photoshop actions! You can either batch edit or use these actions to edit one photo at a time.
Batch Editing with Actions
If you want to use your vintage Photoshop actions to batch edit, go to File, Automate, Batch. Be sure to create a folder on your computer of the photo files you want edited along with a separate folder for the finished photos. Congrats! You did it! You are on your way to creating your own vintage Photoshop actions you can use over and over again.
Photoshop Tutorial: How to do BATCH PROCESSING
Alternative Vintage Effect Techniques
While actions are powerful, Photoshop offers several other methods to achieve vintage looks, providing more flexibility and control.
Method 1: Black and White, Sepia, and Grain
This method focuses on core elements that define many vintage photographs.
- Black and White Conversion: First, translate the photo into black and white using a Black & White Image Adjustment layer. Experiment with different presets or adjust the color sliders within each preset to tweak the appearance of your photo.
- Brightness/Contrast: Add another Image Adjustment Layer to your image and choose the Brightness/Contrast setting. This allows for subtle tonal adjustments.
- Photo Filter: Add another Image Adjustment Layer and select Photo Filter. This allows you to apply a vintage color wash, such as sepia, which gives the image a warm, reddish-brown look.
- Add Noise: Add noise to the image to give it an authentic vintage feel. Click Filter, and then choose Noise from the drop-down menu. Noise gives your photo a texture reminiscent of film grain.
- Inner Shadow (Optional): Click on your pixel layer, then go to Effects and select Inner Shadow from the drop-down list. This can sometimes help to add a subtle depth or vignette.
- Clone Stamp Tool (Advanced): Use the Clone Stamp tool to remove or retouch any modern elements of the image that would disturb the vintage aesthetic. This is useful for more precise manipulation.
Method 2: Mimicking Faded Colors and Contrast Shifts
Color trends change and vary. If you want to create a photo that looks like it’s from the 1950s, the colors will look different from one taken in the 1990s.
- Levels Adjustment: Lessen, or flatten out, the contrast in your image by creating a new Image Adjustment Layer and opening the Levels tool.
- Brightness/Contrast Flattening: Flatten the image even more by creating a new Image Adjustment Layer for Brightness/Contrast.
- Curves for Vibrance: The vibrance in old photo prints changes and fades over time. To recreate this effect, open up the Curves tool from the Image Adjustment Layer drop-down menu and move the sliders to explore different effects. You can also adjust the Hue, Saturation, and Color Balance tools. Since every photo is different, there’s no one-size-fits-all filter.
- Final Noise Application: Give your photo a final vintage touch by adding visual noise. Click Filter and choose Noise from the drop-down options.
Method 3: Detailed Step-by-Step Vintage Effect
This method provides a more granular approach to building a vintage look.
Step 1: Open Your Photo in PhotoshopYou can use any photo that you want to give the retro effect to. Open the photo in Photoshop by choosing File > Open (Ctrl/Command + O) and then searching for the photo in your computer’s hard drive.
Step 2: Add a Curves Adjustment LayerWe’ll alter the tones of the image by using a Curves adjustment layer. At the bottom of the Layers panel, click on the Create a new fill or layer adjustment button (which looks like a circle that’s half filled with gray and half filled with white) and then choose Curves in the menu that appears.
- In the Adjustments panel, change the drop-down menu to the Red channel and modify the curve by clicking-and-dragging it.
- Switch to the Green channel and then adjust the curve.
- Finally, switch to the Blue channel and change the curve again.
Our work’s looking pretty good so far, and we’re only getting started. Let’s keep going.
Step 3: Add a Gradient Map Adjustment LayerNow we’ll add another adjustment layer: a Gradient Map adjustment layer. Click on the Create a new fill or layer adjustment button at the bottom of the Layers panel again, but this time, choose Gradient Map.
- In the Adjustments panel, click on the gradient to open the Gradient Editor. Change the color of the gradient as shown in the image.
- Afterwards, in the Layers panel, double-click on the Gradient Map adjustment layer to open the Layer Styles dialog window. Change the Blend Mode option to Soft Light and set the Opacity to 30%.
Step 4: Add a Light LeakNow we’re going to add a light leak that happens when an old and worn camera gets a hole in its body, thereby letting light get into the camera and affecting the exposure of the photo. It’s a nice detail to give to our retro photo.
- In the Tools panel, set your Foreground Color to a red color (#fc2c2c). Click on the Gradient Tool (G) and, in the Options bar at the top of Photoshop’s interface, click on the gradient to open the Gradient Editor window. In the Gradient Editor window, choose the Foreground to Transparent Preset.
- Now we need a new layer for the gradient we’re about to draw, so go ahead and create a new layer on top of the other layers.
- With your Gradient Tool ready to go, draw a gradient on the new layer. The gradient should start at the left edge of your photo and end a few pixels to its right.
- After that, change the Blend Mode of the layer to Screen.
Step 5: Add a Film Edge BurnLet’s add a film edge burn effect which will give our photo a worn-out characteristic.
- To make this easier, first turn off the visibility of the Curves adjustment layer, Gradient Map Layer, and the light leak layer by clicking on the Eye icon at the left of the layer. The only layer that should be visible is the layer with our original image in it.
- Next, click on the layer with the original image in it to make sure it’s the active layer, and then enter Quick Mask mode by pressing Q on the keyboard. Invert the Quick Mask by going to Image > Adjustments > Invert.
- Set the Foreground Color to white (#ffffff). Switch to the Brush Tool (B). In the Options bar, use a big, soft brush, set the Hardness to 0%, and set the Flow to around 50-60%.
- Paint over the places where you want your film edge burns to show up. For me, I wanted them in the lower and upper right corners of the photo.
- When you’re done, press Q again to exit out of Quick Mask mode. You should have marquee selections around the places where you want the edge burns to appear.
- Add a new Curves adjustment layer and alter the curves of the Red, Green, and Blue channels using the provided reference.
- Turn on the visibility of all the other layers to see our current progress. As you can see, the Curves adjustment only affects the areas we selected.
Step 6: Add ImperfectionsWhat’s neat about retro photos are the unexpected imperfections they have because of light leaks, overexposure, and age. Currently, our work still looks too perfect, so we need to introduce some artificial imperfections to it.
- Create a new layer on top of all the layers. We need to fill the new layer with a purple color. To do that, change your Foreground Color to purple (#510487) and go to Edit > Fill.
- Afterwards, change the Blend Mode of the layer to Screen and set the Opacity to about 50% to tone down the vibrant colors of our photo just a tad bit, giving it a more faded look.
- Create another new layer on top of all the other layers. In the new layer, use the Brush Tool (B) to dab a white spot on the subject’s face using a soft brush.
- Change the Blend Mode of the layer to Soft Light. The effect not only highlights the photo subject’s face but also mimics an overexposure often made by old analog cameras.
Step 7: Add a Grainy EffectWe’re almost there. This is the final step. To reinforce the age of the photo, we’ll give it a slight grainy effect.
- Create a new layer on top of all the other layers, fill it with black (#000000), and then give the layer a Noise filter effect by going to Filter > Noise > Add Noise.
- We need to soften the noise a bit, so go to Filter > Blur > Gaussian Blur, set the Radius to 1px and then apply the filter.
- Set the Blend Mode of the noise layer to Screen and Opacity to about 40%.
Using the Camera Raw Filter for Vintage Effects
Learn how to easily create an old, vintage photo effect with Photoshop and its powerful Camera Raw Filter. To create the "old photo" effect, we'll start by turning our original color image into black and white, and then we'll add a sepia tone for an old-fashioned look. We'll add grain and a vignette effect, and we'll make the image look like it has faded over time by toning down the highlights, lightening the shadows, and reducing contrast in the midtones. To keep the "old photo" effect non-destructive, it's best to apply the Camera Raw Filter as a smart filter. This will keep the effect separate from the image itself so you're not making any permanent changes.
- Convert to Smart Object: To apply the Camera Raw Filter as a smart filter, first convert the Background layer into a smart object.
- Open Camera Raw Filter: Go to Filter > Camera Raw Filter.
- Basic Adjustments: In the Basic panel, you can make initial adjustments. For a vintage look, you'll often want to reduce contrast.
- Highlights: Lower the Highlights value by dragging the slider to the left to tone down highlights.
- Shadows: Lighten the shadows by dragging the Shadows slider to the right.
- Clarity: Reduce the Clarity slider to the left to decrease midtone contrast.
- Black and White Conversion (within Camera Raw): While in Camera Raw, you can convert to black and white. Use the color sliders (Reds, Oranges, Yellows, Greens, etc.) to lighten or darken specific tonal areas, mimicking how different colors would render in monochrome film.
- Split Toning for Sepia: With the Split Toning panel, add a sepia tone using the Hue and Saturation options.
- For the Highlights, set the Hue to an orange-yellow (around 40) and increase Saturation (around 20).
- Adjust the shadows similarly for a balanced sepia effect.
- Effects Panel for Grain and Vignette:
- Grain: In the Grain section, adjust the Amount, Size, and Roughness sliders to achieve the desired film grain.
- Vignette: In the Post Crop Vignetting section, drag the Amount slider to the right to lighten the corners, simulating the fading often seen in older prints.
- Apply and Review: Click OK to apply the Camera Raw Filter. You can then double-click the smart filter in the Layers panel to make further adjustments.
Cross-Processing with Curves for Vintage Washes
Vintage fades and washes have recently become quite popular. Perhaps since modern DSLRs, mirrorless cameras, and even smartphones can capture such high-quality, color-neutral images, there’s more of a desire to reach toward the past with these vintage effects. Regardless of the reason you want to add a vintage effect to your images, it’s a relatively easy look to achieve.
In vintage photos, colors fade over time. The first color to typically begin fading is usually the blues in the highlights of the image. Because of this, the reds and greens of an image become more prevalent in the highlights. However, the reds and greens fade in the shadows, thus revealing more of the blues in the darker portions of vintage photos. In other words, for a vintage effect, you want to remove blues in the highlights, while removing the reds and greens in the shadows (and vice versa). This process is exactly what we are going to mimic in Photoshop using Curves.
- Select an Image: Pick an image that will look nice when given the vintage treatment. It might make sense to work with a photo that contains relatively timeless subjects. Make sure your image is already color-corrected.
- Red Channel Adjustments:
- Add a Curves adjustment layer.
- In the Red channel, add a point on the line near the highlights (around three-fourths of the way into the graph) and drag the curve upward.
- Add another point near the shadows (around one-fourth of the way into the graph) and drag downward. The amount you drag the curve will depend on the intensity of the effect you want.
- Green Channel Adjustments: Do the exact same thing with the Green channel. You might want to inflate the reds slightly more than the greens.
- Blue Channel Adjustments (Implied): By pulling up the shadows and down the highlights in the Red and Green channels, you indirectly influence the Blue channel. This process effectively makes the highlights warmer (more yellow) and brings out blues in the shadows.
- Review and Adjust Opacity: Compare the edited version to the original. If the effect is too strong, you can simply drop the opacity on your Curves adjustment layer.
Exploring Pre-Made Vintage Photoshop Actions
If you’d like to use pre-made vintage Photoshop actions, here are some great ones that are already created for you:
- Creative Supplies Co.: This Photoshop effect set adds beautiful sepia and faded color tones to your photos. It includes several filters along with vintage and gradient overlays.
- Forefathers: Inspired by the 1950’s soda shops and pharmacies, this Photoshop action set includes 6 different action flavors to take your photos back in time.
- CANofART: This action set is inspired by Andy Warhol’s pop art screen printings of Marilyn Monroe.
- FilterGrade: This set includes 25 natural film Photoshop actions, 10 faded pastel tones, and realistic grain & noise filters that will make your photos shine with natural vintage tones.
- MustaART: This Photoshop action adds a vintage effect along with a beautiful light leak that brings you back to the old analog days.
- PhotoSpirit (Antique Artwork): These photo effect overlays are ideal for turning your photos into antique artwork.
- PhotoSpirit (1920s/1930s Inspired): This photo effect was inspired by the 1920’s and 1930’s. These Photoshop actions create a vintage effect with muted color accents. These colorized effects mimic a vintage hand-retoucher.
Designing your own brand? A fun, friendly, FREE guide to build a stellar brand identity. We design templates to empower entrepreneurs to create something beautiful. Reach out if you have any questions - we're happy to hear from you!