VSCO has emerged as a dominant force in the mobile photography and editing landscape, offering users a powerful yet intuitive platform to transform their images. For those looking to elevate their photographic vision, understanding how to effectively utilize VSCO's extensive filter library and integrate it with professional tools like Adobe Lightroom is paramount. This guide will navigate you through the VSCO app, its editing capabilities, and how to leverage its presets and features, including advanced film emulation techniques, to achieve stunning visual results.

Understanding the VSCO Ecosystem
The VSCO app is structured to facilitate a seamless creative workflow, from discovery and editing to community engagement. Zach Hodges, a seasoned user, breaks down the core components:
- Home: This serves as your personalized feed, showcasing images from the VSCO community members you follow. It’s a curated stream of inspiration and a window into the creative styles of others.
- Discover: This section is a hub for creative exploration. Here, you can find inspiring content, creative prompts to spark your imagination, and a robust search function to find specific users, styles, or themes.
- Studio: This is your private digital workspace. Within the Studio, you can import, organize, and edit your photos and videos without them being publicly visible. It’s a crucial area for drafting and refining your work before sharing.
- AI Lab: This innovative section houses VSCO’s artificial intelligence-powered tools. Features like object removal, AI-assisted editing with text prompts, and image upscaling are designed to enhance efficiency and creative possibilities.
- Profile: Your Profile is your public-facing presence on VSCO. It displays your published work, allows for personal detail updates, and enables the creation and management of your VSCO Site, offering a dedicated online portfolio.
- Spaces: This feature allows users to join or create collaborative groups centered around specific interests or themes, fostering community and shared creative endeavors.
Beyond these main sections, a side menu provides access to activity notifications, direct messages, favorited images, follower/following lists, and essential account and privacy settings. From this menu, you can also launch VSCO Canvas, a moodboarding tool, and VSCO Capture, the app's dedicated camera application.
Importing and Editing Your First Photo in VSCO
The journey to editing begins with importing your chosen image into the VSCO Studio.
- Navigate to Studio: Tap on the "Studio" tab, typically located in the center of the app's navigation.
- Import Image: Select the "Import" button to begin adding media.
- Select Media: Choose the photos or videos from your device's camera roll that you wish to edit. You can select multiple items at once.
- Add to Studio: Once your selections are made, tap "Add." These items will then appear in your VSCO Studio as drafts.
It's important to note that these imported images are initially "drafts" within VSCO and are also still present in your device's camera roll. Deleting them from your camera roll at this stage will cause them to disappear from your VSCO Studio as well.
From your Studio, selecting an image reveals several options: "Edit Image," "Use AI Lab," "Create Collage," "Sync to Desktop," and "Share Photo."
Harnessing the Power of VSCO Presets
VSCO Presets are pre-designed filters that offer a quick and effective way to achieve a desired aesthetic. They are invaluable for both beginners and experienced editors looking to establish a consistent look or experiment with different styles.
Accessing and Applying Presets
To begin editing with presets:
- Select Your Image: In the VSCO Studio, tap on the image you wish to edit.
- Enter Editor: Choose the "Edit Image" option.
- Navigate to Presets Tab: You will land on the "Presets" tab, which is the ideal starting point for most editing tasks.
Here, you'll find a vast library of VSCO Presets, categorized to help you navigate and find the perfect look for your image. Tapping the preset icon can reveal more viewing options, such as a grid layout, and the categories at the top are instrumental in organizing the extensive list.
"For This Photo" and Preset Strength
A particularly useful feature is the "For This Photo" option. This uses AI to intelligently recommend presets that are best suited for your specific image. Many users find this an excellent starting point for their editing process. Once a recommended preset is applied, you can often tap it again to adjust its strength, allowing you to fine-tune the intensity of the filter to your preference.
Types of VSCO Preset Photo Filters
VSCO boasts over 200 presets, broadly categorized to suit various styles and applications:
- Free Presets: Available to all VSCO users upon signup, these include foundational presets like B1, B5, F2, G3, M3, M5, P5, T1, and X1.
- Standard Presets: This extensive collection includes numerous options with a strength slider for fine-tuning. Categories include Legacy (01-10), Analog (A1-5), Artificial Lighting (AL1-6), Black & White Classic (B1-3), Vibrant Classic (C1-3), Chromatic (C4-9), Portrait (G1-9), Infrared (IR1-7), Mood (M1-6), Instant (P1-9), Bright (S1-6), and Low Contrast (V1-8), among many others.
- Film Presets: These presets are meticulously crafted to emulate the distinct looks of various analog film stocks from renowned manufacturers such as Fujifilm, Kodak, Agfa, and Ilford.
- We the Creators Presets: Developed in collaboration with professional photographers, these presets offer access to their signature styles and editing techniques.
- VSCO Pro Presets: These premium presets provide enhanced controls for contrast, color, and tone, building upon the foundation of VSCO's most popular looks.
To learn more about any given preset, simply tap its name while in the preset view. This action opens a descriptive page that often includes examples from the VSCO community, showcasing how others have utilized the preset.
Deep Dive into VSCO's Editing Tools
Once a preset has been applied, the "Tools" tab opens up a world of granular adjustments, allowing for precise control over every aspect of your image. These tools are not only for correcting flaws but also for adding artistic flair.
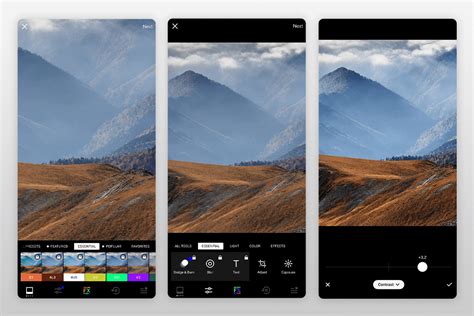
Core Adjustment Tools:
- Adjust: This foundational tool allows for cropping with freehand or predefined aspect ratios, rotating, skewing, and straightening images to perfect composition.
- Exposure: Control the overall brightness of your photo. This is crucial for recovering detail in over- or under-exposed areas, aiming for a natural, editorial finish.
- Contrast: This slider allows you to increase or decrease the difference between light and dark areas, shaping the mood, depth, and light of your image, from subtle to bold.
- Tone: Balance the highlights and shadows. This tool is essential for managing harsh contrast while preserving important details within the frame.
- Dodge and Burn: These specialized brush tools allow for selective brightening (dodge) and darkening (burn) of specific areas, guiding the viewer's eye precisely where you intend.
- Saturation: Adjust the intensity of colors. This can create vibrant, high-saturation looks or muted, desaturated aesthetics.
- White Balance: Correct color casts and set the overall mood by adjusting temperature (warmth/coolness) and tint (green/magenta). This ensures images appear true to life or intentionally stylized.
- HSL (Hue, Saturation, Lightness): This advanced tool offers fine-tuning of individual colors. You can shift hue, adjust saturation, and modify lightness for specific tones, making them stand out while maintaining overall balance.
- Sharpen: Enhance texture and clarity by subtly refining details without sacrificing the natural feel of the image.
- Clarity: Improve texture and depth by cutting through softness, keeping the image clean and natural.
- Bloom: Soften highlights to create a hazy, dreamlike glow, adding an atmospheric and cinematic quality to images.
- Halation: Achieve a warm, cinematic glow with a subtle halo effect, reminiscent of vintage film, without appearing overdone.
- Grain: Introduce film-like texture by adding digital grain, imbuing digital images with the character and depth of classic analog photography.
- Vignette: Apply a darkening effect to the edges of the frame, subtly drawing the viewer's eye towards the center and adding a classic, cinematic focus.
- Fade: Create a softer, time-worn feel by lowering contrast, resulting in a muted, vintage print aesthetic.
- Skin Tone: Subtly balance reds and greens to refine skin tones, ensuring they appear natural and uncompromised by other image adjustments.
- Split Tone: Introduce color into highlights and shadows independently, shaping the mood with subtle tints rather than heavy-handed filters.
- Borders: Add a frame to your image, customizing its size and color to provide structure and a more considered, finished edge.
- Text: Overlay text onto your image, adjusting scale, color, and orientation to integrate typography seamlessly.
- Blur: Control focus intentionally by softening backgrounds or specific areas, guiding attention and adding depth.
VSCO Desktop Studio: Bridging Mobile and Desktop Workflows
VSCO enables a fluid transition between mobile and desktop editing. By syncing photos and videos to the cloud from the mobile app, they become accessible in the VSCO desktop editor (available on web, Mac, and PC). This synchronization works in reverse as well, allowing for a consistent experience across devices.
This cross-platform capability is particularly beneficial for:
- Starting edits on the go and refining them on a larger screen.
- Utilizing the integration with Adobe Lightroom.
- Managing multiple projects more efficiently.
All changes are connected via cloud sync, ensuring your Studio, edits, and organization remain consistent across all your devices without the need for duplicate files or starting over.
AI Lab: The Future of Photo Editing
VSCO's AI Lab represents a growing suite of advanced, AI-assisted tools designed for photographers who prioritize detail and efficiency. Key features include:
- AI Photo Editing with Prompts: Describe the desired edit, and the AI will attempt to achieve it.
- AI Object Remover: Intelligently erase unwanted distractions and clutter from your images.
- Image Upscaler: Sharpen images and reduce pixelization without compromising resolution.
FX Tab: Adding Film and Light Effects
Beyond core adjustments, the FX tab offers a range of overlays for film and light effects, applicable to both photos and videos.
- Distressed Photo Effects: These film-inspired textures introduce imperfections like burn marks, light leaks, and the character of expired or damaged film, lending a lived-in, analog edge.
- Film Frame Overlays: Mimic the look of scanned analog film with options for 35mm, 16mm, and 8mm formats, adding cinematic grit or nostalgic texture.
- Light Effects: Integrate realistic lens flares and light leaks using customizable overlays, adding natural-looking rays of light, depth, atmosphere, and movement.
- Texture: Apply grain, dust, and scratches sourced from real film scans, layering authentic imperfections that define vintage photography.
Video Editing with VSCO
VSCO is not just for photos; it also functions as a capable video editing app. The approach mirrors photo editing: start simple and build from there, using familiar tools like exposure, color grading, grain, and film effects to shape mood and motion.
To edit a video:
- Upload Video: Import a video from your Camera Roll.
- Select "Edit Video": Access the video editing suite.
- Apply Filters and Adjustments: Utilize standard photo editing tools and specific video tools.
Additional video tools include:
- Trim: Cut clips to tighten focus and pacing.
- Speed: Adjust playback speed for slow-motion or fast-forward effects (0.1x to 16x).
- Reverse: Play clips in reverse or create seamless loops.
- Volume: Lower or remove audio to emphasize visual elements.
- Video Effects: Apply retro and creative looks like VHS filters, digital glitches, kaleidoscope mirroring, and chroma split effects.
Creating Collages and Montages
VSCO Studio provides intuitive tools for creative composition:
- Photo Collage: Start with designer templates or a blank canvas. Scale, rotate, flip, and overlay images with drag-and-drop controls. Add solid color or geometric backgrounds, and integrate text. Opacity controls allow for double-exposure effects, and filters can be applied to individual elements.
- Montage: Select a photo or video in your Studio, tap "More," and choose "Create Montage." This allows you to layer photos, videos, shapes, and colors onto a blank canvas, sequencing them into narrative visual stories.
VSCO Capture: Precision in Photography
The core VSCO app includes a built-in camera with effects like prism lenses and double exposures. For those seeking greater control, VSCO Capture is a standalone app offering manual controls for shutter speed, ISO, white balance, and more, enabling photographers to shoot with precision. Photos and videos can be captured with VSCO presets applied or using effects like Bloom and Halation, and then brought into VSCO for further editing and sharing.
Saving and Sharing Your Edits
Saving Your Own Recipes
The "Recipes" tab is a powerful feature for saving your custom editing sequences. This allows for quick recall and consistent application of your favorite looks, significantly speeding up your workflow. The "Organize" tab further personalizes the editor by letting you favorite and arrange tools to your preference.
Sharing Photos on VSCO
When you're ready to share your work:
- Tap Share Icon: Locate the share icon, usually in the top right corner.
- Choose Destination:
- Share to…: Share to other installed applications on your phone.
- Post to VSCO: Publish your image to the VSCO community feed.
- Save to Camera Roll: Save the edited image to your device's photo library.
- Share your recipe: Share your custom editing steps with others.
- Sync to Cloud (Pro Members): Send the image to the web editor for desktop refinement.
Posting Images to VSCO
Posting to VSCO makes your image publicly visible to the community. You can add a description and enable discussions to engage with followers. Note that only VSCO members can participate in discussions, but anyone can view them. Discussions can be enabled or disabled at any time.
The VSCO Feed and Engagement
The VSCO Feed displays your published images at the top (as it's chronological) and content from users you follow. Under each image, you'll find engagement icons:
- Favorites (Star): A private notification to the creator indicating you liked their work.
- Reposts (Chasing Arrows): Share an image to your own followers and add it to your Profile's Reposts tab. The creator is notified.
- Discussions (Chat Bubble): If enabled, allows for creator and member interaction.
The feed also features a suggested carousel of new creators to follow, offering opportunities to discover new talent and expand your network.
Your VSCO Profile: A Digital Portfolio
Your VSCO Profile is where all your published images, reposts, and personal "About" information reside. It's your dedicated space to showcase your work and identity within the VSCO community. Pro members can further organize their content by creating albums.
Advanced Film Emulation with VSCO and Lightroom
The aesthetic appeal of analog film-its unique color tonality, grain, and imperfections-has led to a surge in its emulation within digital photography. VSCO is at the forefront of this movement, offering sophisticated tools to achieve these sought-after looks.
The Allure of Film Aesthetics
While digital photography can achieve near-perfect color accuracy, the appeal of film lies in its inherent characteristics that evoke emotion, nostalgia, and a sense of "glorified reality." The subtle color shifts, balanced saturation, and organic grain of film create a visually pleasing and often more compelling aesthetic than hyper-realistic digital captures.
Understanding Film Presets in VSCO
VSCO's film presets are designed to replicate the distinct looks of various film stocks. The naming convention of these presets is often informative: for example, "AU5" might refer to "Agfa Ultra 50," indicating the film manufacturer (Agfa), the specific film line (Ultra), and its ISO speed (50). Tapping on a preset name reveals detailed descriptions and community examples.
Key Controls for Film Emulation:
When applying film presets, three primary controls allow for nuanced adjustments:
- Strength: This slider controls the intensity of the film effect, blending it with the original image. For maximum realism, it's often recommended to keep this at 100% as real film doesn't have an adjustable "strength."
- Character: This parameter simulates the exposure of the film. Pushing the slider towards the positive (right) can increase contrast and color saturation, mimicking overexposure. Moving towards the negative (left) can decrease contrast and saturation, simulating underexposure, and may even introduce shadow fade. Cross-processed films, like KA3X and FR4X, exhibit extreme reactions to the character slider, offering a wide range of looks.
- Warmth: This control emulates the white balance adjustments made during the film scanning process. It allows you to add a warm or cool tone to the image in a way that feels authentic to the film development process.
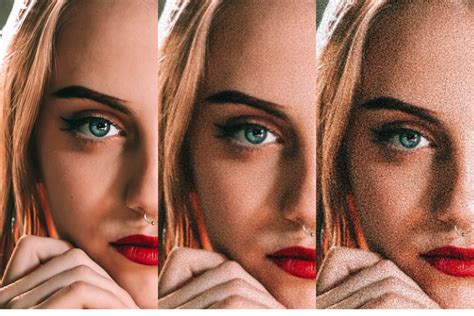
Recreating Film Grain
Film grain is a critical component of the analog aesthetic. VSCO's tools allow for precise emulation:
- What is Film Grain? Film images are formed by microscopic silver-halide crystals. Higher ISO films have larger crystals, resulting in coarser grain, while lower ISO films have finer grain. Brighter scenes typically exhibit less grain than darker scenes.
- VSCO Grain Tool:
- Strength: Controls the overall intensity of the grain.
- Size: Mimics the grain size of different ISO films. Higher ISOs require larger grain, while lower ISOs benefit from smaller grain.
- Color: For color films, this slider adds subtle color to the grain, enhancing realism. For black and white, it should remain at zero.
Film FX and Texture Overlays
Beyond grain, VSCO's Film FX offers overlays derived from real film scans:
- Texture Effects: Includes dust, scratches, and additional grain types for an authentic analog feel.
- Film Frame Overlays: Simulates the borders of various film formats (8mm, 16mm, 35mm) and scanned film imperfections.
- Light Leaks and Lens Flares: Adds realistic light effects that mimic those produced by older or damaged cameras.
- Distressed Photo Effects: Introduces strong effects like burned, expired, or ripped film looks, which can be subtly applied by adjusting strength.
Integrating VSCO with Adobe Lightroom
For photographers who rely on Adobe Lightroom for their RAW editing workflow, VSCO offers powerful integrations.
VSCO Film Presets for Lightroom
VSCO Film presets for Adobe Lightroom allow users to combine the aesthetic of film emulation with the robust RAW editing capabilities of Lightroom. These downloadable assets plug directly into your Lightroom account.
- Availability: Historically, these presets were available for a limited time and often tied to VSCO Pro memberships. The availability of specific packs, such as "Film 02," has varied.
- Compatibility: VSCO Lightroom Presets are optimized for RAW files and are compatible with a wide range of camera models, though specific camera profiles are created for supported models.
- Installation: A provided installation guide details step-by-step instructions for incorporating the presets into Lightroom.
Lightroom Classic Plugin and Integration
VSCO has introduced integrations that streamline the workflow between VSCO and Lightroom:
- Connect to Adobe Lightroom: Users can connect their Adobe account via VSCO Studio settings on the web. This allows for importing photos from Lightroom into VSCO Studio for editing.
- Lightroom Classic Plugin: The plugin facilitates publishing to your VSCO Profile directly from Lightroom or using the export feature to continue editing online with VSCO's desktop Studio. This enables batch processing and efficient portfolio updates.
- "Better Together" Philosophy: The integration emphasizes a symbiotic relationship, allowing users to maintain their established Lightroom editing processes while leveraging VSCO's unique presets, editing tools, and community features.
Utilizing VSCO Calibration Profiles in Lightroom
Even without applying full VSCO presets, the custom camera profiles included with VSCO Film presets can offer unique alternatives to Adobe's default calibrations. These profiles can subtly alter color tonality and contrast, providing a different starting point or inspiration for your edits, especially when working with RAW files. This approach allows for a nuanced "look" without the heavy-handedness of a full preset.
Tips and Tricks for a Refined Film Look
To further enhance the film aesthetic in VSCO, consider these advanced techniques:
- Subtle Blur: Digital images can appear excessively sharp. Applying a very subtle blur with the VSCO Blur tool can help mimic the softer rendering of film.
- Vignette: Reintroduce lens vignetting, a common characteristic of film lenses, to add depth and focus.
- HSL Adjustments: Fine-tune specific color ranges. For instance, shifting reds towards orange can emulate certain film stocks, especially those processed with specific scanners.
- Dodge and Burn: Use these tools for selective brightening and darkening, particularly effective in black and white photography to add drama and guide the viewer's eye, simulating darkroom printing techniques.
- Bloom and Halation: Apply these tools for subtle highlight glow and cinematic effects that enhance the atmospheric quality of an image.
By combining the intuitive interface and extensive preset library of VSCO with the powerful editing capabilities of Adobe Lightroom, photographers can achieve a vast array of creative looks, from contemporary digital styles to the timeless aesthetics of analog film. The key lies in understanding the tools, experimenting with different combinations, and developing a personal editing workflow that consistently brings your unique vision to life.