The pursuit of the perfect photographic aesthetic often leads creators to explore various editing techniques. While capturing an ideal moment with a top-tier camera is crucial, the final image can sometimes appear less vibrant or engaging than anticipated. Fortunately, powerful editing software like Photoshop provides an extensive suite of tools to refine and enhance digital photographs, correcting imperfections and imbuing them with desired moods. This tutorial focuses on achieving a "soft warm" photo effect, a popular style that can add a summery glow and inviting ambiance to your images, using primarily Photoshop's robust capabilities.
Initial Adjustments in Camera Raw
Before delving into specific Photoshop layers, a foundational step in enhancing your image can be taken within Photoshop's Camera Raw filter. This integrated tool offers a powerful starting point for basic image corrections and initial mood setting.
Begin by opening your chosen photograph in Photoshop. To ensure the image fills your screen for optimal viewing and editing, utilize the keyboard shortcut Ctrl+0. This command scales the image to fit the entire workspace.
Within the Camera Raw interface, you can make essential adjustments. For instance, you might have already performed basic edits in ACR, including meticulously adjusting the white balance to ensure accurate color representation, tweaking the exposure to achieve a balanced brightness, and recovering detail in highlights, such as recovering a bit of the white shirt if it was overexposed. These initial steps are crucial for establishing a solid foundation for further enhancements.
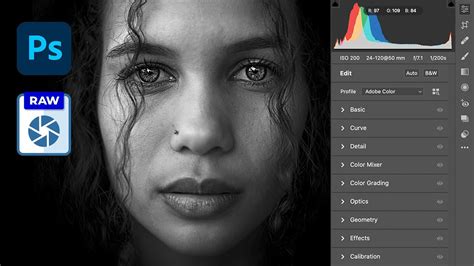
For a subtle enhancement to contrast, navigate to the Presets drop-down menu within the properties panel. Selecting "medium" contrast can serve as a good starting point. Remember, this is a flexible setting, and you can always increase the contrast later if the image requires it, allowing for iterative refinement.
Introducing Warmth with Selective Color
One effective method to introduce warmth into an image is by utilizing the Selective Color adjustment layer. This tool allows for precise manipulation of specific color ranges within your photograph.
To begin, create a Selective Color adjustment layer. Once this layer is active, switch its focus to the "Neutrals" box. Within this section, you can fine-tune the color balance of the neutral tones in your image. To achieve a warmer cast, decrease the magenta slider. For instance, setting it to -2 can help add a subtle touch of warmth without overtly altering the image's color palette. This method is particularly effective for subtly warming up skin tones or neutralizing any cool casts that might be present.
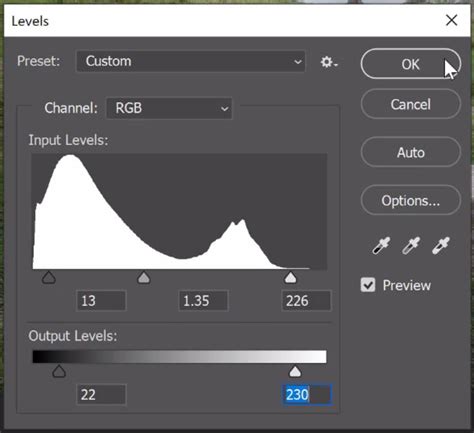
Enhancing the Glow with Levels
To further develop the desired "summery glow," the Levels adjustment layer proves invaluable. This tool provides granular control over the tonal range of your image, allowing you to manipulate highlights, midtones, and shadows independently.
Create a Levels adjustment layer. Within its properties panel, you will find sliders that control the black point, white point, and midtones. By carefully adjusting these sliders, you can dramatically influence the overall brightness and contrast of your image. Experiment with the "numbers" that represent these tonal values. Finding the right combination can imbue your image with a luminous, sun-kissed appearance, effectively creating that sought-after summery glow. For instance, adjusting the output levels can help to crush blacks slightly for more depth or lift shadows for a brighter feel, all contributing to the desired warm and inviting atmosphere.
Utilizing the Photo Filter for Direct Warmth
Photoshop's Photo Filter adjustment offers a more direct approach to adding warmth, mimicking the effect of placing a colored filter in front of a camera lens.
To employ this tool, open your image in Photoshop and navigate to the Adjustments tab. Select the "Photo Filter" option. You will be presented with a range of preset filters, many of which are designed to add warmth, such as "Warming Filter 81" or "Sepia." Choose a filter that aligns with the desired level of warmth. Once the filter is applied, you can precisely control its intensity using the Density slider. This slider allows you to determine exactly how much warmth is infused into your image, offering a straightforward way to achieve a consistent warm tone.
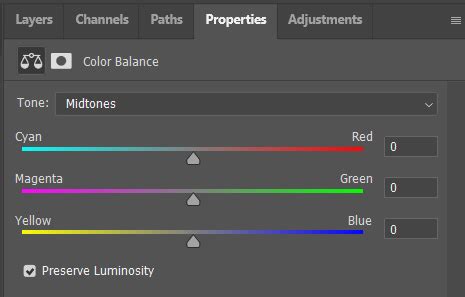
Color Balance for Targeted Tonal Shifts
The Color Balance adjustment layer is another powerful instrument for fine-tuning the color cast of your image. It allows for precise adjustments to the cyan-red, magenta-green, and yellow-blue color channels.
To activate this adjustment layer, head to the Adjustments panel again and click on the Color Balance icon. To obtain a desirable orange glow, you will want to shift the sliders towards warmer tones. Specifically, reduce the blue slider, moving it more towards yellow. Concurrently, pull the cyan slider towards the red. The top slider, representing the midtones, should ideally have a value of around +25, while the bottom slider, often influencing the shadows, can be set to -25. These precise adjustments help to create a rich, warm color palette that enhances the overall mood of the photograph.
The Power of Layer Masks and Soft Light
While specific adjustments are key, the application of these adjustments is equally important. Samantha, a keen observer, highlights, "My favorite tool has to be layer masks, especially using soft light." This sentiment underscores the critical role of layer masks in selectively applying editing effects.
Layer masks allow you to control the opacity of an adjustment layer on different parts of your image. By painting with black on a mask, you hide the effect; painting with white reveals it; and shades of gray create partial transparency. This precise control is essential for ensuring that warmth is applied where it's most beneficial, such as on skin tones or to enhance ambient light, without making the entire image appear unnaturally warm.
The "Soft Light" blend mode, when used in conjunction with layer masks, can further refine the application of warmth. Soft Light gently softens and darkens contrasting areas, creating a subtle yet effective enhancement. By combining layer masks with soft light, you can seamlessly integrate warm tones, making the edit appear natural and organic.
Understanding Your Camera and Editing Workflow: A Broader Perspective
The journey to achieving desired photographic effects often begins long before the editing process. Katie Evans of The Key To Taking Pictures emphasizes the importance of understanding your camera and fundamental photographic principles. She offers a comprehensive 72-page book, "The Key to Taking Pictures Like a Professional Photographer," designed to demystify SLR cameras and beyond. This guide provides a step-by-step approach to mastering essential photography skills.
The book covers critical areas such as achieving proper exposure, identifying and utilizing the best light sources, understanding lens choices and their impact, deciphering important camera settings, differentiating between RAW and JPEG formats, and mastering compositional techniques for striking images. It also delves into the realm of editing software, including Photoshop, and the overall editing workflow.
As a bonus, the winner of a special giveaway will also receive Katie's ebook, "The Key to Natural Posing Guide." This guide goes into specific detail on how to interact with subjects, what to say to them, optimal placement, and techniques for achieving natural, un-posed looks. Understanding these pre-editing elements can significantly simplify the post-processing workflow and lead to more impactful final images.
Leah Cook, an avid photographer who uses a Canon 5D Mark II, shares a similar passion, having been inspired by her father's keen eye for photography. Her interest grew with her first digital camera, and she now resides in Dallas with her family, finding joy in everyday moments. Leahâs perspective highlights that while technical skill is vital, the emotional connection and storytelling within a photograph are equally paramount. Her website, www.leahcookphotography.com, showcases her work, demonstrating the successful integration of technical proficiency with artistic vision.
Lightroom vs. Photoshop for Warm Effects
While Lightroom is an excellent tool for post-processing digital images, Photoshop remains the preferred choice for many designers due to its extensive manipulation capabilities. Today, the focus is on achieving a soft warm photo effect using only Photoshop's Camera Raw Filter, demonstrating that powerful results can be obtained without necessarily relying on a separate application like Lightroom.
Before applying any effect, it's crucial to remember that every image is unique. The settings provided in tutorials should be considered a foundation, a starting point. Your specific image may require minor adjustments to individual settings, but these guidelines will generally work across most photographs.
A practical approach to streamlining your workflow is to save these settings as a new preset. This allows you to quickly apply the same warm effect to future images with just a few clicks. The next time you wish to use this photo effect on another picture, simply open your image in Photoshop and navigate to Filter > Camera Raw Filter. From there, you can load your saved preset, ensuring consistency and efficiency in your editing process.
Color Grading in Camera Raw – Create Cinematic Film Tones Easily
Advanced Techniques and Considerations
Beyond the foundational adjustments, several advanced techniques and considerations can further refine your warm overlay effect.
Gradient Maps: For a more artistic and stylized warm effect, consider using a Gradient Map adjustment layer. You can create a gradient that transitions from a warm color (like a deep orange or red) to a lighter warm tone (like a pale yellow or peach). By setting the blend mode of the Gradient Map to Soft Light, Overlay, or even Multiply, you can infuse the image with a rich, warm character. Experimenting with the gradient's colors and the blend mode's opacity will yield vastly different results, allowing for highly personalized warm aesthetics.
Hue/Saturation Adjustments: While Selective Color and Color Balance offer precise control, a Hue/Saturation adjustment layer can also be used to subtly enhance warmth. You can target specific color ranges, such as the reds, oranges, and yellows, and slightly increase their saturation or shift their hue towards warmer tones. Be cautious with this tool, as over-saturation can quickly make an image look artificial.
Curves Adjustment: The Curves adjustment layer offers unparalleled control over tonal and color adjustments. For warmth, you can create a subtle "S" curve to increase contrast, and then target individual color channels (Red, Green, Blue) within the Curves panel. Adding a slight upward curve to the Red channel and a slight downward curve to the Blue channel can introduce a warm, golden hue. Similar to Hue/Saturation, moderation is key to maintaining a natural look.
Smart Objects: For non-destructive editing, it is highly recommended to convert your image layer into a Smart Object before applying any filters or adjustments. This ensures that you can always go back and modify or remove the applied effects without degrading the original image data.
Layer Opacity and Blend Modes: The true magic of Photoshop lies in the interplay of layers. Don't be afraid to experiment with the opacity of your adjustment layers and explore different blend modes. Modes like Overlay, Soft Light, Color, and Multiply can all contribute to creating unique warm effects when applied judiciously. For instance, a subtle Color blend mode applied with a warm gradient can tint the image without altering its luminosity, preserving detail while adding color.
Subject-Specific Adjustments: Consider the subject of your photograph. For portraits, you'll want to ensure that skin tones remain natural and appealing. For landscapes, you might aim to enhance the warmth of sunlight on foliage or water. Using layer masks is paramount here, allowing you to isolate the effect to specific areas, ensuring that a warm overlay enhances rather than detracts from the subject matter.
Understanding "Warmth": It's important to define what "warmth" means in the context of your image. Are you aiming for a soft, golden hour glow, a fiery sunset effect, or a cozy, inviting ambiance? Each of these interpretations will require slightly different approaches to color temperature, saturation, and tonal adjustments. A "summery glow" might imply bright, slightly desaturated warm tones, while a "cozy" feel might lean towards deeper, richer oranges and reds.
By combining these techniques and understanding the underlying principles, you can move beyond basic warm overlays and create truly compelling and artistically rendered images in Photoshop. The key is to experiment, iterate, and always keep the final desired aesthetic in mind.