Adobe Photoshop stands as an indispensable tool for photographers and content creators aiming to elevate their visual work. While capturing the perfect image in-camera is a crucial first step, the true magic of transforming photos into compelling visuals often happens in post-processing. For those new to the platform, the Photoshop interface and the intricacies of image editing can seem daunting. However, with dedicated practice, mastering advanced editing techniques, detailed retouching, and comprehensive enhancement becomes an achievable goal, leading to professional-grade results.
Optimizing Your Photoshop Workspace for Photography
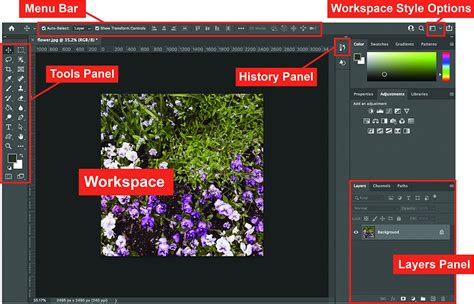
Before diving into enhancement techniques, it's essential to adapt the Photoshop workspace for photography. Customizing the interface by arranging panels and toolbars to suit individual needs significantly improves workflow efficiency. This personalized layout ensures that the most frequently used photo editing tools and features are readily accessible, minimizing time spent searching and maximizing creative output.
Fundamental Enhancement Techniques in Photoshop
Photoshop offers a powerful suite of tools to enhance images effectively, improving both their quality and resolution. The journey begins with opening your image in Photoshop, typically by navigating to "File" > "Open" and selecting your desired file. Once the image is loaded, utilizing adjustment layers is a cornerstone of non-destructive editing, allowing for modifications without permanently altering the original pixel data.
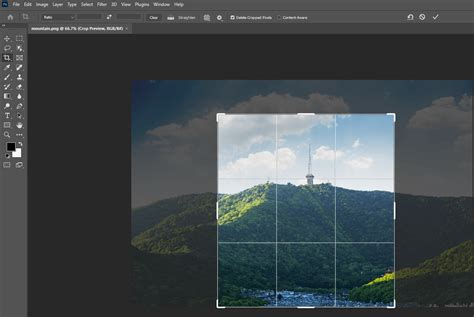
One of the most basic yet impactful editing techniques is cropping. Cropping serves multiple purposes: it helps in removing extraneous elements that detract from the main subject, it allows for a stronger focus on the focal point, and it can be used to introduce a sense of drama or to achieve a specific composition for maximum impact.
Color Correction and Clarity Adjustment
Adjusting color and clarity is another fundamental step in enhancing images. To make photos look more professional and appealing, ensuring they are color-balanced and possess the right contrast is paramount. This involves fine-tuning the tonal range and the intensity of colors.
Color correction is a critical aspect of photo editing. It encompasses adjusting contrast, saturation, brightness, and hue to create a more visually appealing image. The process often starts with using adjustment layers to non-destructively fine-tune the color properties. The Hue/Saturation adjustment layer is particularly useful for modifying the overall color balance. It allows for the separate manipulation of individual color channels, such as red, blue, or green, rather than affecting the entire image uniformly. This granular control ensures precise color adjustments that align with the photographer's vision.
5 POWERFUL Ways To Color Grade Images In Photoshop
Resizing and Resolution Enhancement
Resizing images is an important part of image editing, ensuring that photos fit the intended format or medium without compromising quality. To resize an image, navigate to "Image" > "Image Size" and adjust the dimensions as needed. This dialog box provides controls for width, height, and resolution.
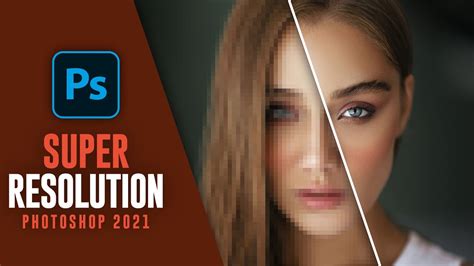
Improving image resolution is crucial, especially for print production or when working with images that have been downscaled. Photoshop offers a technique called Super Resolution, which significantly increases the resolution of an image while meticulously maintaining sharpness and detail. This AI-powered feature is designed to enlarge photos without introducing noticeable pixelation or artifacts, effectively doubling the image's width and height.
When preparing images for print production, creating high-resolution files is often a primary requirement. If you are provided with low-resolution files and tasked with converting them into high-resolution versions, the best results are achieved when starting with natively high-resolution files. However, some low-resolution files can be upscaled without significant quality loss, depending on the required size. In other cases, upscaling is necessary to meet resolution demands.
Reinterpreting Resolution
To reinterpret an image's resolution without altering its pixel dimensions, open your file in Adobe Photoshop and press Shift-Ctrl-I (or Shift-Cmd-I on Mac) to access the Image Size dialog box. Within this dialog, examine the "Document Size" section. If the width and height measurements are substantial but the resolution is set to 72 pixels per inch, the image was likely captured by a digital camera. By unchecking the "Resample Image" box and changing the resolution to 300 ppi, you instruct Photoshop to reinterpret the existing pixel data for a higher print resolution. The pixel dimensions at the top of the dialog box will remain unchanged, but the document size will shrink accordingly. For instance, an image measuring 25 inches by 16.667 inches at 72 ppi will now measure 6 inches by 4 inches at 300 ppi, with the file size remaining constant. This process effectively creates a smaller, high-resolution image from a larger, low-resolution one without adding new pixels.
Increasing Resolution
To truly increase the resolution of an image, open your file in Photoshop and access the Image Size dialog box (Shift-Ctrl-I or Shift-Cmd-I). This time, ensure the "Resample Image" box is checked. Setting the resolution to 300 ppi will cause the Pixel Dimensions at the top of the dialog box to increase, reflecting the added pixels. The document size in inches or centimeters will remain consistent with the original dimensions if the resampling method is appropriate. For example, an image that is 432 pixels wide by 288 pixels high at 72 ppi, when resampled to 300 ppi, will still measure 6 inches by 4 inches but will now have dimensions of 1800 pixels by 1200 pixels. This process increases the file size and, because Photoshop interpolates new pixels to enlarge the image, can sometimes lead to a slight loss of sharpness or the introduction of pixelation if not handled carefully.
Sharpening Techniques for Enhanced Detail
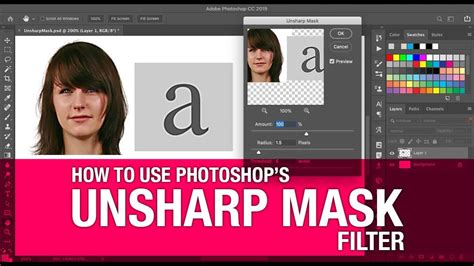
Sharpening is a crucial technique for bringing out details and making subjects more prominent. Photoshop offers several filters for this purpose. The Unsharp Mask filter is a popular choice, working by increasing the contrast around edges to make the overall picture appear sharper. To apply it, navigate to Filter > Sharpen > Unsharp Mask and adjust the Amount, Radius, and Threshold to control the intensity and focus of the sharpening effect.
Another effective method for enhancing sharpness involves using the High Pass filter. This technique requires duplicating your image layer and setting its blending mode to "Overlay." Then, apply the High Pass filter via Filter > Other > High Pass. By adjusting the radius of the High Pass filter, you can control the degree of sharpening applied to the image.
The Smart Sharpen filter provides more advanced control over the sharpening process. Accessible through Filter > Sharpen > Smart Sharpen, it allows adjustments for amount, radius, noise reduction, and even motion blur, enabling a more nuanced sharpening effect.
A key tip for sharpening is to apply it after increasing resolution, not before. Sharpening an image before enlargement can introduce artifacts that are then magnified during the upscaling process. Sharpening afterward can help counteract any softening that may have occurred due to enlargement.
Advanced Enhancement and Creative Effects
Beyond basic adjustments and sharpening, Photoshop provides a vast array of filters and tools for creative enhancement and stylistic transformation. The Filter Gallery is a treasure trove of effects, offering everything from textures and light leaks to painterly styles, allowing users to imbue their images with unique aesthetics.
Noise Reduction and Retouching
Noisy images can detract from the overall quality of a photograph. Photoshop's Reduce Noise filter helps to mitigate this issue by reducing unwanted grain while preserving essential details and the original look of the image. Adjusting the Strength, Preserve Details, and Reduce Color Noise sliders allows for a balance between noise reduction and image clarity.
For smoothing out larger areas of noise or for targeted softening, the Surface Blur filter can be effective. When it comes to retouching imperfections like blemishes or distracting elements, the Spot Healing Brush, Healing Brush, and Patch Tools are invaluable. These tools allow for seamless removal and blending of unwanted areas, making the image appear cleaner and more polished.
AI-Powered Enhancements
Recent versions of Photoshop have embraced Artificial Intelligence to streamline and enhance image editing. Adobe Super Resolution, for example, uses AI to dramatically increase an image's resolution, doubling its width and height while preserving details and minimizing artifacts. This feature is particularly beneficial for enlarging photos that may have been captured with lower-resolution sensors or for restoring detail in older images.
Furthermore, AI-powered JPEG Artifacts Removal is available within the Neural Filters section. This tool can significantly improve the quality of compressed JPEG images, reducing banding and noise that often plague such files.
Exploring Alternative Tools for Image Enhancement
While Photoshop is the industry standard for professional image editing, its complexity can be a barrier for some users. For those seeking simpler yet effective solutions, especially for daily editing demands or for achieving quick enhancements, alternative tools exist.
Adobe Firefly for AI-Powered Editing
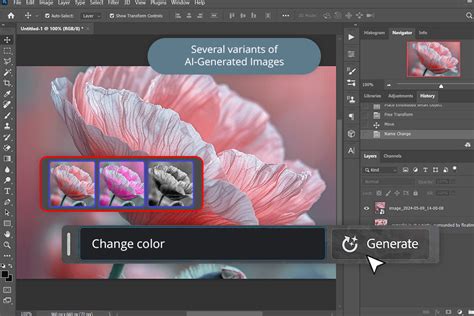
Adobe Firefly is an AI-powered suite of creative tools that offers intuitive editing capabilities. It provides powerful, AI-driven features designed to fit various creative styles and needs. Firefly can be used to sharpen details, refine textures, and even increase image resolution. An AI image upscaler, such as Generative Upscale in Firefly, uses artificial intelligence to improve the resolution, clarity, and sharpness of images. Instead of simply stretching a picture and making it blurry, AI upscaling analyzes the photo and adds realistic detail as it enlarges it, ensuring that images remain crisp and polished even at larger sizes. Firefly can be accessed online, and it offers a free tier with limited generative credits, making it an accessible option for users.
CapCut for User-Friendly Enhancements
CapCut is a versatile multimedia creative suite that offers a user-friendly interface for editing and enhancing images. It provides tools for cropping, resizing, and rotating images, alongside a vast library of resources like filters, templates, and stickers. One of CapCut's standout features is its AI image upscaler, which can increase image resolution up to 4K. This process involves denoising and filling in intricate details, transforming grainy and pixelated images into high-quality versions with no perceptible loss of quality. CapCut also offers other AI-powered tools, such as:
- AI Old Photo Restoration: This tool uses advanced algorithms to detect and intelligently fill in blemishes on old photos, restoring them to their former glory. It can also automatically colorize black-and-white images.
- Low-Light Image Enhancer: This tool improves the quality of dark or low-light images by increasing brightness, enhancing clarity, and preserving original details. It's particularly adept at enhancing faces within images, applying natural skin tones and facial features.
- AI Color Correction: For dull or improperly adjusted color photos, CapCut's AI color correction tool automatically adjusts levels, exposure, contrast, and saturation, offering multiple levels of correction.
- AI Portrait Generator: Users can upload a portrait and choose from various styles, such as 3D cartoons, pop, or manga, to transform their appearance or create unique portraits.
- AI Image Style Transfer: This tool blends image content with artistic preferences, allowing users to apply styles like manga or oil painting to their photos.
CapCut's online editor is accessible and offers a straightforward way to upscale images to 4K resolution, with options to further edit or export the enhanced photo.
Conclusion: Empowering Your Visual Storytelling
Whether leveraging the professional-grade tools within Adobe Photoshop, the intuitive AI capabilities of Adobe Firefly, or the user-friendly features of CapCut, the ability to enhance images is a powerful skill. By understanding and applying these techniques, photographers, marketers, and everyday users alike can breathe new life into their photos, ensuring that their visual content is not only of high quality but also effectively communicates their intended message and artistic vision. The continuous evolution of editing software, particularly with the integration of AI, promises even more innovative ways to refine and perfect images in the future.