The Magic Wand tool in Photoshop is a fundamental selection utility, widely recognized and utilized by both seasoned graphic designers and enthusiastic Photoshop users. Its primary function is to facilitate the rapid and straightforward selection and editing of specific image areas, particularly those characterized by similar colors. This tool operates on a principle of color-based selection: upon clicking a particular pixel, it automatically identifies and selects surrounding pixels that share a similar color. This capability makes it an invaluable asset for tasks ranging from background removal to isolating specific elements within an image.
Locating and Understanding the Magic Wand Tool
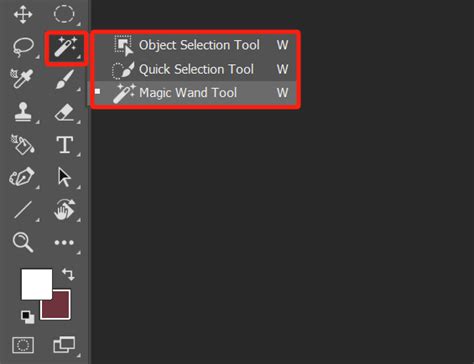
The Magic Wand tool is typically found within the left-hand toolbar in Photoshop. It is often grouped with other selection tools such as the Object Selection Tool and the Quick Selection Tool. If you cannot immediately locate it, it might be nested behind one of these other tools. To access it, click and hold the visible tool, and a fly-out menu will appear, allowing you to select the Magic Wand. Alternatively, if the tool is not visible at all, you can customize your toolbar by navigating to "Edit Toolbar" above the color picker. This panel allows you to add or remove tools from your workspace, ensuring the Magic Wand is readily accessible.
The Core Functionality: Selecting by Color
At its heart, the Magic Wand tool selects objects based on their color within an image. When you click on a pixel, Photoshop analyzes its color and tone and then selects adjacent pixels that fall within a defined range of similarity. This makes it exceptionally adept at selecting large areas of solid or near-solid color. For instance, if you need to select a clear blue sky or a uniformly colored background, the Magic Wand can often accomplish this with a single click.
Key Parameters: Tolerance and Contiguous
Two critical options in the Magic Wand tool's Options Bar significantly influence its behavior: Tolerance and Contiguous.
Tolerance: Defining the Color Range
The Tolerance setting dictates the degree of color difference Photoshop will consider acceptable when making a selection. A lower Tolerance value means Photoshop will select pixels that are very similar in color to the one you clicked. Conversely, a higher Tolerance value allows Photoshop to select a broader range of colors, including those that are slightly different. The default Tolerance is usually 32, but it can be adjusted from 0 to 255.
For example, if you're trying to select a background that has subtle variations in shade, increasing the Tolerance might be necessary to capture all the intended areas. However, if the Tolerance is set too high, you risk selecting parts of your subject or other unwanted elements. Finding the right Tolerance is often an iterative process of adjusting and re-selecting.

Contiguous: Limiting the Selection Area
The Contiguous option, when checked (which is its default state), instructs Photoshop to select only those pixels that are adjacent to the clicked pixel and fall within the Tolerance range. If there are other areas of similar color in the image but they are separated by pixels of a different color, they will not be selected with Contiguous enabled.
Unchecking Contiguous changes the behavior dramatically. Now, Photoshop will select all pixels in the image that fall within the specified Tolerance range, regardless of whether they are adjacent to the initially clicked pixel. This is useful for selecting all instances of a particular color across the entire image, even if they are scattered.
Advanced Options for Refined Selections
Beyond Tolerance and Contiguous, several other options enhance the Magic Wand tool's utility:
- Anti-alias: When this option is checked, Photoshop smooths the edges of the selection by applying a slight blur. This helps to reduce the "stair-stepping" or jagged effect that can occur with pixel-based selections, resulting in a more natural and refined edge.
- Sample All Layers: By default, the Magic Wand tool only samples pixels from the currently active layer. If you need to make a selection that considers colors across multiple layers, checking "Sample All Layers" will include them in the selection process.
Practical Applications and Workflow Examples
The Magic Wand tool is particularly effective in scenarios where you need to isolate areas of relatively uniform color.
Scenario 1: Selecting a Solid Background
Imagine you have a product photo with a clean, solid background that you want to remove or replace.
- Open your image in Photoshop and ensure the Layers panel is visible. If your image is a background layer, double-click it to convert it into a regular layer (e.g., "Layer 0") to enable editing.
- Select the Magic Wand Tool from the toolbar.
- In the Options Bar, set the Tolerance to a value that you estimate will capture most of the background color without encroaching on your subject. Start with a moderate value like 30-40.
- Click on the background area you wish to select.
- If the selection is not complete, hold down the Shift key and click on the unselected background areas to add them to your selection.
- If you have accidentally selected parts of your subject, you can subtract from the selection by holding down the Alt (Windows) or Option (Mac) key and clicking on those areas.
- Once the background is fully selected, you can invert the selection (Select > Inverse or Ctrl+Shift+I / Cmd+Shift+I) to select your subject.
- From here, you can create a mask by clicking the "Add Layer Mask" icon at the bottom of the Layers panel. This will isolate your subject on a transparent background.

Scenario 2: Replacing a Sky
Replacing a sky in a photograph is another common use case for the Magic Wand.
- Open your image. Ensure the sky has a relatively consistent color.
- Select the Magic Wand tool. Adjust Tolerance as needed; often, a higher tolerance is required for skies with subtle gradients.
- Click on the sky. Use Shift-clicking to add any unselected sky areas.
- If you've selected the sky, you'll likely want to select everything but the sky to replace it. Go to Select > Inverse.
- Now, your landscape or foreground is selected. You can then copy and paste this selection into a new document with a different sky, or use advanced techniques like Generative Fill (in newer Photoshop versions) to replace the sky.
How to use the Photoshop Sky replacement tools
Refining Selections: Beyond the Initial Click
While the Magic Wand is excellent for initial selections, especially on solid backgrounds, it often requires refinement.
- "Add to selection" and "Subtract from selection": As mentioned, these modes (accessed by holding Shift or Alt/Option) are crucial for building or correcting your selection.
- Select and Mask Workspace: For more intricate selections, especially those involving hair or fine details, the "Select and Mask" workspace (accessible via Select > Select & Mask or the button in the Options Bar when a selection tool is active) is indispensable. Here, you can use tools like the Refine Edge Brush to intelligently adjust the selection's edge, especially around complex areas like hair.
- Modifying Selections: Photoshop offers options under the "Select" menu to modify existing selections, such as "Smooth," "Feather," "Contract," and "Expand." These can help to create softer transitions or tighten up a selection that has encroached too far. For instance, using "Smooth" with a small radius can help to even out slightly jagged edges after using the Magic Wand.
Limitations and When to Use Other Tools
It's important to acknowledge the limitations of the Magic Wand tool. It struggles with images that have:
- Subtle color variations: If the object you want to select blends seamlessly with the background, the Magic Wand may not be able to differentiate them effectively.
- Complex textures or fine details: Areas like wispy hair, fur, or intricate patterns can be challenging for the Magic Wand to select accurately.
- Scattered or non-contiguous areas of the same color: While unchecking "Contiguous" helps, it can sometimes lead to over-selection.
In such cases, other selection tools in Photoshop often prove more effective:
- Quick Selection Tool: This tool works by "painting" a selection, and it automatically detects edges based on color and texture. It's often more intuitive and faster for selecting objects with more complex boundaries than the Magic Wand.
- Object Selection Tool: In more recent versions of Photoshop, this tool uses AI to automatically identify and select distinct objects within an image, often with remarkable accuracy.
- Lasso Tools (Lasso, Polygonal Lasso, Magnetic Lasso): These tools offer more manual control. The Polygonal Lasso is good for straight-edged selections, while the Magnetic Lasso attempts to snap to edges based on color contrast.
- Pen Tool: For ultimate precision and control, especially for sharp, vector-like paths, the Pen Tool is the professional's choice.

Enhancing Your Workflow with Third-Party Tools
For professionals and enthusiasts looking to optimize their Photoshop workflow, specialized hardware like TourBox can be a significant advantage. By assigning frequently used functions, such as brush size adjustments, zooming, or tool switching, to physical controls, users can maintain focus on their creative work without constantly reaching for their mouse or keyboard. This can lead to a more fluid and efficient editing process, especially when performing repetitive tasks common with selection tools.
The Evolution of Selection Tools
Photoshop continues to evolve, with newer versions integrating AI-powered features like "Select Subject" within the "Select and Mask" workspace. These AI tools can often provide excellent starting points for selections, particularly for well-defined subjects. However, the Magic Wand tool remains a valuable component of the Photoshop toolkit, especially for its speed and simplicity in specific use cases. Understanding its strengths and weaknesses allows users to employ it effectively, often in conjunction with other selection methods, to achieve desired results.
How to use the Photoshop Sky replacement tools
Ultimately, the Magic Wand tool is a powerful yet straightforward utility for making selections based on color similarity. Its effectiveness hinges on understanding its parameters, recognizing its limitations, and knowing when to combine it with other selection techniques or leverage advanced features like "Select and Mask" for professional-grade results. With practice, users can master the Magic Wand and integrate it seamlessly into their image editing workflow.