Capturing the night sky is an endeavor that transcends simply pointing a camera upwards; it's about harnessing the cosmos as the ultimate canvas for a photographer. There's an undeniable magnetism to the celestial expanse that continually draws our gaze skyward. For those venturing into the realm of astrophotography, understanding the fundamental camera settings is paramount. ISO, a measure of your camera's sensitivity to light, dictates how brightly your images will appear. While a higher ISO can brighten a scene, it often comes at the cost of increased image graininess. Shutter speed, conversely, controls the duration the camera's shutter remains open, allowing light to reach the sensor. Measured in fractions of a second or whole seconds, a fast shutter speed might be 1/1000th of a second, while a slow one could be a full second. For the deliberate, slow exposures required in night photography, a tripod is indispensable to prevent motion blur. Furthermore, a lower aperture setting (a smaller f-stop number) is typically necessary to gather sufficient light for a well-exposed image, as higher f-stops, while offering greater depth of field, can significantly limit light ingress.
The journey into astrophotography processing, particularly for celestial objects like the Milky Way, is a continuous learning experience. It's a skill that evolves over time, and one that benefits immensely from exposure to diverse techniques and perspectives. While capturing individual frames might become manageable after some practice, the subsequent processing stages can present a steep, often non-intuitive, learning curve, even for seasoned Photoshop and Lightroom users. The goal of this guide is to demystify some of these advanced processing techniques, offering a structured approach to transforming raw captures into stunning astronomical images.
From Capture to Stack: The Foundation of Astrophotography
The initial phase of astrophotography processing begins long before the image ever hits your computer. It starts with thoughtful capture techniques and the crucial step of image stacking. When I first embarked on deep-sky astro work, I felt reasonably adept at capturing individual images after a few test runs. However, the processing was a significant hurdle, and it wasn't immediately intuitive, even with prior experience in Photoshop and Lightroom. I often wished for a step-by-step guide, as many online tutorials, particularly on platforms like YouTube, tended to be confusing rather than illuminating.
My early forays into deep-sky astrophotography were informed by prior experience with ultra-wide-field tracking, specifically in astro-landscape style shooting with lenses such as 14mm, 20mm, or 35mm/50mm prime lenses. This experience provided a foundation for understanding how to track celestial objects. A notable opportunity arose in March 2021 with a conjunction between Mars and the Pleiades. The fine details visible in a crop of the leading image in this article were a revelation. Previously, crude processing had obscured such nuances, leading me to believe I hadn't captured any faint dust. In fact, my attempts to flatten the sky gradient-a challenging skill for beginners-had inadvertently masked this detail. My perception was incorrect; the data revealed a wealth of faint dust in that region. Had I exposed for longer and collected more images, this signal would have been even stronger. This particular result was commendable given the relatively short exposure time on target. The advantage of shooting under relatively dark skies, a Bortle 4-5 classification, meant less light pollution, enabling the capture of a better signal more rapidly. Looking back, I recognize that I should have opted for an f/2.8 aperture instead of f/4 to maximize light-gathering capabilities during this time-sensitive shot, as the Pleiades cluster was descending below the horizon, as was Mars. The detailed processing steps that led to this image are outlined in this guide.
The Gear for the Shot
To achieve the specific field of view for the Mars and Pleiades conjunction, a 70-200mm f/2.8 lens was employed at 200mm on a Nikon D850 camera set to ‘full frame’ mode. This configuration yielded a 45-megapixel output, which is ample for a competent astrophoto. For cameras with lower resolution, the captured data can later be "drizzled" to effectively double the resolution, a technique originally developed by NASA.
The camera settings for this particular image were: ISO 800, with 2-minute sub-exposures (individual exposures that form the final stacked image). A total of 20 such frames were captured. For the astute observer, this translates to a total integration time of 40 minutes on target when all frames are utilized, assuming no frames are discarded due to factors like wind-induced blur. The initial image, while not perfect, was sufficiently promising to inspire continued exploration. In late 2024, I revisited this image and reprocessed it, applying the accumulated knowledge of the intervening years. This reprocessing significantly enhanced the background signal and revealed considerably more dust, which was remarkable considering the modest 40-minute total exposure. The primary improvements I would have made in hindsight would be to increase the total time on target. Additionally, I would have attempted to track the target more directly overhead (at the zenith) rather than positioning most of the exposures low on the horizon, where light pollution is most prevalent and consequently, the collection of data-the light itself-is weakest.
Beginning Processing: The Art of Stacking
The processing workflow typically commences with importing all captured files onto a computer and utilizing specialized software for stacking. Deep Sky Stacker is a popular choice for this purpose. The stacking process involves combining your "light frames"-the actual exposures containing your celestial targets-with essential "calibration frames." These calibration frames include flats, bias, and sometimes darks.
- Light Frames: These are your primary captures of the night sky.
- Calibration Frames: These are crucial for removing unwanted artifacts and improving the overall quality of the stacked image.
- Flats: Flats are images taken of a uniformly illuminated surface. They are essential for correcting vignetting (the darkening of image corners) and for removing dust spots that may appear on your sensor or the rear element of your lens. While lens profile corrections in software can help, they are often insufficient for accurately removing these artifacts, especially dust spots that become prominent when stacking many hours of data.
- Bias Frames: Bias frames are short exposures taken with the lens cap on. They capture the electronic noise inherent in the camera's sensor readout. Bias frames are used to calibrate the flat frames.
- Dark Frames: Dark frames are exposures taken with the lens cap on, at the same ISO and exposure time as your light frames. They capture thermal noise generated by the camera sensor during long exposures. However, for many modern DSLR and mirrorless cameras, such as the Nikon D850 or Z8, dark frames are often unnecessary due to advanced dark current suppression technology. This saves valuable time under dark skies.
The Drizzle Technique: Enhancing Resolution
Drizzle is a sophisticated technique, originally developed by NASA for processing images from the Hubble Space Telescope and subsequently adopted for the James Webb Space Telescope. Its primary purpose is to achieve greater magnification of a celestial object, especially when using a shorter focal length lens or telescope than ideal, or simply to increase the final image's physical resolution.
To effectively utilize drizzle, several conditions must be met:
- Undersampling: Your camera's pixel size should be smaller than the resolution of the data projected onto the sensor. This often occurs when using wider focal lengths.
- Dithering: During image capture, the camera mount should be intentionally moved slightly between exposures. This randomizes the position of stars on the sensor, helping to distinguish true signal from noise during stacking.
- Sufficient Data: A significant amount of data, typically several hours of total integration time, is required.
If these conditions are met, drizzle can be enabled within your stacking software. It's important to note that drizzle is computationally intensive, demanding substantial processing power. With 128GB of RAM, I can attest to the significant percentage of resources utilized when compiling and processing large image files. A crucial caveat to drizzle is that it can introduce noise. Therefore, it is strongly recommended to have multiple hours of data before enabling X2 or X3 drizzle in your stacking software. Undersampling, in essence, means your camera is sampling the data at a lower resolution than the actual data falling onto its sensor. This is most beneficial when your imaging scale is larger than the atmospheric seeing conditions. Consequently, wide-field images captured with focal lengths under 200mm will almost invariably benefit from drizzle, provided the other prerequisites are satisfied.
Basic astro image stacking and processing with Siril
Obtaining the Stacked TIFF: The Linear Stage
Upon completion of the stacking process, your software will output a stacked TIFF file. This file contains a vast amount of data in a "linear" state, meaning the pixel values are directly proportional to the amount of light received. Consequently, this file will often appear almost entirely black on your screen. This is entirely normal and signifies that the image is ready for the next critical stage: stretching.
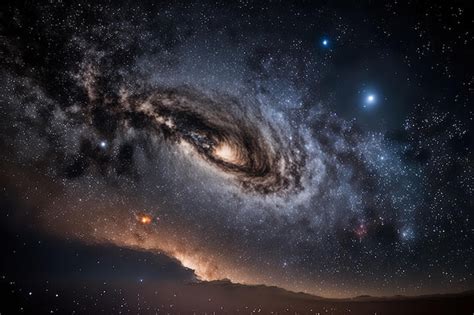
For the purpose of this guide, and because the initial example image is older, we will shift focus to a more recent capture of the Whirlpool Galaxy, located approximately 23 million light-years away. This allows for a demonstration of more advanced processing techniques on a richer dataset.
Importing the Stacked File into Photoshop: The Initial Conversion
When you first import the stacked file from your stacking software into Photoshop, you will be presented with a predominantly black 32-bit file. This is expected. To begin working with the image and to enable the visualization of essential elements like color histograms, it's necessary to convert the file to 16-bit mode. This is achieved by navigating to Image > Mode > 16 Bit. When prompted, select the "Exposure and Gamma" method for the conversion. To streamline repetitive tasks, I have developed custom actions within Photoshop over the years, which significantly expedite this process. It's worth noting that Photoshop has undergone significant upgrades, enhancing its capabilities for 32-bit image manipulation. Therefore, it is now recommended to perform at least one or two "stretches" of the data while still in 32-bit mode. This approach provides substantially greater dynamic range and stretching power before converting to 16-bit.
Stretching: Revealing the Faint Signal
Stretching is the transformative process of carefully excavating the faint signal hidden within the grayscale or blackness of the stacked file. This is achieved by manipulating the image's tonal range. A common method involves creating a new layer (Ctrl+J) and then applying the Curves adjustment (Ctrl+M). By adjusting the curve upwards, you brighten the collected signal, as illustrated when comparing the stretched image to the original 32-bit file. At this stage, you'll observe the histogram shifting towards the right, and the color channels beginning to separate. True color balance is achieved when the start of the data slope aligns across all channels, rather than focusing solely on the midpoint.
Crucially, before proceeding, it's vital to correct the histogram by using a Levels adjustment layer (Ctrl+L). This step is essential for re-establishing the black point of the sky, thereby mitigating sky glow and reducing the impact of light pollution. A faint green cast might become apparent at this stage; this is normal and will be addressed later. The stretching process often requires multiple iterations to achieve the desired result.
Black Point Correction: Setting the Foundation
The black point slider in the Levels or Curves adjustment is used to set the darkest point in the image, typically the sky. By pulling this slider just before the start of the data's curve, you can define the black level. It's imperative to exercise caution to avoid "clipping" the data-that is, crushing the blacks to the point where detail is irretrievably lost. After confirming the change, you can proceed to the next critical step: protecting star colors.
Protecting Star Colors: Preserving Celestial Hues
To safeguard the colors within the stars, a selection is made using the "Color Range" tool (Select > Color Range) on a new layer. The aim is to select the brightest stars that exhibit color in the original stack. Following this selection, you might choose to remove the central part of a galaxy from the selection and then "feather" the selection by expanding it by a few pixels and applying a feather radius. This ensures that the subtle halo of light surrounding each star is captured and protected during subsequent adjustments.
Arcsinh Stretching: A Mathematically Sound Approach to Color and Detail
Arcsine hyperbolic (arcsinh) stretching is a technique favored by many astrophotographers for its ability to preserve color while revealing faint details. When stacking images, especially those without a de-Bayering process applied during capture, color information can be diminished. While standard stretching techniques excavate signal, they can also lead to desaturation. Arcsinh stretching, however, employs a mathematically calculated curve designed to maintain as much color fidelity as possible.
A typical range for arcsinh stretching is between 35 and 60. Values below 35 may not produce a noticeable enough change, while higher values can lead to excessive stretching. After applying the arcsinh stretch, deselect the previous selection (Ctrl+D). Flattening the image and then creating another layer (Ctrl+J) is a good practice to maintain system responsiveness. For this adjustment, I often utilize specially designed stretches, such as those developed by Mark Shelley, which are available for Photoshop.

Correcting Colour Casts: Removing Light Pollution Effectively
As the image processing progresses, a more pronounced green cast often becomes apparent, especially after stretching the data. While various methods exist to combat this, including specialized software like "Hasta La Vista Green," a more accurate and universally applicable approach is based on principles learned from renowned astrophotographer Roger Clark. This method addresses the drift of color channels, a common issue that can arise during image acquisition and processing.
To correct color casts, open a Curves adjustment layer on a new layer. Focus on the histogram view, ensuring that the red, green, and blue channels are visible. Select the green channel in the Curves dialog. By sliding the leftmost point of the green curve to the right, you are effectively subtracting green from the image. This precise method is also the correct way to extract light pollution. Many astrophotographers mistakenly rely on the white balance slider in processing software, which often results in images with an unnatural blue cast and washed-out stars. This guide emphasizes a more natural and scientifically grounded approach to color correction.
To remove light pollution effectively, it's necessary to subtly subtract from each color channel to align the leftmost peak of the data. Subsequently, the main hump of the data can be slowly shifted to the left. The amounts subtracted from each channel may differ to achieve neutrality. The space between the left wall of the histogram and the data hump represents sky glow and any residual light pollution in the image.
Gradient Removal: Achieving a Smooth Background
With the color cast corrected, the image will exhibit a more neutral tone, ready for further processing. At this stage, gradient removal becomes crucial. Gradients, which are smooth variations in brightness or color across the image, are best addressed as they appear and typically through iterative adjustments. While a manual approach is possible, specialized plugins like GradientXTerminator can significantly streamline this process.
For those without such plugins, a manual method can be employed within Photoshop. Throughout this process, it is vital to avoid clipping the black areas. Any clipping visible on the histogram at this point is likely due to stacking artifacts at the edges of the frames. Nearer the end of processing, you will have the opportunity to refine the black point and determine the desired darkness of the sky. For now, the focus is on subtle adjustments. Some files may require numerous stretching iterations. It is generally advisable to perform these adjustments in small, controlled steps rather than one large adjustment that could introduce unwanted artifacts.
From a personal perspective, many amateur astrophotography images suffer from excessively black backgrounds. In reality, space is not an absolute black but rather a deep, pervasive gray. Keeping this in mind, the ultimate decision on the final background tone rests with the photographer. For the current stage, leaving the background slightly brighter preserves the data collected and allows faint structures, such as the spiral arms of a galaxy, to remain visible.
To manually remove gradients in Photoshop, create a new layer. The process might initially seem counter-intuitive: you will effectively remove the deep space object or galaxy from the image. This technique is most effective when there's a distinct object to work with; otherwise, selection feathering becomes necessary. Using the Spot Healing Brush or Clone Stamp tool, carefully remove the galaxy or object, making it as invisible as possible. Subsequently, navigate to Filter > Noise > Dust & Scratches. Then, go to Image > Apply Image, using settings that extract the background gradient from the file. After applying this, the file should exhibit a more leveled background. Any bright areas, such as those in the lower left of an image, can be addressed in subsequent steps. If the initial gradient was not severe, the effect of this process might be less dramatic.
Second-Level Star Color Protection: Fine-Tuning Celestial Details
Depending on how the stars appear after initial processing, it may be necessary to repeat the star color protection process described earlier in this tutorial. This ensures that the vibrant hues of the stars are preserved throughout the editing workflow.
Utilizing Adobe Camera Raw (ACR): A Lightroom-like Environment
At this juncture, it's opportune to open Adobe Camera Raw (ACR), which essentially provides a Lightroom-like editing environment within Photoshop. This is the ideal place to address any remaining lens aberrations, such as purple or green star halos, by utilizing the lens profile correction tools. Additionally, a mild boost to the overall image's saturation and vibrancy can be applied if desired, enhancing the visual appeal of the astrophotograph.
Mangled Colour in Astrophotography Images: The Power of Curves
The manipulation of color in astrophotography is a powerful tool, and Photoshop's Curves adjustment layer offers immense control. The accompanying image demonstrates how easily colors can be altered. By introducing blue into the file, for instance, one simply needs to open a Curves layer, select the blue channel, and gently pull the curve upwards in the lower third of the graph. Some photographers may find this stylistic approach appealing, demonstrating the flexibility of post-processing in achieving diverse aesthetic outcomes.
tags: #adobe #photoshop #for #astrophotography