Resizing objects in Photoshop is a fundamental skill, essential for everything from fitting an image to a canvas to creating dynamic visual effects. While numerous methods exist, understanding the nuances of the Scale tool and its associated transformations can elevate your design workflow. This tutorial delves into the various ways to resize, reshape, and manipulate elements within Photoshop, ensuring you can achieve desired effects with precision and quality.
Understanding the Fundamentals of Image Scaling
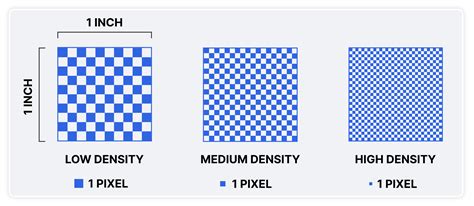
At its core, scaling an image involves changing its dimensions, either width, height, or both. This process is intrinsically linked to the concept of resolution, which dictates the density of pixels (for digital displays) or dots (for print). Understanding the difference between PPI (Pixels Per Inch) and DPI (Dots Per Inch) is crucial. PPI refers to the number of pixels packed into a one-inch square on a screen, while DPI refers to the number of ink dots a printer lays down in the same area. Both terms relate to how much detail an image can hold, with higher numbers indicating greater density and thus, potentially, more detail. When an image lacks sufficient resolution, it can appear soft or pixelated, a phenomenon often referred to as "jaggies." Conversely, excessive resolution results in larger file sizes without a discernible improvement in display quality.
When you resize an image, Photoshop must recreate or discard pixels. This process is known as resampling. For enlargements (upscaling), Photoshop interpolates new pixels based on existing ones, and for reductions (downscaling), it discards pixels. The algorithms Photoshop uses for resampling significantly impact the final image quality.
Key Resampling Algorithms in Photoshop
Photoshop offers several resampling algorithms within the "Image Size" dialog box, each with its strengths:
- Automatic: Photoshop intelligently selects an algorithm based on whether you are enlarging or shrinking the image.
- Preserve Details (Enlargement) / Preserve Details 2.0: This is generally the best choice for enlarging images. "Preserve Details 2.0" aims to maintain textures and minimize noise, offering a good balance for upscaling.
- Bicubic Sharper: This algorithm is optimized for shrinking images. It applies sharpening during the resizing process, helping to prevent details from becoming overly blurry.
- Nearest Neighbor: The fastest but most rudimentary option. It directly copies or discards pixels, which can result in noticeable jagged edges, especially with graphics or sharp lines.
- Bilinear: A middle-ground option that provides average results and is faster than Bicubic methods.
When resizing, it's important to be aware that some quality degradation can occur, especially with significant enlargements. Working with high-resolution source material from the outset is always the best strategy for maintaining optimal quality.
The Power of Free Transform
The Free Transform tool is arguably the most versatile method for resizing and manipulating objects in Photoshop. Activated by pressing Ctrl+T (Windows) or Command+T (Mac), it surrounds the selected layer or object with a bounding box featuring eight control points (handles).
From here, you can perform a multitude of transformations:
- Scaling: Dragging any of the corner handles will resize the object. Holding down the
Shiftkey while dragging a corner handle maintains the aspect ratio, ensuring the object scales proportionally. To scale symmetrically from the center, hold down theAlt(Windows) orOption(Mac) key while dragging a corner handle. - Rotating: Moving your pointer just outside the bounding box transforms it into a curved, two-sided arrow. Clicking and dragging will rotate the object around a fixed reference point. You can also enter a precise rotation angle in the Options bar.
- Skewing: Holding down
Ctrl(Windows) orCommand(Mac) while dragging a side handle will slant the object vertically or horizontally. - Distorting: Holding down
Ctrl+Shift(Windows) orCommand+Shift(Mac) while dragging a corner handle allows you to stretch the object in all directions, independently moving each corner. - Perspective: Holding down
Ctrl+Alt+Shift(Windows) orCommand+Option+Shift(Mac) while dragging a corner handle applies a one-point perspective, making the object appear to recede into space.
Right-clicking (Windows) or Control-clicking (Mac) within the bounding box reveals a sub-menu with direct access to Rotate, Skew, Distort, Perspective, and Warp options.
Advanced Transform Techniques
Beyond the basic Free Transform functions, Photoshop offers more specialized tools for intricate manipulation:
- Warp: This powerful tool allows for detailed, freeform distortion. When activated, a mesh grid appears over the image, and you can drag control points on this mesh to sculpt the object's shape. This is ideal for subtle adjustments or creating organic forms.
- Perspective Warp: For more precise control over perspective, the Perspective Warp tool (found under the Edit menu) allows you to define planes and adjust vanishing points, making it invaluable for architectural photography or aligning objects within a scene.
- Content-Aware Scale: This advanced feature is particularly useful when resizing a background image without distorting the main subject. It intelligently analyzes the content and attempts to preserve important details while stretching or shrinking the rest.
How to Use Content-Aware Scale in Photoshop
Working with Selections and Non-Destructive Editing
Photoshop's transformative capabilities extend to selections themselves. The "Transform Selection" command (available when a selection outline is active) allows you to resize, rotate, skew, or distort the selection boundary without altering the pixels within it. This is incredibly useful for precisely defining areas for further manipulation or for creating unique masking effects.
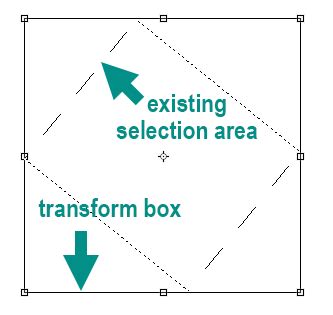
When you activate Transform Selection, a bounding box appears around your selection, and you can manipulate it using the same methods as Free Transform. This means you can reshape the outline of your selection to match a specific perspective or angle.
For truly non-destructive editing, consider using Smart Objects. When you convert a layer into a Smart Object, it becomes a container that preserves the original image data. You can then scale, rotate, and transform the Smart Object multiple times without losing image quality. To convert a layer to a Smart Object, right-click on the layer in the Layers panel and select "Convert to Smart Object."
Preserving Quality During Resizing
A common challenge when scaling images is a perceived drop in quality. To mitigate this:
- Choose the Right Resampling Algorithm: As discussed, selecting the appropriate algorithm in the "Image Size" dialog box is crucial. For enlargements, "Preserve Details" is often the best starting point.
- Utilize Smart Objects: Their non-destructive nature means you can always revert to the original quality.
- Sharpen After Resizing: If an image appears slightly blurry after shrinking, applying a sharpening filter (like Unsharp Mask or Smart Sharpen) can help restore lost detail.
- Start with High-Resolution Sources: The best way to ensure high-quality output is to begin with images that have ample resolution for your intended use.
- Understand Image Size vs. Resolution: When requesting or providing images, specify both the physical dimensions (e.g., 4x6 inches) and the resolution (e.g., 300 PPI/DPI). Simply stating "300 dpi" without dimensions can be ambiguous.
The "Stair-Step" Interpolation Method
An advanced technique, sometimes referred to as the "secret squirrel handshake," involves scaling an image incrementally rather than jumping directly to the final size. The theory is that by scaling up or down by small percentages (e.g., 10% at a time) and applying transformations repeatedly, you can achieve better results. While this was once a popular workaround, modern algorithms like "Preserve Details" in newer Photoshop versions often produce similar or superior results, with some of this incremental processing potentially built-in. It's always worth experimenting with different methods to see what works best for your specific image.
Batch Processing and Workflow Enhancements
For users who need to resize multiple images consistently, Photoshop offers tools for batch processing. The "Image Processor Pro" script, for example, can automate resizing, saving, and format conversions for a large number of files.
Furthermore, specialized hardware like the TourBox can enhance workflow efficiency. While not a direct replacement for Photoshop's tools, devices like the TourBox can map complex shortcuts and functions, allowing for quicker access to transformations and other commands, streamlining the entire process.
Transform Options and Preferences
Photoshop's preferences can subtly influence how tools like Free Transform behave. Accessing Edit > Preferences > General (Windows) or Photoshop > Preferences > General (Mac) reveals various settings. The "Legacy Free Transform" option, for instance, allows you to revert to the pre-CC 2019 transform behavior, which some users may prefer. Understanding these preferences can help tailor Photoshop's functionality to your specific workflow.
When working with vector shapes or shape layers, maintaining their crispness during transformation is paramount. Selecting the appropriate interpolation method and utilizing features like "Snap to Grid" or "Snap to Guides" can ensure precise alignment and sharp results. Always keep an eye on the Options bar when using transformation tools, as it provides context-sensitive controls for maintaining aspect ratio, setting rotation angles, and more.
By mastering the various scaling and transformation tools within Photoshop, from the intuitive Free Transform to advanced techniques like Content-Aware Scale and Transform Selection, you gain the power to manipulate images with precision and creativity, ensuring high-quality results for any project.