Creating visually appealing and commercially viable patterns is a key skill for many digital artists, particularly those looking to sell designs on platforms like Spoonflower. While bold "hero" patterns often grab immediate attention, it's a surprising revelation that simpler, foundational patterns, often referred to as "blender patterns" and "coordinates," can also be highly successful. These patterns, while seemingly basic, are essential for fabric design and digital products, providing versatility and depth to a collection. This tutorial will guide you through the process of creating seamless plaid patterns in Procreate, focusing on precision, flexibility, and creative exploration.
The Foundation of Seamless Patterns: Precision and Tools
The most critical aspect of creating any repeating pattern, especially plaid, is ensuring that the stripes align perfectly. This means not only the width of the stripes but also their texture and how they meet at the edges. For seamless plaid, the top and bottom edges of your pattern tile must match, and the left and right edges must also align flawlessly. This perfect alignment is paramount for a professional and polished final product, whether it's fabric, digital paper, or any other application where the pattern will repeat.
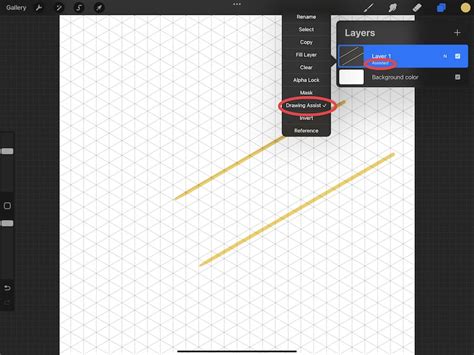
To achieve this level of precision in Procreate, the right tools and settings are indispensable. While Procreate offers a helpful "snap" feature for drawing straight lines, it may not always guarantee the absolute perfect vertical and horizontal alignment required for complex patterns. Therefore, utilizing the "Drawing Assist" feature with a "2D Grid" is highly recommended. This provides a structured framework that ensures your lines are perfectly straight and aligned, simplifying the creation of accurate plaid elements.
For this process, a "monoline brush" is ideal. This type of brush has a consistent width and no inherent texture, which is crucial for clean lines that will tile seamlessly. If you don't have a suitable monoline brush, you can easily edit a native brush in Procreate to achieve the desired characteristics - making it larger and ensuring no textural variation. You can access a free, large monoline brush as a newsletter subscriber in the "Potpourri brushset," or simply adjust an existing brush to suit your needs.
Once your brush is ready, navigate to "Actions" (the wrench icon), then "Canvas," and activate "Drawing Guide." This will default to a 2D grid, providing the visual aid necessary for precise line placement.
Building Your Plaid: Layers, Colors, and Blend Modes
The creation of a plaid pattern in Procreate is a straightforward, yet highly adaptable, process. You can begin by drawing either horizontal or vertical lines. A key decision point early on is whether to place all your colors on a single layer or to utilize separate layers for each color or set of lines. Experimenting with these approaches will help you discover your personal workflow and the method that yields the best results for your specific design. Many artists find that separating elements onto different layers offers greater flexibility later in the process.
After establishing your first set of lines (e.g., horizontal), you will then proceed to create the intersecting lines in the other direction (vertical). You can turn off the visibility of the grid lines at this stage if you prefer a cleaner workspace, but remember that "Drawing Assist" will continue to be applied to your layers, maintaining their straightness.
Color experimentation is a vital part of the plaid design process. The possibilities are virtually endless, and discovering color combinations that work harmoniously is key to creating a visually pleasing pattern. Don't be afraid to try a wide range of palettes to see what resonates with you and your intended application.
When working with a light background color, as is common in many plaid designs, exploring "Blend Modes" can unlock fascinating visual effects. The "Multiply" blend mode, for instance, is particularly effective. It creates beautiful, rich tones in the areas where colors overlap, giving the plaid a sense of depth and dimension. If you are working with a dark background, you will likely rely more on adjusting the "opacity" of each layer to achieve a similar nuanced effect. Reducing the opacity of individual layers allows for subtle color interactions and prevents the pattern from becoming too harsh or overwhelming.
Ensuring Seamlessness: Checking and Repeating the Pattern
Once you have laid down your intersecting lines and are happy with the color interactions, you have the fundamental building blocks of your plaid pattern. However, before considering it complete, it is imperative to check for seams. This involves ensuring that the pattern tiles perfectly when repeated. A crucial step in this verification process is to view your pattern from a zoomed-out perspective. This allows you to see the overall effect and identify any misalignments or visual glitches that might not be apparent when zoomed in.
To check for seamlessness, a common technique involves duplicating your pattern tile. A quick way to do this in Procreate is to perform a "3-finger swipe down" to copy all visible layers, then swipe down again to paste this content onto a new layer. You can then duplicate this new layer multiple times, typically four times, and arrange these copies into the corners of your canvas. This creates a larger representation of your repeating pattern, making it much easier to spot any imperfections at the edges where the tiles would meet. If the seams look good, you've successfully created a seamless plaid!
How To Make a Seamless Pattern in Procreate - using clipart!
Advanced Plaid Techniques: Texture, Rotation, and Flexibility
While the basic method provides a solid foundation, there are several advanced techniques that can elevate your plaid designs and offer greater creative control.
Tip 1: Incorporating Texture
For a more traditional or artisanal feel, experiment with texture brushes. However, when introducing texture, the importance of checking seams becomes even more critical. You must pay close attention not only to the alignment of the textured lines themselves but also to any textural variations at the edges of those lines. Some textures can create "hard edges" that don't blend seamlessly, requiring careful adjustment or the selection of different brushes.
Tip 2: Efficient Line Duplication and Rotation
If you aim for a traditional plaid where the horizontal and vertical sets of lines are identical in their structure and spacing, you can streamline the process. Draw one set of lines (e.g., horizontal), duplicate the layer, and then rotate the duplicated layer by 90 degrees to create the vertical lines. A crucial tip for accurate rotation is to select both the layer you intend to rotate and a filled layer simultaneously before performing the rotation. This is achieved by swiping right on the desired layers. Doing so ensures that the rotation point is centered on the canvas, preventing distortion and maintaining the integrity of your pattern.
Tip 3: Maximizing Flexibility with Layer Separation
As mentioned earlier, separating your lines onto different layers offers significant advantages. This approach provides maximum flexibility for achieving diverse looks. It's often beneficial to keep lines of the same color grouped together on their respective layers. This organizational strategy not only aids in clarity but also unlocks powerful creative options.
By keeping lines separate, you can create a base plaid pattern once in Procreate and then easily generate numerous color variations. Simply duplicate the entire plaid composition and then adjust the colors on the individual layers to create new palettes. Furthermore, you can fine-tune the visual impact of your plaid by adjusting the opacity of each layer independently. This allows for subtle shifts in color intensity and depth, enabling you to create a wide spectrum of plaid styles from a single foundational design.
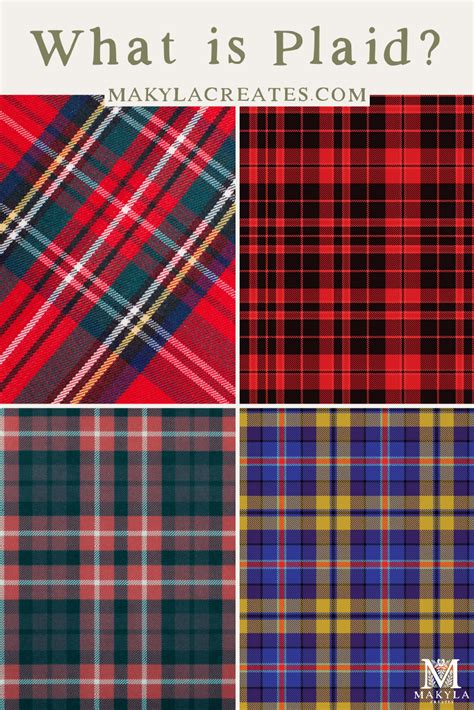
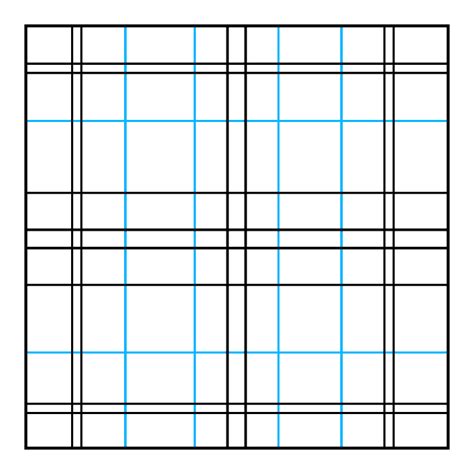
Studying classic plaid designs from various sources can be incredibly insightful. By analyzing the line weights, spacing, and color interactions, you can begin to deconstruct them into their basic building blocks. This analytical approach will train your eye to see the underlying structure of different plaid types, empowering you to recreate them and develop your own unique variations. For instance, in some classic plaids, you might notice a deliberate difference in the opacity of the vertical versus the horizontal lines, contributing to a specific visual character. Experimentation is key; play with opacities, line thicknesses, and color combinations to discover what you find most appealing.
Beyond the Basics: Exploring Further Possibilities
The methods outlined above provide a robust foundation for creating a wide array of plaid patterns in Procreate. However, the creative journey doesn't end there. For those interested in exploring more complex variations, such as diagonal plaid patterns, dedicated tutorials and resources can offer specialized techniques.
How To Make a Seamless Pattern in Procreate - using clipart!
For artists seeking ongoing support and a structured learning environment, consider joining a membership program. Platforms like "Creative Journey" offer comprehensive resources, including classes, live Zoom calls, and a private community, designed to support artists at every stage of their Procreate journey. These memberships often provide exclusive brushes, color palettes, and opportunities for feedback, fostering growth and skill development.
New creatives, in particular, can benefit immensely from structured courses designed to build confidence. A well-crafted class can demystify complex design concepts, providing step-by-step guidance that ensures you never feel lost or overwhelmed. The goal is to equip you with the skills to create finished plaid patterns that can be confidently used in portfolios, print-on-demand shops, or as digital product assets. Even if you have no prior experience with plaid or a formal design background, a good starting point can make all the difference. The emphasis should be on starting simple, staying playful, and designing patterns you are proud of, regardless of your current skill level. You are a pattern designer, and every artist needs a starting point.
Membership platforms often feature monthly classes covering various pattern design techniques, including the use of pattern layouts and unique methods. They also provide access to exclusive Procreate resources like brushes and color palettes, along with opportunities for constructive feedback and support through Q&A sessions. Monthly challenges can further hone your skills by simulating briefs and encouraging the development of a unique design style. Engaging with a community of like-minded artists fosters collaboration, shared experiences, and collective growth. Joining such a program means gaining access to a rich archive of past content, ensuring continuous learning and inspiration.
While Procreate is a powerful tool for pattern creation, some designers may find that other software, like Photoshop, offers additional flexibility and precision for certain types of intricate patterns. However, the accessibility and ease of use of Procreate make it an excellent option for creating seamless plaid patterns, especially when you want to design without the need for more complex software or when you simply want to create on the go. The ability to make a seamless plaid pattern without even leaving your couch is a testament to the power and convenience of modern digital art tools.
Whether you discovered this method through trial and error or by following a guide, the experience of creating seamless patterns in Procreate is rewarding. Engaging with the digital art community, sharing your work, and learning from others can significantly enhance your creative process. Platforms like Skillshare, where experienced instructors offer a wealth of classes, can be invaluable resources. A free trial can grant access to a vast library of courses, empowering you to explore various techniques and expand your artistic repertoire.