Photoshop, a powerhouse for digital image manipulation, offers a robust set of tools designed to enhance precision and control in your creative workflow. Among these, rulers and grids stand out as fundamental aids for alignment, measurement, and composition. Whether you're a seasoned professional or a beginner venturing into graphic design, understanding how to effectively enable and utilize these features can significantly elevate the quality and accuracy of your work. This guide delves into the intricacies of Photoshop's rulers and grids, providing a step-by-step approach to harnessing their full potential for both simple and complex design tasks.
Enabling and Customizing Rulers
The rulers in Photoshop are indispensable for precise measurements and positioning of elements within your document. They appear along the top and left edges of the image window by default, providing a visual scale.
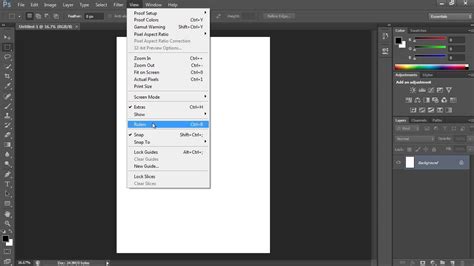
To toggle the rulers on or off, navigate to the Menu Bar and select "View" > "Rulers." This simple command will either display or hide the rulers, allowing you to manage screen real estate as needed.
Adjusting Measurement Units
The default unit of measurement displayed on the rulers is often inches. However, for digital design, especially when working with web graphics or specific pixel dimensions, it's crucial to switch to pixels. To change the units of measurement, right-click directly on either the horizontal or vertical ruler. A context menu will appear, offering various units such as pixels, inches, centimeters, millimeters, points, picas, and percent. Select "Pixels" from this menu to update the ruler display.
For a more permanent change to the default unit of measurement, you can access the Photoshop Preferences. Go to "Edit" > "Preferences" > "Units & Rulers…" from the Menu Bar. This action opens the "Units & Rulers" settings within the "Preferences" dialog box. Within the "Units" section, locate the "Rulers" drop-down menu and select your desired default units. This setting will be applied to all new documents and will persist until you change it again.
Setting the Ruler Origin Point
The origin point, indicated by "0" on both rulers, is typically located at the top-left corner of the document. However, you can reposition this origin to suit your workflow. To do this, click and drag from the intersection of the rulers (the upper-left corner where they meet) down and to the right. The position at which you release the mouse pointer will become the new origin point for both rulers. This is particularly useful when you need to measure distances relative to a specific point within your image rather than the absolute edge.
Leveraging Grids for Layout and Alignment
The grid in Photoshop serves as an underlying structure, offering a framework for aligning and laying out content with enhanced accuracy. Unlike guides, which can be customized for each document, the default grid appearance is consistent across all Photoshop documents.
To turn the grid on or off, go to "View" > "Show" > "Grid" from the Menu Bar. This command will toggle the visibility of the grid lines.
Customizing Grid Appearance
The appearance and density of the grid can be fine-tuned to match your project's requirements. To adjust these settings, navigate to "Edit" > "Preferences" > "Guides, Grid & Slices…" from the Menu Bar. This opens the "Guides, Grid & Slices" settings within the "Preferences" dialog box.
Within this dialog box, you'll find options to control the grid's appearance. The "Gridline Every" field allows you to set the frequency of the major gridlines. Enter a numerical value here, and then select the desired unit of measurement from the adjacent drop-down menu. For instance, you could set it to "50 pixels" to have a major gridline every 50 pixels.
Furthermore, the "Subdivisions" field enables you to determine the number of subdivisions that appear between each major gridline. Entering a number here will divide each major grid square into smaller sections, providing finer alignment points. For example, setting "Subdivisions" to "5" when "Gridline Every" is set to "50 pixels" would create minor gridlines every 10 pixels.
The "Color" option allows you to choose the color of the grid lines, ensuring they are easily visible against your artwork. You can also select "Percent" as a unit for "Gridline Every," which will divide the image into even sections, a useful option for general compositional layouts.
The Power of Guides: Precision Placement
Guides are non-printing lines that you can place within your document to help align elements accurately. They are incredibly versatile and can be created and manipulated in several ways.
Creating Single Guides
To place a single guide at a specific, predetermined location, choose "View" > "New Guide." A dialog box will appear, allowing you to specify the orientation (Horizontal or Vertical) and the exact position (in pixels, inches, or your current ruler units) for the new guide. This is invaluable when you need to align elements to precise measurements, such as the example of placing vertical guidelines at 0px, 57.5px, 115px, 172.5px, and 230px for a 300px by 230px image.
Adding Guides from Rulers
A more intuitive method for adding guides is by directly interacting with the rulers. Simply click within the ruler area (either the top or left ruler) and drag your mouse pointer into the document. As you drag, a guide will appear, following your cursor. Releasing the mouse button will place the guide at that location.
To create a guide that snaps precisely to the ruler tick marks, hold down the "Shift" key while dragging from the ruler. This "snapping" behavior ensures that your guides align perfectly with the established increments on the rulers, preventing slight inaccuracies.
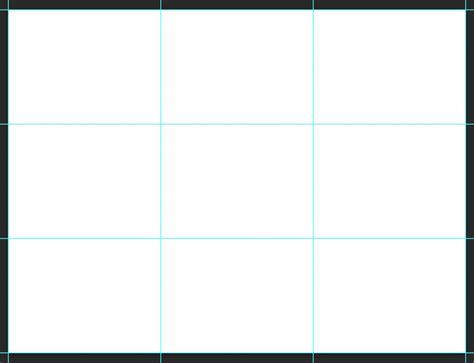
Creating Multiple Guides with New Guide Layout
For more complex layouts requiring a structured grid of guides, Photoshop offers the "New Guide Layout" feature. Navigate to "View" > "New Guide Layout." This powerful tool allows you to define a grid of guides with remarkable flexibility.

In the "New Guide Layout" dialog box, you can:
- Select the Target: Choose whether the guides should apply to the entire "Canvas," a specific "Artboard," or "Selected Artboards."
- Choose Guide Color: Select a color for your guides, making them stand out against your artwork.
- Define Columns and Rows: Specify the number of columns and rows you wish to create.
- Set Width, Height, and Gutters: Define the dimensions of your columns and rows, as well as the spacing between them (gutters).
- Specify Margins: Set the margin amounts for the top, bottom, left, and right edges of your document.
- Center Columns: Opt to center the columns within the document.
- Clear Existing Guides: Choose whether to remove any existing guides before applying the new layout.
Once you've configured your desired guide layout, you can save it as a preset by clicking "Save Preset." This allows you to quickly reapply the same guide structure to future projects, ensuring consistency.
Creating Guides from Shapes
Photoshop offers an innovative way to create guides based on existing objects: "New Guide From Shape." Select a shape layer, type layer, or even pixel-based layers, and then choose "View" > "New Guide From Shape." Photoshop will automatically generate guides that precisely outline the boundaries of your selected object. This is incredibly useful for aligning elements to the exact dimensions and positions of other elements on your canvas.
Managing and Manipulating Guides
Once guides are in place, Photoshop provides several tools and shortcuts for their management.
Repositioning Guides
To move an existing guide, you can use the "Move Tool" (V). Simply position the "Move Tool" directly over the guide you wish to reposition, and then click and drag it to a new location. Holding down the "Shift" key while dragging will snap the guide to the ruler tick marks, ensuring precise alignment.
Deleting Guides
To remove a single guide, you can either drag it off the canvas or, more efficiently, "Option"-click (Mac) or "Alt"-click (Windows) directly on the guide itself. This action will instantly delete the selected guide.
For deleting multiple guides at once, you can use a modifier key combination. Holding down "Option + Shift" (Mac) or "Alt + Shift" (Windows) while clicking on a guide will select multiple guides. You can then drag these selected guides to reposition them simultaneously or delete them collectively.
Locking and Unlocking Guides
To prevent accidental movement or deletion of your guides, you can lock them. The shortcut for locking and unlocking guides is "Command + Option + ;" (Mac) or "Control + Alt + ;" (Win). Alternatively, you can access this function via "View" > "Lock Guides." It's important to unlock guides when resizing your document, as this allows the guides to resize proportionally with the image.
Adjusting Guide Visibility and Appearance
Guides, especially on high-resolution monitors, can sometimes be difficult to see due to anti-aliasing. To make them appear thicker and more prominent, navigate to "Preferences" > "Performance." Within the "Graphics Processor Settings," click "Advanced Settings" and uncheck "Anti-alias Guides and Paths." This setting can significantly improve the visibility of guides and paths.
To change the color of selected guides, first select the guides you wish to modify (using the multiple selection method described earlier or by selecting them individually). Then, go to "View" > "Edit Selected Guides" and use the "Color" options to choose a new color.
Smart Guides and Pixel Grids: Advanced Alignment
Photoshop's "Smart Guides" are dynamic, context-aware guides that appear automatically as you move and align layers. They provide visual cues for spacing and alignment relative to other objects on the canvas, making it incredibly easy to position elements precisely without manual guide creation. To ensure Smart Guides are active, go to "View" > "Show" > "Smart Guides."
How to Use Smart Guides in Photoshop
When you zoom into an image above 500%, a "Pixel Grid" becomes visible. This grid displays individual pixels and is exceptionally useful for aligning vector shapes or other elements to ensure they begin and end on full pixel boundaries, thus avoiding anti-aliased edges that can appear blurry.
The "Snap Vector Tools and Transforms to Pixel Grid" preference, found under "Edit" > "Preferences" > "General," further enhances pixel-level precision. When this preference is enabled, shapes drawn or transformed will automatically snap to the pixel grid.
Consider the following illustration:
- The first shape was drawn with "Snap Vector Tools and Transforms to Pixel Grid" enabled. It aligns perfectly to the pixel boundaries.
- The middle illustration shows a shape drawn with this preference turned off. The shape's fill might not align perfectly with the pixel grid.
- The final illustration demonstrates the same shape from the second illustration, but with the "Align Edges" option enabled in the Options bar after drawing. This option forces the fill of the shape to "jump" to the nearest pixel grid edge, even if the original path (the black outline in this case) is not perfectly aligned. This offers a way to achieve pixel-perfect fills even if the initial drawing wasn't precise.
By mastering the use of rulers, grids, guides, and smart guides, you equip yourself with the essential tools for achieving unparalleled precision and professionalism in your Photoshop projects. These features, when utilized effectively, transform the creative process from guesswork into a controlled and accurate endeavor.