DaVinci Resolve's Magic Mask feature, powered by its advanced AI Neural Engine, has revolutionized the way editors and colorists perform secondary adjustments. Gone are the days of painstakingly drawing complex masks frame by frame. Magic Mask intelligently identifies and creates selections around people or objects, offering a powerful and efficient solution for targeted color grading and visual effects. This tutorial delves into the intricacies of this remarkable tool, from initial isolation to sophisticated refinement, ensuring you can leverage its full potential.
Understanding the Core of Magic Mask: AI-Powered Selection
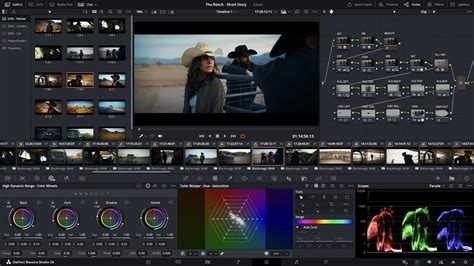
At its heart, the Magic Mask palette in DaVinci Resolve utilizes the AI Neural Engine to automatically detect and generate masks around individuals or specific items within your video footage. The process is remarkably intuitive: you simply provide the AI with a few guiding clicks, and it constructs a detailed selection. This capability is exceptionally valuable for performing secondary adjustments. Imagine the power to alter the color of a single car in a scene, enhance the brightness of a person's face without impacting the surrounding background, or apply specific effects to a tracked element with precision. The AI intelligently interprets shapes and forms, significantly simplifying what were once complex and time-consuming selection tasks.
Getting Started: Effortless Isolation and Tracking
The elegance of Magic Mask v2 lies in its straightforward initiation. The process, as demonstrated in accompanying visual guides, is designed for immediate usability.
Step-by-Step Isolation
- Navigate to the Magic Mask Palette: Begin by opening the Color Page within DaVinci Resolve. Locate and select the Magic Mask palette, which is typically found within the power window tools.
- Initiate Selection with the 'Add' Eyedropper: Utilize the 'Add' eyedropper tool. Your objective is to click directly on the subject you intend to isolate. A single click on a prominent part of the person or object is often sufficient for the AI to begin its analysis.
- Refine with the 'Subtract' Tool (If Necessary): If the initial mask generated by the AI encompasses more than your intended subject, the 'Subtract' tool comes into play. Click on the areas that have been incorrectly included to inform the AI and refine the mask's boundaries. This iterative process of adding and subtracting allows for precise control.
- Engage Tracking for Motion: When your footage involves movement, the forward and reverse tracking buttons are essential. Once your initial mask is satisfactory, activating the tracker allows the AI to analyze the motion of your subject. It then diligently works to maintain the mask's adherence to the subject throughout the entire clip, ensuring consistency even with dynamic camera angles or subject movement.
Often, this streamlined process is all that is required to achieve a highly usable mask, setting the stage for impactful adjustments.
NEW Magic Mask 2 in DaVinci Resolve Studio 20 is INCREDIBLE! Full Tutorial & Examples
Advanced Refinement: Taking Complete Control of Your Mask
While the initial mask generated by Magic Mask v2 is frequently impressive in its accuracy, DaVinci Resolve equips you with an extensive array of tools to perfect it. The accompanying video tutorials offer an in-depth exploration of these functionalities, but here’s a glimpse into the key areas:
Mastering the Toolbar Controls
Beyond the fundamental 'Add' and 'Subtract' eyedropper tools, the Magic Mask interface offers granular control:
- Tracking Controls: These allow for sophisticated motion analysis. You can opt for frame-by-frame tracking for ultimate precision, range tracking to apply tracking to specific sections of your clip, or even explore more advanced settings for complex motion scenarios.
- Basic Paint Tools: For those moments when the AI needs a little human intervention, basic paint tools are available for quick, manual touch-ups on specific frames. This is particularly useful for addressing minor discrepancies or occlusions.
- Essential Toggles: Don't overlook the importance of the 'Invert Mask' and 'Mask Overlay' toggles. 'Invert Mask' is critical when you need to apply adjustments to everything except your selected subject. 'Mask Overlay' allows you to visualize your mask clearly against the footage, aiding in the refinement process.
Optimizing Adjustment Settings
The Magic Mask palette also features settings that directly influence the quality and behavior of your mask:
- Quality Settings: Options such as 'Faster' and 'Better' allow you to balance processing speed with mask accuracy. For quick previews or less critical adjustments, 'Faster' can be beneficial. For final grades requiring the utmost precision, especially around fine details like hair, selecting 'Better' is recommended.
- Consistency: This crucial parameter helps to smooth out any jittering or instability in the mask's edges over time. By increasing consistency, you can achieve a more stable and natural-looking matte, which is particularly vital when dealing with elements like wispy hair or subtle movements.
Polishing with Matte Finesse
This is where you truly elevate your mask from good to exceptional, ensuring seamless integration with your color grading or visual effects. The 'Matte Finesse' controls provide sophisticated tools for edge refinement:
- Smart Refine: This intelligent algorithm analyzes the edges of your mask and attempts to automatically clean them up, removing artifacts and improving the overall quality.
- Blur Radius: Controls the softness or sharpness of the mask's edges. A subtle blur can help to blend the masked area more naturally with the rest of the image.
- In/Out Ratio: This allows you to control how the mask expands or contracts from its initial selection. It's useful for fine-tuning the mask's boundaries to perfectly match the subject.
- Clean Black/White: These controls help to eliminate any stray pixels or noise that might appear on the edges of your matte, ensuring a clean separation between the masked area and the rest of the image.
- Other Controls: A range of other parameters, such as 'Mode,' 'Shape,' and 'Radius,' offer further customization. These can be used to adjust the mask's behavior, shape, and edge properties, providing the ultimate level of control for achieving professional-looking results.
Why Magic Mask v2 Represents a Significant Leap Forward
Magic Mask v2 is not merely another masking tool in the vast arsenal of DaVinci Resolve; it signifies a substantial advancement in automated selection technology.
Unified Power: Eliminating Redundancy
A key differentiator of Magic Mask v2 is its unified approach. Previously, users might have encountered separate modes for 'Person' and 'Object' selections. Magic Mask v2 consolidates this power, eliminating the need to switch between distinct modes. This streamlined functionality means that the AI is now more adept at recognizing a broader range of subjects and forms without requiring explicit categorization, making the tool more versatile and user-friendly. The AI's enhanced understanding of visual elements allows it to adapt to various scenarios, whether isolating a person, a vehicle, a piece of furniture, or any other distinct object within the frame. This unified intelligence simplifies the workflow and broadens the applicability of the Magic Mask, empowering users to tackle a wider array of creative challenges with greater efficiency. The underlying algorithms have been refined to better discern the nuances of different subjects, leading to more accurate initial selections and reducing the need for extensive manual correction. This consolidation of features into a single, powerful tool underscores DaVinci Resolve's commitment to innovation and user-centric design in its post-production software.