Photoshop's capabilities extend far beyond static image editing, offering artists a powerful toolkit for digital creation. Among its most versatile features is the ability to design and customize brushes, transforming them into unique extensions of an artist's imagination. This article delves into the process of creating custom brushes in Photoshop, with a particular focus on simulating the delightful imperfections and unpredictability found in traditional art through brush randomization. We will explore how to build a custom brush from scratch, understand the underlying principles of brush creation, and then examine how to introduce elements of randomness to achieve more organic and less predictable results.
The Foundation: Creating a Custom Brush in Photoshop
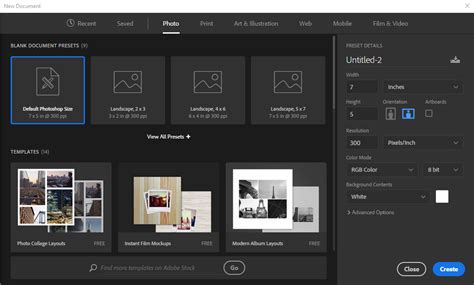
The journey to a custom Photoshop brush begins with a blank canvas. To start, create a new Photoshop document. A document size of 200 x 200 pixels is a good starting point, ensuring a balance between detail and performance. Navigate to the File menu, select "New," and in the New Document dialog box, set both Width and Height to 200 pixels, ensuring the measurement unit is set to "pixels." While Photoshop permits brushes up to 2500 x 2500 pixels, such large dimensions can strain system resources and may not always yield the desired results, akin to using an oversized tool for delicate work. It's generally advisable to create brushes at a size that adequately suits your intended use, understanding that this initial size becomes its default.
It's crucial to remember that custom brushes created in Photoshop are pixel-based. This means they are essentially images, and their behavior, particularly when resizing, is consistent with how regular images behave. While they tend to remain sharp when scaled down, increasing their size significantly beyond the default can lead to a loss of crispness, resulting in a soft and dull appearance. Therefore, the process often involves a degree of trial and error to determine the optimal size for a new brush.
To begin designing the brush, select the Brush Tool. Right-clicking (Windows) or Control-clicking (Mac) within the document window will open the Brush Preset picker, a condensed version of the comprehensive Brushes panel. This picker allows for the selection of various preset brushes. For illustrative purposes, let's choose the "Hard Round 5 Pixels" brush. If Tool Tips are enabled in Photoshop's Preferences, hovering over the thumbnails will reveal the name of each brush.
Understanding Brush Dynamics: Grayscale and Transparency
The background color of your document plays a critical role in brush creation. When a new document is created, its default background is typically white. This is significant because all brushes in Photoshop operate within a grayscale spectrum: they can only contain black, white, or shades of gray. Areas of white within the brush definition translate to transparency, meaning they will not be visible when painting. If we were to convert the current white document into a brush, the resulting brush would be entirely transparent, rendering it invisible. For practical applications, we require visible elements, which are achieved by introducing areas of black. These black areas form the visible shape of the brush, known as the brush tip.
Photoshop utilizes the current Foreground color for painting. By default, the Foreground color is set to black. To add visible elements to our brush, ensure black is selected as the Foreground color. The color swatches at the bottom of the Tools palette display the current Foreground and Background colors. With the small round brush selected and black as the Foreground color, click within the document window to paint a series of short horizontal strokes.
To introduce variation and detail, alter the thickness of these strokes by adjusting the brush size using keyboard shortcuts. The left bracket key [ reduces the brush size, while the right bracket key ] increases it. These keys are typically located to the right of the 'P' key on most keyboards.
Once you are satisfied with the painted strokes, you can save this as a new brush. When you attempt to save, Photoshop will prompt you to name your new brush. For instance, naming it "My New Brush" and clicking "OK" finalizes the creation process. This newly created brush is now ready for use. To select it later, ensure the Brush Tool is active, then right-click (Win) / Control-click (Mac) within the document window to open the Brush Preset picker. Scroll through the list of available brushes until you find your custom brush's thumbnail, which will typically appear at the bottom of the list, and click to select it.
Enhancing Control: The Brushes Panel
While the Brush Preset picker is convenient for selecting existing brushes, achieving greater control over brush behavior requires delving into Photoshop's main Brushes panel. This panel is the more powerful counterpart to the Brush Preset picker, offering a comprehensive suite of options.
Upon opening the Brushes panel (typically by going to Window > Brushes), the "Brush Presets" option is usually selected by default, displaying brush icons similar to those in the picker. Locate and select your newly created brush from this list if it isn't already active. The bottom of the Brushes panel provides a live preview of the selected brush stroke.
In traditional painting, a brush lays down a continuous line of paint. Photoshop, however, operates by "stamping" the brush tip onto the canvas as you drag the mouse. If these stamps are placed close enough together, they create the illusion of a seamless stroke. Conversely, if the spacing is too wide, the individual stamps become apparent, resulting in a ridged appearance.
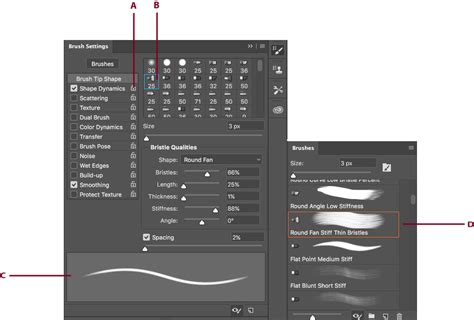
Within the Brushes panel, under the "Brush Tip Shape" section, the "Spacing" option directly controls the distance between these stamps. The default spacing is often too high for smooth strokes. Adjusting the slider or entering a specific value into the input box can lower this to around 13% for a smoother effect.
Shape Dynamics: Adding Life to Brush Strokes
Clicking on "Shape Dynamics" (not just selecting it, but clicking on the words themselves) reveals options for dynamically altering the brush tip's size, angle, and roundness as you paint. A common issue with custom brushes, especially those with distinct directional elements like our horizontal strokes, is that the brush tip orientation remains fixed regardless of the painting direction. To rectify this, under the Shape Dynamics options, change the "Control" setting for "Angle" to "Direction." This crucial setting ensures that the brush tip will now orient itself according to the direction of your mouse cursor's movement, creating a much more natural and responsive stroke.
Master Brush Tool from Start to Finish - Photoshop for Beginners | Lesson 12
For artists using pressure-sensitive pen tablets, further customization is available within Shape Dynamics. The "Size Jitter" section, for instance, can be set to "Pen Pressure," allowing the pressure applied to the pen to control the size of the brush tip dynamically. This dramatically enhances the organic feel of digital painting, mimicking the nuanced pressure variations of traditional media.
These dynamic brush controls offer a glimpse into the extensive possibilities for shaping brush behavior. By following these steps, one can move from a basic concept to a fully customized brush with unique characteristics, demonstrating the power and flexibility inherent in Photoshop's brush engine.
The Quest for Randomness: Simulating Traditional Imperfection
The current level of brush customization is powerful, but for artists with a traditional background, there's a desire to replicate the inherent "imperfections" that give traditional art its unique character. Digital art, while precise, can sometimes feel too perfect, lacking the subtle unpredictability that arises from physical media. This is where the concept of a "brush randomizer" becomes particularly compelling.
Imagine a feature that iterates through an array of different brushes with each stroke, or even within a single stroke. This would introduce a level of genuine randomness that is difficult to achieve manually. For example, a scattered brush could be randomly adjusted in its scatter amount, or a custom brush with specific features could be applied, followed by a completely different brush style in the next stroke, all without the artist needing to predict or manually select each variation. This ability to introduce unpredictability, to move away from 100% control, is what can lend digital art a more traditional and organic feel.
Such a feature could manifest in several ways:
- Stroke-based Randomization: Each time the user initiates a new brush stroke, the software randomly selects from a pre-defined set of brushes or brush settings. This would mean that one stroke might be a thick, textured brush, the next a fine, delicate line, and the subsequent one a splattered effect, all without manual intervention.
- Parameter Randomization within a Brush: For a single brush type, certain parameters could be randomized for each stamp. For instance, the size, opacity, angle, or spacing of the individual brush tip stamps could fluctuate slightly with every application, even within the same stroke. This would create a more painterly and less uniform texture.
- Brush "Mixer" Functionality: A more advanced concept could involve a "mixer" that blends characteristics from multiple selected brushes for each stroke. This would allow for truly unique and emergent brush behaviors that are not directly predefined but are a result of the algorithmic combination of different brush elements.
The appeal of such a randomizer lies in its ability to break the perceived perfection of digital tools. Traditional mediums, by their very nature, involve a degree of unpredictability. The way paint flows, the texture of paper, the subtle variations in pigment density â these all contribute to a unique outcome for every piece. A brush randomizer in software like Photoshop could bridge this gap, offering artists a way to inject that delightful "happy accident" element into their digital workflow.
The development of such a feature would not only enhance the creative possibilities for existing Photoshop users but could also attract new artists who are drawn to the expressive potential of digital art but miss the organic unpredictability of traditional methods. It represents a step towards making digital tools feel more like an extension of the artist's hand, rather than a purely mechanical process. The viability of developing such a system is high, and its implementation would undoubtedly be an interesting and useful addition to the digital art landscape, addressing a gap that is currently present not only in Photoshop but in many other painting software applications as well.