The journey of a landscape photograph from capture to a stunning final image is often as intricate and captivating as the scene itself. While the initial capture relies on light, composition, and timing, the true magic that makes a landscape photo stand out from the crowd is often unlocked in the digital darkroom. This tutorial delves into the advanced Photoshop techniques that transform raw captures into professional, evocative masterpieces, emphasizing the importance of individualized editing steps for each unique image.
The Foundation: Lightroom and Camera RAW Essentials
The post-processing workflow for landscape images typically begins with Adobe Lightroom CC or Camera RAW, serving as the crucial first step in shaping the creative direction of the photograph. During this initial phase, fundamental adjustments are made to establish the overall tone, contrast, and dynamic range. This includes meticulously setting the White Balance, refining contrast, managing dynamic range, and developing the initial color palette.
When working with RAW files, it's imperative to understand the capabilities and limitations of this format. RAW files preserve the maximum amount of image data, offering unparalleled flexibility in post-processing. However, even RAW files have their limits. If a RAW file has overexposed parts, the pixels in those areas have already reached the highest possible brightness level, meaning there is no further information to recover. In such cases, changing sliders will not help, as there is no visible contrast. Therefore, recovering highlights is a critical aspect of this initial stage.
The process often starts by opening the RAW file directly into Adobe Camera Raw (ACR). Within ACR, exploring different camera profiles can significantly alter the initial appearance of the photo, providing various starting points for the edit. Once a profile is selected, the Basic panel, despite its name, is where foundational adjustments are made. A key technique, taught by Photoshop and Camera Raw creator Thomas Knoll himself, involves pushing the shadow and highlight recovery sliders to their absolute limits. Don’t be alarmed if these movements appear extreme; this is intentional to extract maximum detail. Adding punch to the shadows and highlights by adjusting the blacks and whites further enhances the image's depth.
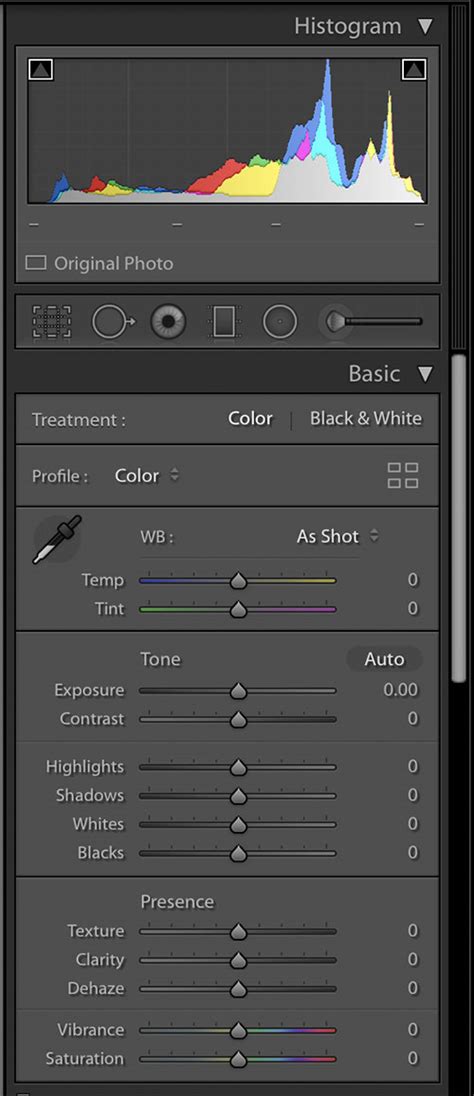
The "Details" section offers further refinement, where adjustments to Texture and a subtle use of Dehaze can add significant punch and detail. Enabling Profile Corrections is also vital at this stage to reduce lens distortion and mitigate vignetting, ensuring a cleaner and more accurate representation of the scene. This initial RAW processing sets the stage for the more advanced manipulations to come in Photoshop.
Unleashing Creative Potential: Advanced Photoshop Techniques
Once the foundational adjustments are made in Lightroom or Camera Raw, the image is opened into Adobe Photoshop CC. This is where the true artistry of landscape editing unfolds, allowing for advanced image blending, dodging, burning, and a myriad of other techniques that grant complete control over the final output. The goal is to enhance the natural beauty of the scene, imbue it with emotion, and create a sense of depth and dimension.
Compositional Refinement and Initial Passes
Upon opening the file into Photoshop, it's often best practice to open it as a Smart Object. This preserves the original RAW data and allows for non-destructive editing. The initial pass in Photoshop is typically dedicated to composition. This might involve subtle cropping or straightening to ensure the strongest possible arrangement of elements within the frame.
Following compositional adjustments, the second pass focuses on adding dimension and shape to the image. A powerful technique for this involves the use of gray layers set to Overlay blending mode. To create these, hold down the Alt/Option key and click on the "Create New Layer" icon. Change the blending mode to "Overlay" and then, using the "Fill with Gray" option, create a neutral gray layer.

Duplicate this gray layer (Ctrl/Cmd+J). One of these layers will be used for darkening (dodging), and the other for lightening (burning). It's a common practice to start with the darkening layer. Reset the foreground and background colors to their defaults by pressing the 'D' key. When using a brush for dodging and burning, if you don't have a graphics tablet, setting the brush opacity to 20-30% is recommended. For those with a tablet, opacity can remain at 100%, but the flow should be reduced to around 10%.
When working on the darkening layer, use a black brush to paint over areas you wish to darken. For instance, if the clouds are too bright, you would paint over them with black to reduce their intensity and add drama. Conversely, when using the lightening layer (which is typically addressed after the darkening pass), a white brush is used. A smaller black brush can then be employed to paint into the shadows, deepening them and further enhancing the sense of three-dimensionality.
Enhancing Light and Atmosphere: Dodging, Burning, and Beyond
Dodging and burning are fundamental techniques that mimic the traditional darkroom process of selectively lightening or darkening areas of a print to control exposure. In Photoshop, these are used to sculpt light and shadow, guiding the viewer's eye and creating a more dynamic and engaging image. By carefully applying these techniques, you can emphasize key elements, create a sense of depth, and direct attention to the focal points of your landscape.
Beyond basic dodging and burning, advanced techniques can introduce or enhance atmospheric elements. Adding mist, for instance, can create a sense of depth and mystery, particularly in forest or mountain scenes. This can be achieved through various methods, including using custom brushes or blending textures. Color painting on elements like trees or rock formations can also dramatically alter the mood and visual impact of a photograph. This involves selectively applying color to specific areas to enhance their natural hues or to introduce entirely new color tones, contributing to a desired aesthetic, such as a "perfect green summer mood" or emphasizing the "red tree trunks."
[Advanced] Dodge and Burn Landscape Photographs in Photoshop
Shifting the light to one side of the image can also create a more dramatic and cinematic feel. This is often achieved through careful use of gradients or by painting light onto specific areas. The aim is to simulate the direction and quality of natural light, even if the original capture wasn't ideal.
Color Grading and Separation
Achieving the "best colors" in a landscape image is a sophisticated process that goes beyond simple saturation adjustments. It involves understanding color theory and how different color combinations evoke specific emotions and moods. Techniques like color grading can transform a photograph, imbuing it with a dark, dramatic mood or a bright, airy feel. This is where the vision for the final image truly comes into play.
Increasing separation in the colors and contrast is crucial for creating a three-dimensional effect. This means ensuring that distinct color ranges and tonal values are clearly defined, preventing the image from appearing flat. By enhancing the contrast between different color elements, you can make the landscape feel more tangible and impactful.
Recovering Blown-Out Highlights and Fine-Tuning
While it's true that completely overexposed parts of a RAW file cannot be fixed, there are techniques to recover highlights that are merely blown out, meaning they have lost detail but not entirely saturated. This often involves careful manipulation of the highlight recovery sliders in ACR or Photoshop.
Furthermore, the editing process often involves a return to Camera Raw for a few final tweaks. This "second pass" in ACR allows for further refinement of global adjustments, such as sharpening and noise reduction, after the more localized manipulations in Photoshop.
Sharpening with Precision
Sharpening is a critical step in bringing out the fine details in a landscape photograph, but it must be done with precision to avoid undesirable artifacts. Over-sharpening can lead to a harsh, unnatural look, often referred to as "sizzle," where light tones become overly bright or develop halos.
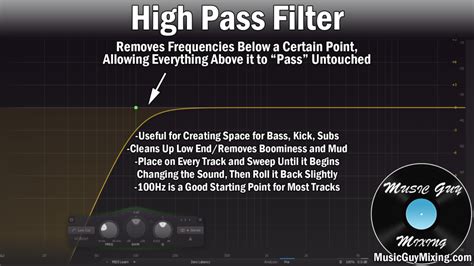
A common and effective method for sharpening in Photoshop involves using the High Pass filter. To do this, first, composite all visible layers by pressing Cmd+Option+Shift+E on a Mac (or Ctrl+Alt+Shift+E on Windows). Then, change the layer's blending mode to "Overlay." Navigate to Filter > Other > High Pass. Adjust the Radius slider to control the amount of sharpening. The key is to keep it subtle, revealing only the essential details without introducing harshness. The goal is to enhance texture and definition, not to create an artificial, over-processed appearance.
Vision: The Driving Force Behind Extraordinary Landscapes
Ultimately, the most impactful landscape photography post-processing stems from a clear vision. This vision is the guiding principle that dictates every editing decision, from the initial RAW adjustments to the final sharpening pass. It's the sense of direction that transforms a photograph from a mere snapshot into a compelling piece of art.
This vision can be fueled by a wide range of influences, including films, music, paintings, or even personal experiences. For some, the inspiration might come from the dark, dramatic moods of films like "The Lord of the Rings" or the atmospheric qualities of "Prometheus." This influence can translate into a desire to create a cinematic quality in still images, a hallmark of truly exceptional landscape photography.
The process of developing this vision is deeply personal. While music can be a powerful aid in setting the mood during editing, the underlying artistic intent is paramount. The digital darkroom is not just a tool for fixing flaws; it's an instrument to enhance the light and atmosphere captured by the RAW file, to realize the creative potential that was present from the moment the shutter was pressed.
The RAW file itself might appear unremarkable, but with a strong vision, the photographer can already anticipate the editing techniques that will be employed to transform it into something magical. This might involve adding light, removing distracting elements like overexposed clouds, introducing haze, or subtly enhancing colors. The aim is to create three-dimensional objects within the landscape, to add incredible light effects, and to craft a final image that resonates with emotion and tells a story.
Applying Techniques Across Diverse Landscapes
The beauty of mastering these Photoshop landscape editing techniques lies in their versatility. While each photo is unique and requires individual adjustments, the core principles and tools remain consistent. Whether you are editing a forest scene, a monumental tree, a coastal vista, or a mountain panorama, the ability to refine composition, sculpt light and shadow, enhance colors, and add atmospheric depth will elevate your work.
For instance, the techniques used to add mist to a forest can be adapted to create a sense of fog rolling over mountains. The color painting applied to tree trunks can be used to enhance the warm tones of autumn foliage or the cool blues of a winter landscape. The overarching goal is to imbue the photograph with a sense of realism, drama, and artistic intent, making it more than just a record of a place, but an experience.
Conclusion: A Continuous Learning Process
Mastering landscape photography editing in Photoshop is an ongoing journey. The techniques outlined here provide a robust framework, but continuous practice, experimentation, and a commitment to developing your personal vision are essential. By understanding the fundamentals of RAW processing, leveraging the power of Photoshop's advanced tools, and always working with a clear artistic intent, you can transform your landscape photographs from ordinary to extraordinary, making them truly stand out from the crowd. The ability to apply these landscape editing techniques through your editing workflow of any image will undoubtedly bring your landscape photography skills to the next level.