Replacing an undercast or overexposed sky is a common and highly requested technique in post-production. If a client sees this done once, they will likely want it for every project. The power of DaVinci Resolve lies in its ability to integrate various tools seamlessly, making complex compositing tasks surprisingly accessible. While sky replacement can be achieved across multiple pages within Resolve - Cut, Edit, Color, and Fusion - this tutorial will focus on the Color page, as it offers a straightforward approach for isolating and replacing skies, particularly when dealing with foreground elements like buildings.

Understanding the Core Concepts
At its heart, sky replacement in DaVinci Resolve involves isolating the sky from the original footage and compositing a new sky element into its place. This process typically utilizes a combination of keying, masking, and tracking.
- Keying: This is the process of selecting a specific range of color or luminance values to isolate a particular part of an image. In sky replacement, you'll often key out the blue of the sky or areas of similar brightness.
- Masking (Power Windows): Masks, often referred to as Power Windows in Resolve's Color page, allow for more precise isolation of areas. These can be simple shapes or complex, animated outlines that follow the contours of foreground objects.
- Tracking: When the camera moves, the replacement sky needs to move with it to maintain realism. Tracking analyzes the motion of the original footage and applies that motion data to the new sky element.
Sky Replacement on the Color Page: A Step-by-Step Approach
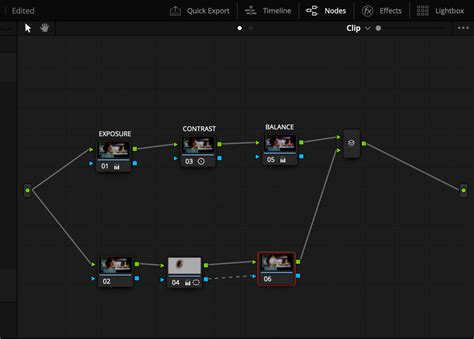
The Color page provides a robust yet intuitive environment for executing a sky replacement. This method leverages the power of nodes to build a compositing chain.
Initial Sky Isolation
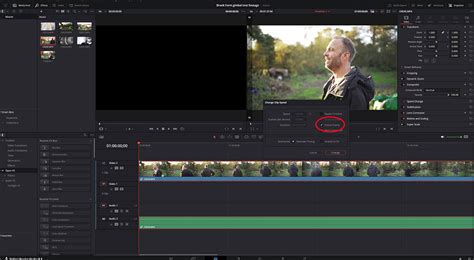
- Navigate to the Color Page: After importing your footage into DaVinci Resolve, switch to the Color page.
- Create a New Serial Node: Select the node associated with your clip. Right-click within the Node Graph area and choose "Add Node" > "Add Serial." This creates a new node for processing.
- Isolate the Sky: Within this new serial node, you'll use a keying tool. One common method is to click and drag over areas of the sky you wish to replace. Each click can be seen as refining or resetting the selection.
- Preview the Key: To visualize the area that has been selected (keyed), click the "Highlight" tool (often represented by a magic wand icon in the top left of the viewer) or use the keyboard shortcut "Shift + H." This will show the keyed area in white and the rest of the image in black.
Refining the Key and Inverting the Selection
Often, the initial key will not be perfect. There might be areas where the key "bleeds" into the foreground, or parts of the sky are missed.
- Invert the Key: Currently, you have selected the sky. To apply a new element to the sky, you need to invert this selection so that the foreground is selected. Right-click within the Node Graph and select "Add Alpha Output." This crucial step connects the alpha channel of this node to the next stage, allowing you to manipulate transparency.
- Address Artifacts with Power Windows: If you notice artifacts, such as around a billboard where the advertisement shares similar luminance to the sky, you'll need to refine the mask.
- Enter the Power Windows Tab: Locate and click on the Power Windows section.
- Create a Garbage Matte: Select the "pen" icon, which typically represents a curve window. Draw a shape precisely around the problematic area, like the billboard, or any region where the key is incorrectly affecting the foreground.
- Invert the Power Window: By default, the Power Window affects what's inside the drawn shape. If you've drawn around the billboard, you've essentially isolated the billboard. To ensure this area is not keyed out, you need to invert the Power Window. Look for an "Invert Window" button within the Power Window controls and activate it. Now, the key will be applied everywhere except within the shape you've drawn, effectively creating a "garbage matte" that protects the foreground.
Introducing the New Sky and Tracking
Once the original sky is properly isolated, it's time to bring in your replacement.
- Add the New Sky Element: Import your desired sky footage or image into the Media Pool. You can then drag this element into your Node Graph, typically as a separate node that will be composited.
- Position the New Sky: Step back into the Edit page. Select the clip containing your new sky element in the timeline. Use the Inspector panel to reposition, scale, or rotate the sky to fit your scene.
- Tracking the Scene: For the replacement sky to feel natural, it needs to move with the camera.
- Return to the Color Page: Go back to the Color page where you were working on the original footage's node.
- Enter the Tracker Panel: Locate and open the Tracker panel.
- Select Tracking Points: Analyze your scene to identify suitable areas for tracking. Flat surfaces with high contrast, like edges of buildings or distinct features, are ideal. Place tracking points on these areas.
- Apply Tracking Data: Once you have generated tracking data, you need to apply it to the new sky. In the tracker settings, you'll typically find options to "Track" or "Apply" the motion. If the sky appears to move in the opposite direction of the camera, you may need to adjust the "Strong" value (e.g., changing it from 100 to -100) or experiment with different values like -50. Playback the timeline to observe how the new sky moves with the camera.
Advanced Techniques and Free vs. Studio Version Differences
DaVinci Resolve offers different workflows and features depending on whether you are using the free or Studio version.
Sky Replacement in the Free Version
The free version of DaVinci Resolve provides powerful tools for sky replacement, primarily through manual keying and masking.
- Node Setup for Free Version:
- Add your video to DaVinci Resolve and navigate to the Color page.
- Select your clip's node, right-click, and choose "Add Node" > "Add Serial."
- On this new serial node, right-click again and select "Add Node" > "Add Layer." This creates a layer node structure that is useful for compositing.
- Using the Qualifier 3D Tool:
- With your last created node selected, go to the "Qualifier" section and choose the "Qualifier 3D" tool.
- Activate the "Highlight" icon in the preview window. Click on the sky to select it.
- If some areas are missed, use the "Qualifier+" tool to add them to your selection.
- Importing and Compositing the New Sky:
- Import your new sky footage into the Media Pool.
- Drag the new sky clip onto a separate node in your Node Graph.
- Add a "Match Move" effect to this new sky node. This effect is crucial for linking the new sky to your original clip and allowing for customization and matching.
- To connect the new sky to your original footage, right-click on the node containing the new sky and select "Add OFX Input." This adds a green input icon to the node.
- Connect the green output icon from your new sky node to the green input icon on the node containing your original footage. This creates a mask, effectively replacing the keyed-out sky.
- Adjusting Position and Tracking:
- Go to the "Effects" panel and under the "Match Move" menu, select "Show Controls for" > "Compositing." This reveals the masking effect controls.
- If the new sky doesn't align correctly, choose "Show Controls for" > "Positioning" to adjust its position and proportions using a grid overlay.
- If the motion of the new sky doesn't match your clip, or if you're using a still image for the sky, go to the "Show Controls for" > "Tracking" menu.
- While tracking in the free version is less automated than in the Studio version, you can track frame by frame. Select "Composite" in the Output and place tracking points below the skyline. Position a tracking point on the first frame and use the "track forward" arrow in the Tracking Controls menu. Ensure each tracking point is accurate, repositioning if necessary.
Sky Replacement in the Studio Version
The Studio version of DaVinci Resolve offers more advanced and integrated tools, including a dedicated "Sky Replacement" effect, which significantly streamlines the process.
- Applying the Sky Replacement Effect:
- Add your video to the Color page.
- Select your clip's node and go to the "Effects" library.
- Search for "Sky Replacement" and drag it directly onto your node.
- Sky Removal Methods: The Studio version provides several efficient ways to remove the existing sky:
- Qualifier Tool: This is ideal when the sky's color and luminance are distinctly different from the foreground.
- Activate the "Highlighting" option within the Sky Mask Adjustments.
- Use the Qualifier tool (often a 3D eyedropper) to click on the sky.
- Use "Qualifier+" to add any missed areas.
- Magic Mask: This AI-powered tool is incredibly effective for complex scenes.
- With your node selected, click on the "Magic Mask" tool.
- Use the "Selector+" icon and click on the sky.
- Click the "Motion Tracking" tool to allow DaVinci Resolve to analyze the video's movement.
- If parts of the sky remain, refine the mask using sliders like "Refine," "White Level," "Shift Edge," or "Black Level" within the Sky Mask Adjustments menu.
- Qualifier Tool: This is ideal when the sky's color and luminance are distinctly different from the foreground.
- Adding a New Sky: The Studio version offers two primary methods for introducing a new sky:
- Artificial Sky: Create a custom sky directly within Resolve.
- Navigate to the "Artificial Sky" menu within the Sky Replacement effect.
- Increase "Sky Opacity" to reveal the generated sky.
- Customize colors, horizon, and even add clouds by adjusting parameters like opacity, scale, and tilt. You can also add a sun by manipulating "Hotspot Brightness" and selecting a color.
- Add Sky from Another Video: Import your desired sky footage into the Media Pool and drag it onto a new node, without directly linking it to your original footage node initially.
- Right-click on your original node and select "Add OFX Input."
- Connect the green output icon from your new sky node to the green input icon on your original node. This establishes the mask.
- Artificial Sky: Create a custom sky directly within Resolve.
- Sky Movement and Adjustments:
- To fine-tune the movement of your new sky, select your original node and go to the "Sky Position" menu.
- Choose from tracking options like "Keyframing Only," "Track Foreground," "Track Original Sky," or "Use FX Tracker." Select the most appropriate option for your footage and click the "Track" button. DaVinci Resolve will then analyze and apply the tracking data.
- If the new sky reveals black borders due to mismatched movement, the "Autosize for Motion" button can often resolve this.
The Advantage of In-Grade Compositing
Performing sky replacements directly within the color grading process offers significant advantages over leaving it entirely to VFX departments. As colorist Eric Whipp noted in an interview regarding "Mad Max: Fury Road," the ability to perform hundreds of sky replacements using the grading software's tracking capabilities allowed for relative ease and flexibility. The primary benefit is that skies can be changed and adjusted in real-time as the overall look of the film is being developed. This iterative process, where color and compositing are intertwined, allows for a more cohesive and artistically driven final product, ensuring the sky not only fits technically but also enhances the film's intended aesthetic and mood.
Learn PRO-Level Color Grading in 64 Minutes [DaVinci Resolve Tutorial]
This integrated workflow, where tools like keyers, masks, and trackers can be used in tandem within a single node, is a hallmark of DaVinci Resolve's Color page. Mastering this approach can lead to highly efficient and visually stunning results, transforming mundane or problematic skies into compelling cinematic elements. The flexibility to refine keys with Power Windows and then track those refinements ensures a clean and convincing composite, even in challenging scenarios.
tags: #davinci #resolve #sky #replacement