The Properties panel in Adobe Photoshop is a cornerstone for efficient image editing, offering contextual controls that adapt to your current selection or active tool. Its presence and functionality have evolved over different versions, leading to occasional user confusion about its location and purpose. This article will demystify the Properties panel, explaining where to find it, how it operates, and its significance in streamlining various editing workflows.
Understanding the Core Functionality of the Properties Panel
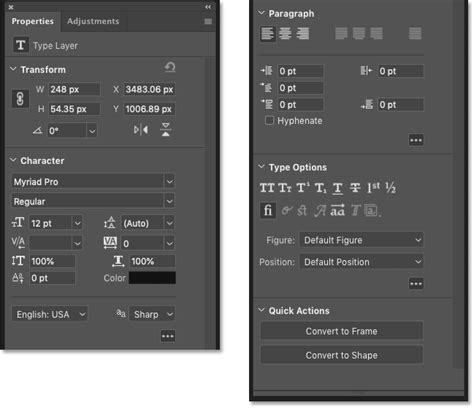
At its heart, the Properties panel serves as a dynamic control center. It presents the most crucial options relevant to whatever you currently have selected or the tool you are actively using. This means that as you switch between tools or select different elements within your image, the panel's content will update accordingly, providing immediate access to relevant adjustments and settings.
For instance, when you select an adjustment layer, the Properties panel will display controls specific to that adjustment. This is a far more intuitive and streamlined approach compared to older versions of Photoshop where adjustment controls might have been dispersed across multiple panels or modes. The panel is designed to simplify common tasks, making it easier for users to achieve desired effects without extensive searching.
Locating the Properties Panel in Photoshop
The location of the Properties panel can vary slightly depending on your Photoshop version and workspace setup. However, it is generally accessible through the main menu or by enabling it from the Window menu.
Accessing via the Window Menu:
The most reliable way to ensure the Properties panel is visible is to go to the Window menu at the top of your Photoshop interface. From the dropdown list, simply select Properties. If a checkmark appears next to it, the panel is already open and likely docked somewhere within your workspace. If there is no checkmark, selecting "Properties" will open the panel.
Default Docking Locations:
By default, Photoshop often docks the Properties panel in a convenient location. In recent versions, it is frequently found alongside other essential panels like the Layers panel and Adjustments panel, typically on the right-hand side of the screen. However, users can customize their workspace by dragging and docking panels to any desired location. If you've reset your workspace to a default setting, you're likely to find it in its common resting place.
Troubleshooting a Missing Properties Panel:
If you are using a version of Photoshop where the Properties panel seems to be missing, such as the scenario described for Photoshop CC 2015 in some user forums, there are a few troubleshooting steps to consider:
- Check the Window Menu: As mentioned above, the first and simplest step is to ensure it's not just hidden by going to Window > Properties.
- Reset Preferences: Corrupted preference files can sometimes cause panels to disappear or behave erratically. Resetting Photoshop's preferences can resolve such issues. The process for resetting preferences can vary slightly between versions, but generally involves holding down a key combination (like
Ctrl+Alt+Shifton Windows orCmd+Option+Shifton Mac) immediately after launching Photoshop. You can find detailed instructions on Adobe's website for specific versions, such as "Preference file functions, names, locations | Photoshop CC 2014." - Consider Version Differences: It's important to note that the Properties panel, as we know it today, evolved over Photoshop versions. For instance, it was introduced in Photoshop CS6, replacing earlier "Adjustments Controls" modes and the "Masks Panel." If you are using a much older version, the functionality might be distributed differently or not present in the same integrated way. If you are running an older version like CS6 and experiencing issues, a user suggested that switching to a more recent version like CC 2015 might offer a more integrated experience.
The Properties Panel and Adjustment Layers
One of the most significant contributions of the Properties panel is its seamless integration with Adjustment Layers. Adjustment Layers are crucial for non-destructive editing, allowing you to apply color and tonal adjustments without permanently altering the original pixel data of your image.
When you create an Adjustment Layer (e.g., Levels, Hue/Saturation, Curves), the Properties panel immediately populates with the specific controls for that adjustment. This makes it incredibly straightforward to fine-tune parameters like exposure, contrast, color balance, and saturation.
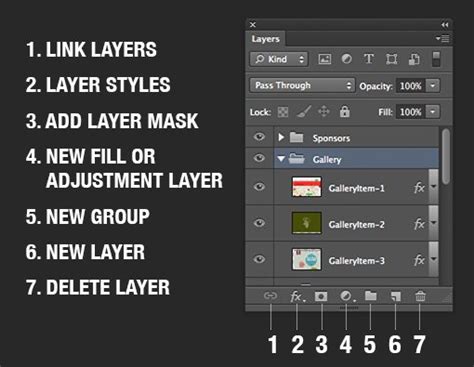
- Adjustment Layer in Layers Panel: The Adjustment Layer itself will appear in the Layers Panel, clearly indicating that a non-destructive adjustment has been applied.
- Properties and Controls: The Properties panel then displays all the necessary sliders, input fields, and options to modify that specific adjustment. For example, selecting a Levels adjustment layer will bring up the histogram and sliders for black, white, and midtones in the Properties panel.
- Clipping to Layer: A key control within the Properties panel for adjustment layers is the "Clip to Layer" button (often represented by a downward-pointing arrow). When activated, this ensures that the adjustment only affects the layer directly below it. This is invaluable for targeted adjustments. By default, adjustments apply to all layers below, but clipping allows for precise control.

The Properties Panel and Layer Masks
Beyond adjustment controls, the Properties panel also plays a vital role in managing and refining layer masks. Layer masks are fundamental to compositing and selective editing, allowing you to control the visibility of parts of a layer.
The functionality of the former Masks panel, introduced in Photoshop CS4, has been amalgamated into the Properties panel since Photoshop CS6. When a layer with a mask is selected, the Properties panel transforms to offer mask-related controls.
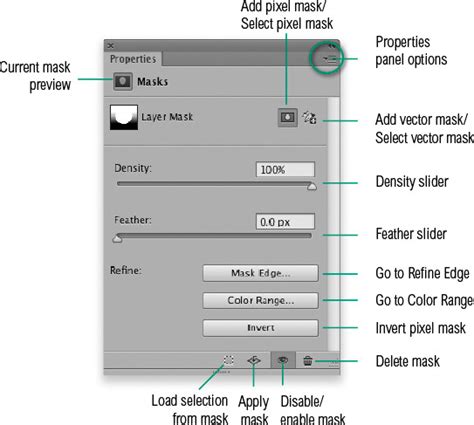
- Mask Selection: At the top of the panel, you'll find options to select between pixel masks and vector masks, and these can also serve as buttons to add a new mask if one doesn't exist. The panel will not display mask properties until a mask has been added to the layer.
- Density and Feather: The Density slider allows you to control the opacity of the mask, effectively adjusting the overall transparency of the masked area. This can be used to subtly fade an adjustment or effect. The Feather slider is used to soften the edges of the mask, creating smooth transitions between masked and unmasked areas, which is crucial for realistic blending.
- Mask Edge and Refine Edge: The "Mask Edge…" button opens the Refine Edge dialog box. This powerful tool offers advanced options for fine-tuning mask edges, especially useful for complex selections like hair or fur.
- Color Range and Selections: The "Color Range…" button provides a shortcut to the Color Range selection tool. This allows you to create selections based on specific colors within your image, which can then be used to precisely modify a layer mask.
- Invert Mask: The Invert button offers a quick way to invert a pixel mask. If a mask hides an area, inverting it will reveal that area instead. Similar functionality for vector masks can be achieved by manipulating path outlines and switching path modes.
Evolution and Consistency Across Versions
The integration of adjustment and mask controls within a single, context-aware Properties panel represents a significant evolution in Photoshop's user interface. This consolidation aims to reduce clutter and improve workflow efficiency.
- Non-Modal Editing: In newer versions of Photoshop, the editing of adjustment layers has become non-modal. This means you are not locked into a specific editing state. However, to navigate efficiently between fields within the Properties panel (e.g., using the Tab key), you might need to enter a "Properties panel edit mode" by first using the
Shift+Returnkeyboard command. - Illustrator Comparison: It's worth noting that the concept of a dynamic Properties panel is not unique to Photoshop. Adobe Illustrator also features a Properties panel that displays context-sensitive controls for selected objects, text, and paths, aiding in quick edits.
Advanced Uses and Workflow Enhancements
The Properties panel is not just for basic adjustments; it also offers advanced controls that can significantly enhance your workflow.
- Presets: For many adjustment types, the Properties panel includes a Presets dropdown menu. This allows you to quickly apply pre-defined settings for common effects, saving you time and providing a starting point for further customization. You can also save your own custom adjustment settings as presets by configuring an adjustment and then selecting "Save Preset…" from the Properties panel menu.
- State Comparison: The button that switches between the previous and current edited state (sometimes involving holding down the
\key) is a powerful tool for comparing the impact of your adjustments. This helps you make informed decisions about whether your edits are moving the image in the desired direction. - Reset and Undo: The panel often includes a Reset button to quickly revert the current adjustment to its default state. Alongside Photoshop's standard Undo (
Ctrl/Cmd+Z) and Step Backward (Ctrl/Cmd+Alt+Z) commands, these options provide comprehensive control over your editing history. - Visibility Toggle: The eyeball icon within the Properties panel allows you to quickly toggle the visibility of the adjustment layer on and off, enabling easy before-and-after comparisons.
Photoshop Layer Masks Explained in 7 Minutes!
By understanding and utilizing the Properties panel effectively, Photoshop users can significantly enhance their editing speed, precision, and overall creative control. Its context-aware nature ensures that the most relevant tools are always at your fingertips, making it an indispensable part of the modern Photoshop workflow.