Saving your work in Adobe Photoshop is more than just a simple click of a button; it's a critical process that ensures the integrity of your projects, facilitates seamless workflows, and prepares your creations for diverse applications. Whether you're a seasoned professional or just starting your creative journey, understanding the nuances of saving files can significantly impact your efficiency and the quality of your final output. This comprehensive guide delves into the various methods and settings available in Photoshop for saving your files, from basic file preservation to advanced options for compatibility and security.
The Foundation of File Preservation: Basic Saving and Auto-Save
At its core, saving a Photoshop file is about safeguarding your progress. The fundamental command, "Save" (Ctrl+S on Windows, Cmd+S on macOS), or "Save As" (Shift+Ctrl+S on Windows, Shift+Cmd+S on macOS), allows you to commit your changes to disk. However, Photoshop offers robust features to enhance this basic functionality, making the saving process more resilient and less prone to data loss.
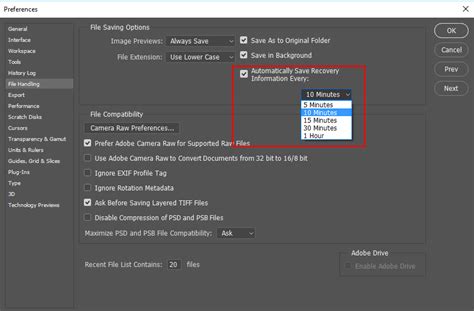
One of the most crucial features for preventing accidental data loss is Auto Save. This setting, found within Preferences > File Handling, enables Photoshop to automatically save recovery information at regular intervals. By default, this feature is often enabled, but it's essential to verify and configure it to your preferred time interval. To activate and customize Auto Save, navigate to Preferences > File Handling and enable "Automatically Save Recovery Information." You can then use the dropdown menu to select a timeframe for these automatic backups, ensuring that even if your system crashes, you can recover a recent version of your work.
Complementing Auto Save is the Background Save feature. When enabled, which it is by default in Photoshop 2022 and later versions, Background Save allows you to continue working in Photoshop even while selecting "File > Save" or "Save As." This means your creative flow isn't interrupted by lengthy save operations; the saving process occurs as a background task, enhancing overall productivity.
Navigating Save Locations: Default Settings and Customization
Understanding where your files are saved is crucial for organization and retrieval. In Photoshop 2022, the default save location is set to Creative Cloud. This integration with cloud storage offers benefits like accessibility from multiple devices and version history. However, you can customize this behavior to suit your workflow.
When you choose "Save As," Photoshop, by default, "Saves As" to the same location as the original file. This is a sensible default that helps keep related project files together. For those who prefer to manage their local storage more explicitly, the default save location can be altered. To change the default file location, navigate to Edit > Preferences > File Handling (Windows) or Photoshop > Preferences > File Handling (macOS). Here, you can choose your preferred option under "Default File Location" and select "OK." You have the option to set the default to your computer's local storage or the Creative Cloud. You can also specify whether the "Save As" dialog should always open the folder where you last saved a file or the folder from where you last opened a file.
Cloud Documents and Local Storage
For users who leverage Photoshop's Cloud Documents feature, managing local copies is also configurable. The default location for local copies of cloud documents can be changed within Preferences > File Handling > Cloud Documents Local Working Directory. This allows you to designate a specific folder on your local machine where these cloud-synced files will be stored, providing more control over your file system.
Advanced Saving Options for Enhanced Compatibility and Workflow
Beyond basic saving, Photoshop offers a suite of advanced options designed to improve file compatibility with other applications, manage file sizes, and add security.
Maximize PSD and PSB File Compatibility
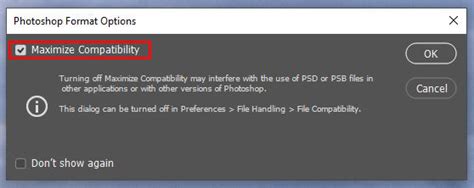
When you work with layered Photoshop files (PSD or PSB), you often need to open them in other applications that may not fully support all of Photoshop's advanced features, such as layers. To address this, Photoshop can create a "flattened" (composite) version of the image and save it within the layered file. This flattened version is a single image layer that most applications can readily interpret.
To ensure Photoshop automatically saves this flattened version for broader compatibility, go to Preferences > File Handling and set "Maximize PSD and PSB File Compatibility" to "Always." When this option is set to "Ask," a dialog prompts for confirmation to maximize PSD compatibility, and this dialog includes a "Don't Show Again" checkbox. This setting is particularly useful if you frequently import your Photoshop files into applications like Lightroom or other image-editing software.
If you ever need to open a flattened composite version of a layered document manually, you can do so by choosing File > Open, navigating to the image, and then holding Option + Shift (Mac) or Alt + Shift (Windows) and clicking "Open." A dialog will appear with the message "Read the composite data instead?" Click "OK" to confirm.
Saving Copies and Naming Conventions
Sometimes, you might want to save a modified version of your file without overwriting the original. Photoshop facilitates this with the "Save a Copy" function. When you save a copy of a file, Photoshop automatically appends the word "copy" to the end of the filename. For instance, if your original file is named "myimage.psd," the copy will be named "myimage copy.psd."
If you find this automatic naming convention to be a nuisance, you can disable it. Navigate to Preferences > File Handling and enable the "Do not append 'copy' to file name when saving a copy" option on both macOS and Windows. This setting ensures that when you save a copy, the filename remains unchanged, offering a cleaner approach to duplicate files.
Requiring a Password to Open a Document
For sensitive projects, Photoshop provides security options when saving files as Photoshop PDF. By choosing Save As, selecting "Photoshop PDF" as the file format, you can then access the "PDF Security" options on the left-hand side of the dialog box. Here, you can set a password requirement to open the document, adding a layer of protection against unauthorized access.
Create password protected PDF file in Photoshop for beginners
Exporting for Diverse Applications: Beyond the PSD
While saving as a PSD preserves all your layers and editing capabilities, many creative workflows require exporting your work into different file formats for specific uses, such as web display, print, or sharing. This is where Photoshop's export features come into play, and they are just as critical as saving.
The Image Processor: Batch Processing Made Easy
When you need to save a number of images to a different format (e.g., PSD, TIFF, or JPEG), Photoshop's "Image Processor" is an invaluable tool. You can find it under File > Scripts > Image Processor. This feature allows you to batch convert multiple files simultaneously.
The Image Processor can be accessed in a couple of ways. You can select a folder of images directly within Photoshop and then run the Image Processor. Alternatively, if you prefer to convert only a selection of images, you can begin by selecting the desired images in Adobe Bridge. Then, choose Tools > Photoshop > Image Processor. If no files are selected in Bridge, the Image Processor will assume you want to process all of them.
In the Image Processor dialog box, you can choose a destination folder for your converted files and select the desired File Type (or types, as you can process files to multiple formats at once). You can also specify additional options such as "Resize to Fit" and compression settings. Furthermore, you can even choose to run a custom Photoshop action after the batch conversion is complete, automating further post-processing steps.

Save for Web (Legacy) and Export As
For web optimization, the "Save for Web (Legacy)" command has long been a staple. This dialog box offers granular control over image compression, color reduction, and file size, allowing you to produce images that load quickly on web pages. When you use "Save for Web," if your file has layers, a dialog appears, and it uses a format that is recognizable to most web browsers, optimizing color quality and producing a slightly smaller file size. You can choose the level of compression, with higher compression resulting in better image quality and a larger file size.
More recently, Photoshop introduced the "Export As" command, which offers a more streamlined and modern approach to exporting. It provides a preview of your exported image and allows you to easily adjust settings for different file formats like JPG, PNG, and GIF. This command is often preferred for its user-friendliness and real-time preview capabilities.
Understanding File Formats and Their Implications
The choice of file format is paramount when exporting. Each format has its strengths and weaknesses:
- JPEG (JPG): A widely used format for photographic images, especially on the web. It uses lossy compression, meaning some image data is discarded to reduce file size. This is generally acceptable for photos but can lead to artifacts in images with sharp lines or text.
- PNG: Offers lossless compression, meaning no image data is lost. It supports transparency, making it ideal for web graphics, logos, and images that require transparent backgrounds. However, PNG files can be larger than JPEGs.
- TIFF: A flexible bitmap image format supported by most paint, image-editing, and page-layout applications. TIFF files can be saved with or without layers and support lossless compression. They are often used for print and archival purposes due to their high quality and flexibility.
- PSD: The native Photoshop format. It preserves all layers, masks, effects, and other editing information, making it ideal for ongoing work. However, PSD files are generally not viewable by most other applications without Photoshop.
- GIF: Primarily used for simple web graphics and animations. It supports transparency and a limited color palette (up to 256 colors).
- PDF: A cross-platform and cross-application file format used for exchanging documents. Photoshop can save files as PDFs, offering options for embedding color profiles, preserving layers (if supported by the PDF viewer), and adding security.
When saving files, especially for web use, consider options like embedding a color profile for accurate color representation across different devices. Some UNIX file servers do not recognize uppercase file extensions, so saving with lowercase extensions can prevent issues when uploading files to certain web servers.
Elements Organizer Integration
For users of Adobe Photoshop Elements, there's an option to include saved files in the Elements Organizer catalog. This allows your images to be easily browsed and managed within Elements. However, be aware that some file formats supported in the Photoshop workspace may not be supported in the Elements Organizer. Selecting "Includes the saved file in your catalog so that it displays in the Photo Browser" will add the file to your catalog. Conversely, if this option is disabled or unavailable, the file will not be added.
Closing Files Efficiently
Managing multiple open documents in Photoshop can become overwhelming. Photoshop provides convenient ways to close files:
- Close All Files: By Option-clicking (Mac) or Alt-clicking (Win) a file's close button, you can instruct Photoshop to close all open documents. Be aware that Photoshop will prompt you to save each file before it closes them.
- Close All Others: The File > Close Others command allows you to close all open files except for the currently active document. This is a quick way to declutter your workspace when you're focused on a single project.
By mastering these saving and exporting techniques, you can ensure your Photoshop projects are well-preserved, efficiently managed, and perfectly prepared for their intended use, ultimately enhancing your overall creative workflow and the quality of your final output.