The green screen effect, also known as Chroma Key, is a powerful video editing technique that allows creators to superimpose subjects onto an unlimited number of different virtual backgrounds. This advanced feature, found within overlay tools, makes a specific color range in the top layer of two superimposed clips transparent. Consequently, the background video clip or image situated behind the top layer becomes visible, enabling the creation of truly captivating visual experiences. From the phantasmagorical landscapes and mythical creatures seen in the Lord of the Rings trilogies to the epic battles of the Avengers saga, the green screen effect is instrumental in bringing fantastical worlds to life. It's a special tool used during the video making process, allowing for the creation of really cool shots, such as depicting a superhero flying through the sky or conjuring dragons spitting fire.
Understanding the Fundamentals of Green Screen Technology
Green screen, or Chroma Keying, is a technique that has seen a significant surge in popularity, particularly in the digital age of filmmaking. Its essence lies in isolating a specific color - typically green, though blue is also common - and making it transparent. This transparency then allows another layer of video or imagery to be revealed beneath it. The effectiveness of this technique hinges on a few key elements: the quality of the footage, the lighting, and the software used for the post-production process.
The Importance of Quality Footage and Lighting
To ensure the green screen effect works optimally, it is highly advised to use a good quality camera that shoots high-definition video. While any camera capable of recording in MP4 and MOV formats will suffice, including smartphone cameras, higher resolution and frame rates will undoubtedly contribute to a cleaner final product.
Crucially, the lighting of the green screen itself is paramount. The green background should be illuminated evenly to avoid shadows, which can complicate the removal process. Shooting outdoors on a sunny day can be an excellent choice if you lack professional spotlights, as natural sunlight can provide consistent and effective lighting for the scene. Conversely, if filming indoors, ensuring the green screen is well-lit without creating harsh shadows is essential.
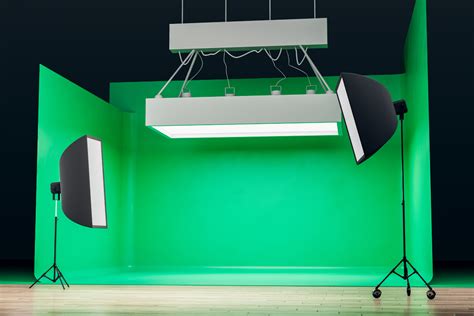
Preparing Your Green Screen Set
Before you begin filming, meticulous preparation of the green screen background is vital. It may seem like a simple step, but failing to ensure the green sheet is free of wrinkles and creases can cause a fair amount of trouble during post-production. Wrinkles can create uneven color tones, making it harder for the software to distinguish the green background from the subject. Therefore, it's recommended to use a taut, smooth green screen.
Furthermore, when selecting costumes for your subject, it's important to choose colors that contrast sharply with the green or blue background. If the subject's clothing contains green or blue hues, the software might mistakenly make parts of their attire transparent, leading to undesirable visual artifacts. By carefully considering costume colors, you can avoid the need to reshoot scenes, saving time and effort.
The Filming Process for Green Screen Effects
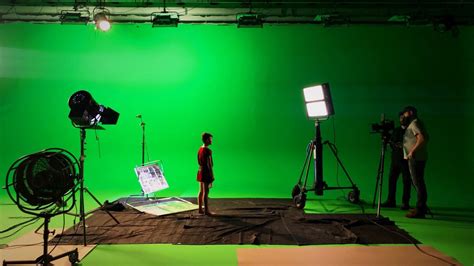
Once you have your location sorted, the lighting adjusted, and the appropriate costume colors selected, you are ready to begin filming. A stable camera setup is critical for achieving professional-looking results. Make sure your camera is perfectly still by placing it on a tripod. This stability will prevent camera shakes, which can be jarring and detract from the illusion you are trying to create.
When filming, consider the action you want your subject to perform. Will they be interacting with elements that will be added later? Will they be moving across the frame? Planning these actions in advance will help you capture the necessary footage for seamless integration with your chosen background.
Post-Production with Wondershare Filmora: A Step-by-Step Guide
While numerous green screen video editing software options are available on the market today, Wondershare Filmora stands out as a reliable and user-friendly video editor capable of creating compelling green screen scenes with ease. Filmora's Green Screen feature, also known as Chroma Key, is designed to make professional compositing accessible to users of all skill levels, allowing for the replacement of a solid-colored background with any image or video in just a few simple steps. This feature empowers you to create virtual environments, cinematic scenes, and creative visual effects without requiring advanced editing expertise.
Importing and Layering Your Footage
To begin the process within Filmora, launch the application and create a new project. The next step is to import both your background video or image and your green screen footage into the media library.
Once your media is imported, drag and drop your chosen background footage onto the first video track on the timeline. Subsequently, place your green screen video clip on the track directly above the background footage. This layering is fundamental to the green screen effect, ensuring that the green screen clip acts as a mask over the background.
Master Layers - Photoshop for Beginners | Lesson 2
Applying the Chroma Key Effect
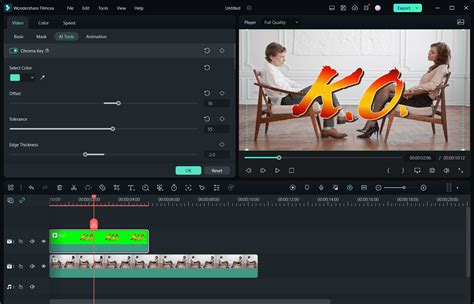
With your clips layered correctly, you can now apply the Chroma Key effect. Double-click on the green screen clip in the timeline to bring up the settings window, typically located in the left corner of the interface. Within this settings window, navigate to the "Video" tab. You will then find an option for "AI Tools" or a similar category where the Chroma Key feature is located. Select the "Chroma Key green screen" option.
Filmora offers a user-friendly "Color Picker" tool. Use this tool to tap directly on the green background within the preview window. This action tells Filmora precisely which color to make transparent.
Refining the Green Screen Effect
After applying the initial Chroma Key, you will likely need to refine the effect to achieve a polished look. Filmora provides several sliders and controls to help you achieve this:
- Strength and Shadow Sliders: Beneath the Color Picker, you will find "Strength" and "Shadow" sliders. These are crucial for fine-tuning the transparency and ensuring a smooth, seamless background removal. Adjust these sliders until the subject appears crisp and is entirely free from any lingering green edges or halos.
- Offset and Tolerance: These settings allow you to further adjust the clarity of the background removal. "Tolerance" controls how much of the selected color range is made transparent, while "Offset" can help fine-tune the edges.
- Edge Thickness and Edge Feather: These parameters are vital for refining the edges of your subject. "Edge Thickness" can help to clean up any rough edges, while "Edge Feather" softens the transition between the subject and the new background, making the composite appear more natural.
- Transparency, Shadows, and Borders: You can also adjust the levels of transparency, shadows, and borders around your subject to enhance the integration with the new background.
Play with these settings until the subject is clearly defined and seamlessly integrated with the new background, free from any unwanted green spill or artifacts.
Positioning and Finalizing Your Composite
The final step in the process involves ensuring the background video clip is correctly positioned to fill the transparent areas of the green screen clip. Once you have achieved the desired look for your green screen effect, the background footage will naturally fill the areas that were made transparent, and the two video layers will appear as a single, coherent video. You can adjust the position, scale, and rotation of the background clip as needed to perfectly align it with your subject.
Exporting Your Masterpiece
Once you are satisfied with all the adjustments and the overall composition, you are ready to export the footage you have created. Filmora offers a range of export options to suit various platforms and requirements, allowing you to share your visually stunning creation with the world.
Beyond the Basics: Advanced Techniques and Considerations
While Filmora makes the green screen process remarkably accessible, understanding some advanced concepts can elevate your results further.
Dealing with Green Spill
"Green spill" occurs when the green light from the background reflects onto the edges of your subject, particularly their hair or lighter clothing. This green tint can be difficult to remove entirely. To mitigate green spill during filming, try to keep the subject a reasonable distance from the green screen. Using a fill light on the subject can also help to overpower any ambient green light reflecting onto them. In post-production, subtle color correction or specialized spill suppression tools in more advanced software can help. Filmora's edge refinement tools can also assist in minimizing its appearance.
Choosing the Right Background
The choice of background is as important as the green screen itself. Consider the narrative of your video. Are you aiming for a realistic environment, a fantastical landscape, or a simple, clean studio look? Filmora's extensive stock media library offers a wide array of options, and you can also import your own custom backgrounds. For a more dynamic effect, consider using video backgrounds that have subtle movement, adding another layer of realism to your composite. You can obtain hundreds of different video files that feature many different kinds of movement and elements that can be used for the creation of your videos. You can now download not only video effects for the Filmora video editor but also After Effects templates.
When to Use Blue Screen
While green is the most common color for Chroma Keying due to its distinctiveness from most skin tones and clothing, blue screens are also frequently used. Blue screens can be advantageous when your subject is wearing green clothing, or in situations with specific lighting conditions. The principle of applying the Chroma Key effect remains the same, regardless of whether you are using a green or blue background.
Alternative to Green Screen: AI-Powered Removal
Emerging technologies are also introducing AI-powered background removal tools that can sometimes eliminate the need for a physical green screen altogether. These tools analyze the video and attempt to isolate the subject from the background based on intelligent algorithms. While still evolving, these AI solutions offer a glimpse into the future of video compositing, potentially making complex effects even more accessible. Filmora itself is incorporating AI tools, which can further streamline the editing process.
By understanding these techniques and utilizing the powerful features within Wondershare Filmora, you can unlock the full potential of the green screen effect and bring your creative visions to life with professional-quality results.
tags: #wondershare #filmora #green #screen