In the realm of digital photography, the quest for higher resolution and pristine image quality is a perpetual endeavor. For years, photographers and editors have grappled with the limitations of pixel density, often finding themselves at a crossroads when needing to enlarge an image without sacrificing its visual integrity. The familiar scene of a detective "enhancing" a blurry photograph on a screen, as often depicted in popular media, highlights a long-standing desire for such capabilities. While true cinematic magic remains elusive, modern software solutions, particularly Adobe Photoshop and Adobe Lightroom, have brought this aspiration remarkably close to reality through their advanced Super Resolution features. This article will explore the intricacies of image resolution, resampling, and the transformative power of AI-driven Super Resolution, providing practical guidance on how to leverage these tools for superior image quality.
Understanding Image Resolution: Pixels, Upsampling, and Downsampling
At the core of every digital image lies a grid of pixels. The resolution of an image is fundamentally determined by the number of pixels it contains. A higher pixel count generally translates to a higher resolution, allowing for greater detail and clarity, especially when printing or viewing images at larger sizes.
Downsampling is the process of reducing the number of pixels in an image. This is typically done to decrease file size, speed up loading times for online content, or optimize images for specific display requirements. While beneficial for certain applications, downsampling inherently discards image data, which can lead to a loss of detail.
Conversely, upsampling involves increasing the number of pixels in an image. This is the process most relevant when aiming to enlarge a photograph or improve the quality of a low-resolution image. Historically, upsampling without a significant degradation in quality was a considerable challenge. Traditional methods often resulted in noticeable pixelation, loss of sharpness, and a "crunchy" or unappealing appearance due to the software's attempt to guess and fill in the missing pixel information.

The Advent of AI in Image Enhancement: Super Resolution
The limitations of traditional upsampling techniques have been significantly addressed by the integration of Artificial Intelligence (AI) and Machine Learning (ML) into image editing software. Adobe's Super Resolution feature, powered by its Sensei AI technology, represents a significant leap forward in this domain. Trained on millions of photographs, this AI model learns to intelligently analyze an image and generate new pixels that not only fill the gaps but also preserve and even enhance essential details, textures, and natural colors.
The core principle behind Super Resolution is to intelligently upscale an image by doubling its width and height, effectively quadrupling the total pixel count. This process goes beyond simple interpolation; it involves a sophisticated understanding of image context to predict and render the most visually plausible and high-quality pixels.
AI, Machine Learning, Deep Learning and Generative AI Explained
Leveraging Super Resolution in Adobe Lightroom
For photographers seeking a swift and effective method to improve lower-resolution images and prepare them for high-quality prints, Adobe Lightroom offers a streamlined Super Resolution feature. This tool allows users to increase image resolution without the need for intricate manual adjustments.
The process in Lightroom is designed for simplicity:
- Select the image: Open your desired image in Lightroom.
- Access Enhance: Right-click on the image thumbnail or select the image and navigate to
Photo > Enhance...from the menu bar. - Choose Super Resolution: In the "Enhance Preview" dialog box, ensure the "Super Resolution" option is checked.
- Process: Click "Enhance." Lightroom will then process the image, doubling its dimensions and quadrupling the pixel count.
- Save as DNG: Lightroom automatically saves the upscaled image as a new DNG (Digital Negative) file, a flexible, non-destructive RAW format that retains all the enhanced detail for further editing.
This method is particularly beneficial for photographers who prioritize a non-destructive workflow and wish to maintain the original image data while benefiting from AI-driven upscaling.
Advanced Control with Super Resolution in Photoshop
While Lightroom provides a quick solution, Adobe Photoshop, in conjunction with Adobe Camera Raw (ACR), offers more granular control over image resolution, especially for users who require specific dimension adjustments or have complex layering needs.
To utilize Super Resolution in Photoshop:
Open in Camera Raw:
- For RAW files: Simply open your RAW file (e.g., .CR2, .NEF, .ARW, .DNG) directly in Photoshop via
File > Open. It will automatically launch in the Adobe Camera Raw (ACR) interface. - For JPEG, PNG, TIFF, and other raster files: Open Adobe Bridge, locate your image, right-click on its thumbnail, and select "Open in Camera Raw." Alternatively, in Photoshop, go to
File > Browse in Bridge, then right-click and select "Open in Camera Raw." - Important Note: Super Resolution is not accessible via the Camera Raw Filter within Photoshop itself. The image must be opened directly into the ACR processor.
- For RAW files: Simply open your RAW file (e.g., .CR2, .NEF, .ARW, .DNG) directly in Photoshop via
Access Enhance: Once the image is open in the ACR dialog box, right-click anywhere on the image. From the context menu, select "Enhance…" or use the keyboard shortcut
Ctrl + Shift + D(Windows) orCmd + Shift + D(macOS).Apply Super Resolution: In the "Enhance Preview" dialog box that appears, check the "Super Resolution" box. You can click and hold on the image preview to toggle between the original and the AI-enhanced version, allowing for a direct visual comparison. The dialog also provides an estimated processing time.
Enhance: If you are satisfied with the preview, click "Enhance." Photoshop will then process the image and save it as a new DNG file, which will automatically open in Camera Raw, ready for further editing.
Traditional Resampling in Photoshop for Specific Needs
For scenarios where AI-driven upscaling isn't the primary goal, or when precise control over dimensions and resolution is paramount, traditional resampling methods in Photoshop remain valuable. These methods allow for independent adjustment of print size and resolution, directly influencing the pixel count of the image.
To adjust resolution using traditional resampling:
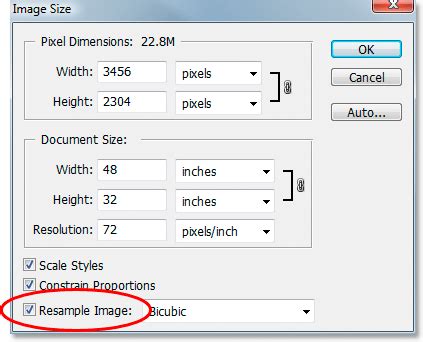
- Open Image Size: Go to
Image > Image Size...in Photoshop. - Check "Resample": Ensure the "Resample" box is checked. This is crucial for allowing independent adjustments to dimensions and resolution.
- Adjust Dimensions: Under the "Dimensions" section, you can enter specific values for Width and Height, typically in inches or centimeters for print purposes.
- Set Resolution: Adjust the "Resolution" value (usually in pixels per inch or PPI). As you change one value (e.g., Width, Height, or Resolution), Photoshop will automatically update the others to maintain the image's aspect ratio and pixel count, or vice versa, depending on which parameters are being adjusted.
- Scale Styles (if applicable): If your image contains layers with applied styles, consider selecting "Scale Styles" under the gear icon to ensure these effects are scaled proportionally with the image.
- Confirm: Click "OK" to apply the changes.
Adjusting Resolution Without Changing Pixel Count:
In some cases, you might need to adjust the print resolution without altering the total number of pixels in the image. This is useful for preparing an image for a specific print size at a different PPI.
- Open Image Size: Go to
Image > Image Size.... - Deselect "Resample": Uncheck the "Resample" box.
- Adjust Resolution: Enter new values for "Resolution." Photoshop will automatically adjust the "Document Size" (Width and Height) while keeping the total pixel count constant.
- Adjust Document Size: Alternatively, you can adjust the "Document Size" values (Width and Height) directly, and Photoshop will modify the "Resolution" accordingly, maintaining the original pixel count.
- Confirm: Click "OK."
It's important to note that resampling, especially upsampling, can still lead to a reduction in image quality if not managed carefully. The choice of interpolation method (how software calculates the color values for new pixels) plays a significant role in minimizing unwanted artifacts. Photoshop offers various resampling algorithms, such as Bicubic Smoother (good for enlargements) and Preserve Details, each with its strengths.
Understanding the Nuances and Limitations
While Super Resolution is a powerful tool, it's not a magic bullet for all image quality issues. Several factors influence its effectiveness:
- Original Image Quality: Super Resolution works best with high-quality source images, particularly RAW files. These files contain more image data, allowing the AI to make more informed decisions about pixel generation. Low-quality images with excessive noise, compression artifacts, or blur may see limited improvement or even have artifacts exaggerated.
- File Type: While Super Resolution supports JPEG, TIFF, and PNG files, its performance is generally superior with RAW formats due to the richer data they contain. Compressed JPEGs, in particular, can sometimes exhibit exaggerated compression artifacts when upscaled.
- Upscaling Limits: Adobe Super Resolution is designed to double the linear resolution (2x width and 2x height), resulting in 4x the pixel count. It cannot upscale beyond this by default. For higher upscaling ratios, multiple applications might be necessary, or third-party tools may be considered. Additionally, there are maximum output dimensions (65,000 pixels on the long side) and megapixel limits (500 MP).
- GPU Performance: A high-performance Graphics Processing Unit (GPU) significantly speeds up the Super Resolution processing. Users with less powerful systems may experience longer wait times.
- Not a Fix for Out-of-Focus Images: Super Resolution cannot magically bring an out-of-focus image into sharp focus. It enhances existing detail and interpolates new pixels based on that detail, not on creating detail that was never captured.
- File Size Increase: Upscaling an image, especially a RAW file, can dramatically increase its file size. Users should ensure they have adequate storage space and consider using Solid-State Drives (SSDs) for faster read/write operations.
- Denoise vs. Super Resolution: In newer versions of Camera Raw, features like Denoise and Super Resolution are available. However, they often cannot be used on the same image simultaneously; you must choose one or the other.
Comparisons with Third-Party Solutions
Adobe's Super Resolution is a formidable tool, but it's not the only AI-powered image upscaler available. Competitors like Topaz Gigapixel AI and Aiarty Image Enhancer offer alternative approaches.
- Topaz Gigapixel AI: Often praised for its ability to produce sharper details and less noise, Topaz Gigapixel AI can sometimes apply stronger edge enhancement, which might occasionally result in a slightly over-processed look compared to Adobe's more natural rendering.
- Aiarty Image Enhancer: This tool is noted for its ability to deliver very clear and defined details, though it may introduce subtle color variations. It is also capable of higher upscaling ratios (up to 32K) and excels at removing artifacts like blur, noise, and pixelation.
While third-party solutions might offer certain advantages in specific scenarios, Adobe's Super Resolution is deeply integrated into the Adobe ecosystem, offering a seamless workflow for Creative Cloud subscribers. It particularly shines for photographers who prioritize non-destructive editing and RAW file manipulation. For users needing extreme upscaling or significant artifact correction on heavily compressed images, dedicated AI upscalers might present a more compelling option.
Practical Tips for Optimal Results
To maximize the benefits of Super Resolution and other upscaling techniques in Photoshop and Lightroom:
- Start with the Best Source: Always use the highest quality original image available. RAW files are preferred.
- Understand Your Goal: Are you preparing for a large print, cropping significantly, or restoring an old photo? Your objective will guide your choice of tool and settings.
- Leverage GPU Acceleration: Ensure your system meets the GPU requirements for AI-powered features for faster processing.
- Consider Post-Processing: After upscaling with Super Resolution, you may need to make minor adjustments to sharpening, noise reduction, and texture to achieve the perfect balance, especially if the original image had artifacts.
- Experiment and Compare: Don't hesitate to test different tools and settings. Comparing the output side-by-side will help you determine the best approach for your specific image and needs.
- One-Click Upscaling: For many common scenarios, like enlarging a cropped photo for a headshot, Super Resolution offers a remarkably simple and effective solution with just a few clicks.
By understanding the underlying principles of image resolution and skillfully employing tools like Adobe's Super Resolution, photographers and digital artists can push the boundaries of image quality, transforming potentially problematic low-resolution files into high-impact visuals suitable for a wide range of applications, from web display to large-format printing.