Creating a truly realistic wood texture in digital art can feel like an intricate dance between creativity and technique. The ability to imbue your digital creations with the tactile quality of natural materials elevates them from mere images to immersive experiences. With the right tools and a nuanced understanding of their application, you can transform your artwork into something that feels both alive and tangible, inviting viewers to almost reach out and touch the surface you've rendered.
Enter IbisPaint, a remarkably versatile drawing application that has captured the hearts of over 460 million users worldwide. Its extensive feature set and user-friendly interface make it an accessible yet powerful platform for artists of all levels. Imagine starting with a blank canvas-a pristine digital expanse that is perhaps just waiting for your unique vision to come alive. You open IbisPaint, ready to embark on the journey of texture creation, and dive into its extensive library of brushes. The search begins: how do you find that perfect brush to mimic the grainy beauty of wood, to capture its inherent character and subtle imperfections?
Exploring IbisPaint's Brush Library for Wood Effects
Within IbisPaint's vast collection of brushes, several stand out as particularly effective for generating realistic wood textures. One popular and highly recommended choice is the ‘Grain Brush.’ This brush is designed to allow you to layer strokes that effectively mimic the natural imperfections and flowing lines found in real wood grains. Its inherent texture can be manipulated to create a foundational layer that suggests the underlying structure of timber. By varying the pressure and angle of your strokes, you can begin to suggest the directionality and subtle variations in density that characterize different types of wood.
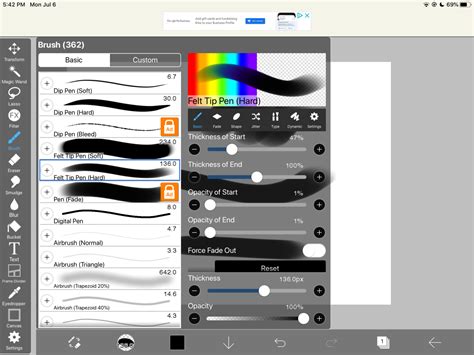
Another highly effective option is to explore the world of custom brushes. Many talented artists within the IbisPaint community have dedicated time to creating and sharing brushes specifically designed to replicate natural textures, including wood. These custom brushes often offer a more specialized approach, sometimes mimicking specific wood types like oak, pine, or mahogany with remarkable fidelity. Seeking out and experimenting with these user-generated assets can significantly accelerate your progress towards achieving authentic-looking wood. The creators of these brushes have already grappled with the nuances of digital wood replication, and their solutions can provide invaluable shortcuts and inspiration.
Layering and Blending: The Art of Depth and Realism
As you experiment with these brushes, it is crucial to remember that a single brushstroke is rarely enough to achieve convincing realism. The true magic happens when you start employing blending techniques and layering different shades and opacities. A wise approach is to begin with a lighter base color that establishes the overall tone and brightness of the wood. This foundational layer acts as a canvas upon which you will build the more intricate details.
Once your base is established, you can then begin adding darker lines and subtle variations that resemble knots, growth rings, or the natural fissures that occur in timber. These elements are critical for breaking up the uniformity of a flat color and introducing visual interest. Think about the organic, often irregular patterns of real wood. Knots, for instance, are rarely perfectly circular; they often have an elongated or asymmetrical form. Growth rings are not always consistent concentric circles; they can be interrupted by other grain patterns or imperfections.
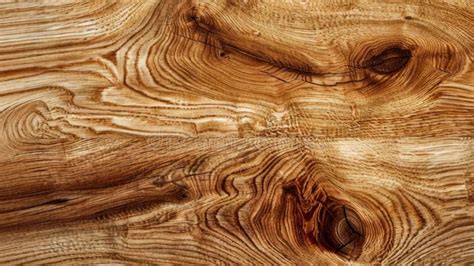
Consider the interplay of light and shadow. Even on a seemingly flat wooden surface, subtle highlights and shadows can define the texture and give it form. Use lighter shades to suggest where light might be catching the raised edges of the grain, and darker shades to deepen the valleys between them. This careful attention to light interaction is what will ultimately give your digital wood a sense of three-dimensionality.
Techniques for Simulating Wood Grain and Imperfections
To further enhance the realism of your wood textures, consider a multi-layered approach. Start with a base color that establishes the general hue of the wood. Then, using a brush with a slightly textured edge, such as the ‘Grain Brush’ or a custom grain brush, lay down strokes that follow the natural direction of the wood grain. Vary the pressure and opacity of these strokes to create subtle differences in intensity.
Knots can be created by drawing irregular, darker shapes and then adding lighter rings around them to suggest the way the wood has grown around a branch. These rings should not be perfectly uniform; organic variation is key. You can also introduce subtle imperfections like small dents, scratches, or even simulated woodworm holes. These details, while small, contribute significantly to the overall believability of the texture.
For a more weathered or aged look, you might introduce subtle variations in color, such as hints of grey or desaturated tones, and perhaps even simulate areas where the wood has been worn down or slightly splintered. This can be achieved by using a softer brush with a low opacity to gently scuff the surface or by introducing small, irregular white or light grey highlights to suggest splintering.
Understanding Wood Grain: A Foundational Principle
To truly master the creation of wood textures, a fundamental understanding of actual wood grain is invaluable. Wood grain refers to the arrangement, texture, and direction of fibers in wood. Different types of wood have distinct grain patterns. For example, oak often exhibits a prominent, open grain with visible pores, while pine typically has a straighter, more uniform grain with distinct growth rings.
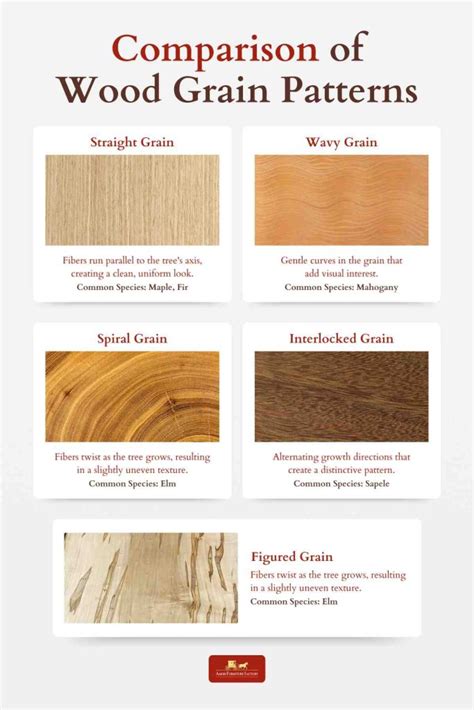
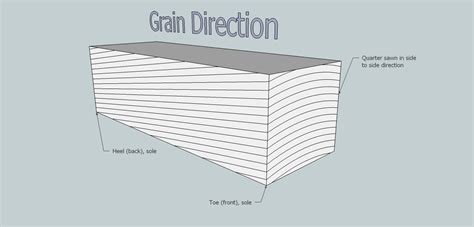
The way wood is cut from a log also influences its visible grain. Plain-sawn lumber (the most common and economical cut) reveals a flatter, more varied grain pattern, often with "cathedral" shapes. Quarter-sawn lumber, cut perpendicular to the growth rings, displays a straighter, more linear grain and can often reveal beautiful ray flecks. Understanding these differences allows you to choose the appropriate brush strokes and patterns to represent specific types of wood accurately.
When creating your textures, pay attention to the directionality of the grain. It generally flows parallel to the length of the tree trunk. In IbisPaint, this translates to creating your primary grain lines in a consistent direction across a surface, with variations and imperfections introduced as secondary details.
Advanced Techniques and Experimentation
Beyond the basic grain brushes, IbisPaint offers a wealth of tools that can be repurposed for wood texture creation. Consider experimenting with brushes that have a built-in texture, such as certain chalk or charcoal brushes, and adjusting their blending modes. For instance, setting a textured brush to ‘Multiply’ can create darker grain lines over a lighter base, while ‘Overlay’ or ‘Soft Light’ might be used to add subtle highlights or variations in color.
TUTORIAL Menggamber Tekstur KAYU di Ibis Paint X
The ‘Smudge’ tool can also be incredibly useful for softening harsh lines and blending colors together to create a more organic, natural appearance. Use it sparingly and with a textured brush tip to avoid over-smoothing the grain.
Don't be afraid to experiment with different color palettes. While classic brown tones are common for wood, consider the myriad of natural wood colors that exist, from pale blonde to deep reddish-browns and even greyed or almost black woods. You can also introduce subtle color variations within a single piece of wood, reflecting the natural inconsistencies of the material.
The process of creating realistic wood textures in IbisPaint is an iterative one. It involves understanding your tools, observing the real world, and applying that knowledge with patience and creativity. By layering, blending, and paying close attention to the subtle details that define natural wood, you can achieve remarkably convincing results that add depth and authenticity to your digital artwork. Each new technique you master will unveil fresh possibilities within your work, turning a simple digital surface into a rich, tactile experience.