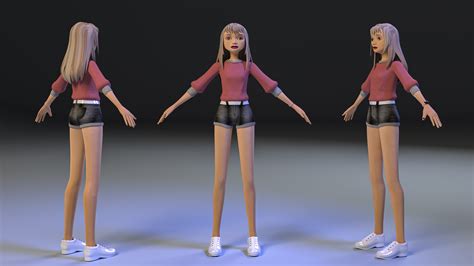
The world of digital art is constantly evolving, and the integration of 3D modeling with 2D painting software has opened up exciting new possibilities for artists. Procreate, a powerful and intuitive drawing application for iPad, is at the forefront of this evolution, allowing artists to leverage 3D models as a foundation for stunning 2D artwork. This tutorial delves into a workflow that utilizes 3D blockouts to create intricate and well-composed 2D illustrations, offering a significant advantage in efficiency and creative control. For those new to the iPad art scene or looking to upgrade, exploring guides on the best iPads for drawing and understanding iPad generations can be a valuable first step. Additionally, a thorough Procreate review can highlight why this app is such a game-changer for digital artists.
Leveraging 3D Blockouts for Enhanced 2D Creation
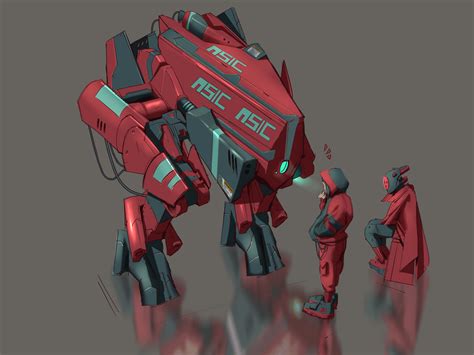
For a significant portion of an artist's career, the creation of 2D drawings often precedes their transformation into 3D. However, a more streamlined and effective approach involves reversing this process. By utilizing 3D models as a reference, artists can expedite the creation of complex 2D artwork. This tutorial will demonstrate how to use a 3D blockout, created in a program like Nomad Sculpt (available on iPad), as a reference to develop a painting within Procreate. Nomad Sculpt is a highly recommended choice due to its affordability and versatility, offering a wide array of tools suitable for shaping primitive forms.
The advantage of this 3D blocking approach lies in its ability to quickly define the visual appearance of a character or object using simple primitive shapes. This method allows for the exploration of lighting and composition within the 3D environment before transitioning to a preferred painting program. By resolving complexities related to perspective and overall composition in the 3D stage, artists can then dedicate their efforts to detailing the design in Procreate with greater speed and confidence. This also allows for the exploration of different poses and lighting scenarios with relative ease, providing a robust foundation for the 2D artwork.
The Power of Primitive Shapes and Sculpting
The initial stage of this workflow involves using any 3D sculpting package, with Nomad Sculpt being a favored option for its accessibility and feature set. The process begins by gathering reference material, such as images of Gundam mechs in this specific example, and then proceeding to block out initial ideas. The focus at this stage is not on intricate details of individual body parts, but rather on establishing the overall form and pose. This is achieved by employing basic primitive shapes like spheres, cubes, and pyramids to construct the basic structure of the body, limbs, and head.
The Knife tool within the sculpting software proves invaluable for refining these primitives. By trimming off sections of the shapes, artists can create chamfered edges that effectively catch light, adding a rudimentary sense of form and dimension even at this early stage. This deliberate shaping of primitives not only aids in defining the silhouette but also pre-emptively considers how light will interact with the model, a crucial element for realistic rendering in the subsequent 2D painting phase.
Importing and Sketching in Procreate
Once the 3D blockout is established, the next step is to bring it into Procreate. It is advisable to start with a fairly large document size, for instance, 4,000 pixels high, to ensure ample resolution for detailed work. The 3D model can be imported as a screenshot onto a dedicated layer within Procreate. While Procreate's 'Reference' feature is a useful tool, for this particular project, simply having the reference on a layer suffices.
A new layer is then created specifically for sketching. This sketch layer is built upon the imported 3D reference, allowing the artist to draw the basic outline of the design. This initial sketch serves as a guide, translating the 3D form into 2D lines and shapes. The process of sketching directly from a 3D model ensures that the proportions and perspective are accurate from the outset, saving considerable time and effort compared to freehand sketching from imagination or 2D references alone.
Refining the Line Art and Establishing the Silhouette
With the initial sketch in place, the process moves towards creating a clean and detailed line drawing. A new layer is created above the sketch layer, and the sketch layer's opacity is reduced to approximately 50%, making it visible but unobtrusive. The Technical pen, set to around 90% opacity, is then used to draw over the sketch. This stage requires careful attention to detail, ensuring that the lines are accurate and that all elements are properly connected. This meticulousness is crucial, especially if the intention is to use flood fills for applying base colors later in the process.
Following the completion of the clean line drawing, a new layer is created directly beneath it. This layer is dedicated to establishing the silhouette of the mech. At this point, the color of the silhouette is not critical, as it will serve multiple purposes in later stages and can be easily modified as needed. The silhouette layer acts as a foundational shape, defining the overall mass and contour of the subject. This is a common and reliable method of layer management, a system that has been employed effectively in various digital art programs, including Photoshop, long before the widespread adoption of iPad-based art creation.
Mastering Lighting and Shading with Layer Modes
Effective lighting is paramount in creating a sense of depth and form. In this workflow, a new layer is created above the silhouette layer but below the ink sketch layer. This layer is set to the 'Multiply' blend mode. Crucially, it is also set as a 'Clipping Mask' to the silhouette layer. This clipping mask ensures that any painting or shading applied to this layer will be confined strictly within the boundaries of the silhouette below.
The lighting direction is decided upon, typically from the top right in this example. This 'Multiply' layer is then used to paint in the core shading, effectively creating an Ambient Occlusion effect. This technique helps to define the form by showing where light would be blocked, creating darker areas in crevices and undercuts. Understanding how these layer modes function in programs like Procreate and Photoshop is fundamental to achieving sophisticated rendering results.
Following the shading, another new layer is created, positioned above the silhouette layer but still below the sketch layer. This layer is set to the 'Overlay' blend mode and also functions as a 'Clipping Mask' to the silhouette. This 'Overlay' layer is where the main lighting details are applied. Since the light source was established as coming from the top right, this layer will be used to paint in the highlights and areas where light directly hits the model. This approach creates a natural interplay of light and shadow, complementing the 'Multiply' layer and adding depth to the illustration.
String of Glowing Lights in Procreate!
The Importance of Flipping and Compositional Checks
A critical step in ensuring the accuracy and visual appeal of the artwork is to regularly flip the image horizontally. This technique allows the artist to view the illustration from a reversed perspective, which can often reveal subtle errors in proportion, balance, or detail that might otherwise go unnoticed. While it is generally recommended to flip the image frequently and at an earlier stage, in this instance, flipping the mech after establishing the initial lighting and shading revealed that most elements worked well. This success is largely attributed to the foundation laid by the 3D reference model, which inherently maintains accurate proportions and perspective.
This habitual practice of flipping the canvas is a cornerstone of good digital art practice, enabling artists to maintain a critical eye on their work and catch potential issues before they become more deeply ingrained in the composition. The 3D blockout significantly aids in this regard, as its inherent structural integrity minimizes the likelihood of major compositional flaws.
Building the Environment and Base Colors
With the character or object well-defined and its lighting established, the focus shifts to the surrounding environment. A new layer is created at the very bottom of the layer stack. Using a cloud brush or a similar textured brush, a rough background is blocked out. It is best to use only grayscale tones â blacks, whites, and grays â at this stage. This allows for a focus on establishing the overall value structure and mood of the scene, without the distraction of color. The background elements are known to change later in the process.
Once satisfied with the background's value and composition, a new layer is added above the background layer and set to the 'Multiply' blend mode. This layer is then used to block in the basic color washes. Initial color choices might be reds and blues, serving as a starting point for the broader color palette of the illustration. This method of applying base colors over a grayscale underpainting is a common technique that helps in establishing a cohesive color scheme.
Color Refinement and Texture Application
To further explore and refine the color palette, Procreate's 'Curves' tool can be a powerful ally. By adjusting the hue, saturation, and brightness of the color layers, artists can fine-tune the overall color balance until they achieve the desired aesthetic. This iterative process of color adjustment allows for significant control over the mood and atmosphere of the illustration.
One of the final steps in bringing the illustration to life is the application of texture. A new layer is created and set to the 'Multiply' blend mode. This layer is then used to add a variety of textures, such as speckles, scratches, dust, and damage. A wide range of built-in Procreate brushes can be utilized for this purpose; the key is to select brushes that offer interesting visual qualities. Experimenting with brush opacity, size, and layering different textures can yield highly effective and nuanced results. The purchase of additional brush packs can further expand the textural possibilities, and exploring guides on the best Procreate brushes can be beneficial for discovering new tools.
Final Touches and Layer Management
As the illustration nears completion, a crucial step involves merging all the layers down. This consolidated layer then becomes the canvas for final refinements. Tools like the Smudge tool and Blur tool can be employed to blend elements, soften transitions, and enhance the overall painterly quality. Additional lighting adjustments can also be made at this stage to further enhance depth and form. This final pass allows for a cohesive integration of all the elements that have been built up throughout the process.
The proficiency in layer management, as demonstrated through the use of blend modes, clipping masks, and organized layer stacking, is a fundamental skill that translates across various digital art applications. This systematic approach, honed through extensive practice and experience, enables artists to tackle complex projects with confidence and efficiency. The ability to work with 3D models as a reference within Procreate significantly streamlines the creation of detailed and well-composed 2D artwork, offering a powerful advantage in the modern digital art landscape. The example of Glen Southern, a specialist in character and creature design with a portfolio featuring work for major productions, underscores the effectiveness of such advanced workflows. His studio, SouthernGFX, has contributed assets for TV and film, including 3D models for "Game of Thrones'" house sigils, highlighting the professional application of these techniques. Glen's extensive experience, including over 15 years using and training ZBrush and his role as a Wacom Ambassador, further validates the sophisticated nature of this 3D-to-2D integration.
The ability to export objects directly from Procreate in View in AR mode by tapping the Share icon in the top right of the AR window allows for immediate visualization of the artwork in a real-world context. Procreate's integration with Augmented Reality, accessed through Gallery by opening an OBJ or USDZ file and tapping Actions â 3D â View in AR, provides an immersive way to experience and present 3D models. The first-time permission request for camera access is a standard security measure. Once in AR, the object is placed on the first detected flat surface. To exit or reposition the object, the 'X' in the top left corner of the AR window is used. This feature can be particularly useful for showcasing 3D models or even for artists who wish to see their 2D creations, derived from 3D references, interact with their physical environment.
The concept of "Paint through mesh" is another powerful feature within Procreate's 3D capabilities. When toggled on, brush strokes will ignore and pass through any unselected meshes. This is incredibly useful when working with complex 3D scenes where you might want to paint details on a specific part of a model without inadvertently affecting other parts that are behind it from your current viewing angle. This selective painting approach significantly enhances precision and control.
Furthermore, the "Edit Lighting" option opens the Procreate Lighting Studio, a dedicated environment for manipulating light sources. Here, artists can add multiple lights, adjust their hue, saturation, and intensity, and even incorporate environmental lighting. This allows for precise control over how light interacts with the 3D model, enabling the creation of specific moods and atmospheric effects that can then be translated into the 2D artwork. This level of control over lighting within the painting application itself is a testament to Procreate's advanced features for 3D integration.