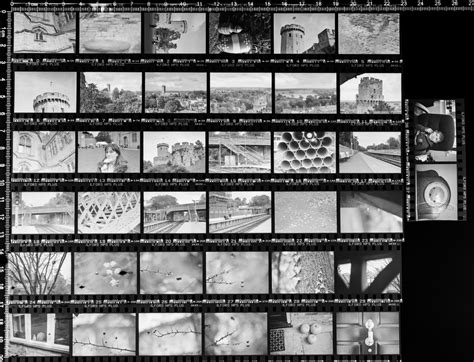
The creation of a "contact sheet" in digital photography, while perhaps a relic of the film era, remains a valuable tool for photographers. Historically, a contact sheet was a page of images printed at the same size as the film negative, allowing photographers to quickly review and select negatives for further printing. This was achieved by placing the film directly in contact with photographic paper. Today, the term "contact sheet" has evolved to describe an arrangement of multiple, small, same-size images on a single page, often accompanied by identifying information like filenames. Its primary purpose is to provide a visual reference to a larger set of images, aiding in organization, review, and selection.

Understanding the "Lightroom" vs. "Lightroom Classic" Distinction
A crucial point of confusion for many users stems from the existence of two distinct Adobe products: Lightroom (cloud-based) and Lightroom Classic (desktop-based). The cloud-based Lightroom, particularly versions like v3.2, does not possess a 'Print' module, and therefore, it cannot be used to create contact sheets. This is a significant limitation for users accustomed to the functionality of its predecessor or who require this specific output. In contrast, Lightroom Classic retains the 'Print' module, which is essential for generating contact sheets and offers a robust set of customization options. Users seeking to create contact sheets must ensure they are using Lightroom Classic.
The Enduring Relevance of Contact Sheets in the Digital Age
Despite the shift to digital photography and the proliferation of digital viewing methods like laptops, web galleries, and tablets, the printed contact sheet continues to hold its ground. Several compelling reasons contribute to its sustained relevance:
- Visual Overview and Selection: Contact sheets offer a macro view of a series of images on a single page. This allows photographers to quickly scan through many photos, identify the strongest shots, and make informed decisions about which images to enlarge or use for specific projects. This is particularly useful for large shoots where hundreds of images might be captured.
- Organizational Tool: They serve as an excellent organizational tool. By creating contact sheets for specific projects, themes, or collections, photographers can maintain a clear record of their work. Exported JPEG contact sheets can even be incorporated into photo books, creating a comprehensive archive.
- Creative Exploration: The arrangement of images on a contact sheet can foster creative exploration. Users can experiment with different layouts, observe how images relate to one another, and discover pleasing combinations or sequences. Adjusting thumbnail sizes and positions allows for unique visual presentations.
- Client Presentation: For certain clients, a physical contact sheet can offer a more tangible and impactful way to present a selection of images compared to a digital gallery. It provides a different, and sometimes preferred, viewing experience.
- Copyright Registration: In some jurisdictions, like the US Copyright Office, a contact sheet can be submitted as proof of electronic works, streamlining the copyright registration process.
Step-by-Step Guide to Creating Contact Sheets in Lightroom Classic
For users of Lightroom Classic, the process of creating a contact sheet is straightforward and highly customizable.
Select Your Images: Begin by navigating to the folder or collection containing the photographs you wish to include in your contact sheet. Select all the desired images from the Filmstrip. A common method is to click the first image, then Shift-click the last image. Alternatively, if the Toolbar is visible (press 'T' to toggle it), you can select "All Filmstrip Photos" from the "Use:" dropdown menu.
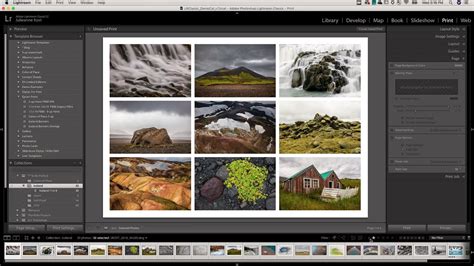
Navigate to the Print Module: Once your images are selected, click on the "Print" module, typically found in the top-right corner of the Lightroom interface.
Choose a Contact Sheet Template: In the Print module, locate the "Template Browser" at the top of the left-hand panels. Lightroom Classic offers several pre-designed grid layouts suitable for contact sheets. Look for templates specifically labeled as "Contact Sheet." A common starting point is the "4x5 Contact Sheet" template, which typically displays four columns and five rows of images.
Utilize the Toolbar for Navigation and Overview: If the Toolbar is not visible, press the 'T' key to display it. The Toolbar provides valuable information, including the number of pages your contact sheet will occupy. You can also use the arrow keys on the Toolbar to navigate between these pages.
Adjust Page Setup:
- Paper Size and Orientation: Under the left-hand panels, click "Page Setup." Here, you can change the default paper size (often US Letter) to your preferred dimensions and select the desired orientation (portrait or landscape).
- Layout and Grid: In the "Layout" panel, you can precisely control the arrangement of your images. Adjust the number of "Rows" and "Columns" to dictate how many images appear on each page. Decreasing the number of rows or columns will automatically increase the size of the individual image cells.
- Cell Size and Spacing: The "Cell Size" sliders for Height and Width allow you to fine-tune the dimensions of each image cell. As you adjust these, notice that the "Cell Spacing" values will also update. You can also manually adjust the spacing between images to improve readability.
Customize Image Information (Photo Info):
- Displaying Text: To add text below your images, go to the "Page" panel and check the "Photo Info" box.
- Selecting Metadata: By default, this might display the filename. You can click the arrows next to "Filename" to select other metadata fields such as "Caption," "Title," "Date," "Exposure," or "Equipment."
- Custom Text and Data: For more advanced customization, click "Edit" next to the "Photo Info" dropdown. The "Text Template Editor" provides access to a wide array of data, including EXIF and IPTC information, sequential numbering, and the ability to type your own custom text. This is invaluable for adding specific notes or identifiers to each image. For instance, you can combine a sequential number with the filename for clear referencing.
How to Make a Contact Sheet PDF in Lightroom Classic [2026 Full Guide]
Advanced Layout Options:
- Keep Square: In the "Layout" panel, the "Keep Square" checkbox can be useful. When selected, it attempts to maintain a square aspect ratio for image cells. In some layouts, this might result in a mix of portrait and landscape images on the same page, depending on the original image orientation.
- Margins: Adjusting the "Bottom" or "Top" margins in the "Page" panel can create space for other elements.
Adding Identity Plates (Watermarks):
- Placement: In the "Page" panel, check the "Identity Plate" box. You can then select an existing Identity Plate (often your logo or name) or create a new one.
- Positioning and Scaling: By default, the Identity Plate appears in the center of the page. You can drag it to your desired location and adjust its scale using the "Scale" slider. This is useful for branding your contact sheets.
Outputting Your Contact Sheet:
- Print to File (JPG): If you intend to save your contact sheet as a digital file, navigate to the "Print Job" panel on the right. Select "Print to JPG File." You will then be prompted to name the file and choose a save location. You can also set "Custom File Dimensions," though this affects the overall page size, not the individual image cells, which must be adjusted separately.
- Print to PDF: To create a PDF, you'll need a PDF printer driver installed on your system (e.g., Adobe PDF or a third-party option). Go to "Page Setup," select your PDF printer, and configure the page size to match your template. Then, in the "Print Job" panel, set "Print to:" to "Printer" and click "Print."
- Direct Printing: If you wish to print directly to a physical printer, ensure your printer is selected in the "Page Setup" and then click "Print."
Saving Custom Templates:
- Preserving Your Work: If you've spent time customizing a layout, you can save it as a new template for future use. In the "Template Browser" header, click the plus (+) symbol. Provide a name for your template and choose where to store it (e.g., "User Templates"). This allows you to quickly recall your preferred settings for future contact sheet creation.
Addressing Specific User Queries and Quirks
Several users have encountered specific challenges when creating contact sheets.
- Missing Print Module: As highlighted earlier, the absence of the "Print" module in the cloud-based Lightroom is the primary reason some users cannot create contact sheets. This feature is exclusive to Lightroom Classic.
- Exposure Settings Not Showing: One user reported an issue with exposure settings not appearing on their contact sheets in LR Classic after an update. The response indicated that this functionality should still be available in Lightroom Classic. If issues persist, checking for further updates or seeking Adobe support might be necessary.
- Filename Display Truncation: A common quirk is that longer filenames may not display fully on the contact sheet. A workaround suggested is to select a different item from the "Photo Info" pulldown (e.g., "Exposure"), then reselect "Filename." This often resolves the display issue.
- Caption Proximity to Image: A user inquired about controlling the vertical spacing between an image and its caption, wanting the caption closer to the image above it. While Lightroom Classic offers control over margins and cell spacing, precise pixel-level control over the caption's vertical placement relative to individual cells is limited. Adjusting overall cell spacing and margins can influence this, but it might not offer the exact desired outcome for every scenario.
- Alternative Software: For highly specialized captioning needs, some users have explored third-party software like "ContactPage Pro 6," though its cost can be a deterrent for a specialized tool.
The Historical Context of Contact Sheets
The term "contact sheet" originates from the practice of placing photographic film directly onto a sheet of photographic paper and exposing it to light. This resulted in a direct, full-size print of each negative on the roll. This method was fundamental in the darkroom era for quickly assessing the content of film rolls. The purpose was to identify the best images for further processing and enlargement without having to make individual prints of every frame. While the physical process has been superseded by digital workflows, the underlying principle of creating a visual index of images remains.
Creative Applications and Advanced Customization
Beyond simple reference, contact sheets can be leveraged for creative purposes:
- Thematic Groupings: Curate collections of images based on specific themes, such as "Things outside houses" or a particular color palette, and present them as a contact sheet.
- Visual Storytelling: Arrange images sequentially to tell a story or illustrate a process.
- Portfolio Review: Create contact sheets of your best work for a quick portfolio overview, either for yourself or for potential clients.
- Personal Projects: Document personal projects or assignments with a dedicated contact sheet that serves as a visual log.
The ability to customize templates in Lightroom Classic means that the "contact sheet" is no longer a rigid, one-size-fits-all output. Photographers can design layouts that perfectly suit their needs, whether it's for copyright registration, client presentations, personal archiving, or creative exploration. The flexibility to adjust image size, spacing, add custom text, and incorporate branding elements transforms a historical photographic practice into a dynamic digital tool.