For those captivated by the dynamic world of Photoshop text effects, the creation of three-dimensional typography offers a powerful way to add depth, visual interest, and a professional polish to designs. This tutorial delves into the fundamental steps involved in transforming flat text into an engaging 3D object within Photoshop, covering shape manipulation, light source configuration, material definition, and the final rendering process. While the core principles are explored here, it's important to acknowledge that achieving highly intricate or specialized 3D text effects often involves more advanced techniques or dedicated assets, which we will touch upon later.
Initial Setup and Text Preparation
The journey to creating a 3D text effect begins with setting up your canvas and inputting your desired text. If you're accustomed to working with Adobe Illustrator for vector-based elements, you can initiate your design there and then bring it into Photoshop. For those working directly within Photoshop, the process starts with creating a new file. Once your document is ready, select a font that is both prominent and bold. The choice of typeface significantly influences the final 3D appearance, with thicker fonts generally yielding more impactful results.
After typing your text, the next step is to convert it into a 3D object. Photoshop will apply some default settings to your text, immediately transforming it into a rudimentary 3D form. Before diving into customizing these settings, it's crucial to establish the environment in which your 3D text will exist. This involves orienting your camera and setting up the background elements that will interact with your text.
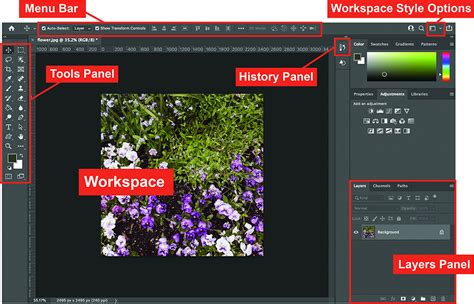
Navigating the 3D Properties Panel
With your text converted to a 3D object, you'll interact with its properties primarily through the dedicated 3D panel. This panel is your command center for all 3D manipulation. To begin adjusting the perspective and positioning of your text within the scene, click on the 3D text object. Navigate to the "Coordinates" tab within the Properties panel. Here, you'll find tools to manipulate the camera. Select the first tool in the upper bar of the 3D panel. By clicking and dragging your mouse cursor outside of the text object, you can effectively move the camera around the 3D scene, changing the viewing angle and establishing the initial composition. This step is vital for determining how your 3D text will be perceived.
Establishing the Scene: Background and Environment
A compelling 3D effect often relies on how the subject interacts with its surroundings. Therefore, adding a background that complements your 3D text is a logical next step. Select the last tool available in the upper bar of the 3D panel. This tool allows you to create and manipulate shapes within the 3D space. Resize the rectangular shape generated by this tool to completely fill the entire scene. This will serve as your background plane, providing a surface for lighting and shadows to interact with, thus grounding your 3D text and enhancing its realism.
Sculpting the 3D Shape: Depth and Form
Now that the scene is set, it's time to refine the actual 3D properties of your text. Return to the first tab within the Properties panel, which is dedicated to the 3D text's core settings. Within this tab, you'll find "Shape Presets." While these presets offer quick starting points, the true control lies in the "Cap" tab. This section provides a wealth of settings that allow you to meticulously adjust the shape and form of your 3D text.
Within the "Cap" tab, you can modify parameters such as the "Extrusion Depth," which determines how far the text extends into the third dimension. You can also adjust the "Warp" settings to introduce curvature or other distortions, and fine-tune the "Bevel" options. The bevel defines the edges of your text, allowing you to create sharp, rounded, or chamfered profiles. Experimenting with these settings is key to achieving the desired aesthetic, whether you're aiming for a sleek, modern look or a more robust, chiseled appearance. The ability to precisely control these elements is what elevates a basic 3D text from a simple extrusion to a sculpted form.
EASY 3D Text EFFECT in Adobe Photoshop - v1
Illuminating Your Creation: Mastering Light Sources
Light is a fundamental element in defining the perception of three-dimensionality. Properly setting up light sources in your 3D scene is crucial for casting realistic shadows, highlighting contours, and defining the material properties of your text. Scroll down the list of 3D options in the Properties panel to find the "Infinite Light" settings.
The default infinite light often provides a basic illumination. However, to achieve more nuanced lighting, it's beneficial to add additional light sources. Click on the white card located at the bottom of the 3D panel. From the options that appear, select "New Infinite Light." This will introduce a second light source into your scene.
To understand the impact of each light, you can temporarily turn off the first light by clicking its visibility icon. Now, with only the new light active, drag its position and adjust its angle. The goal here is to strategically illuminate the contours of your letters. This often means positioning the light to create subtle highlights along the edges and defining shadows that emphasize the depth and form of the extruded text. Once you've refined the position and intensity of this second light, you can re-enable the first light and adjust its settings as well, creating a more complex and dynamic lighting environment. The interplay between multiple light sources allows for greater control over the mood and realism of your 3D text.
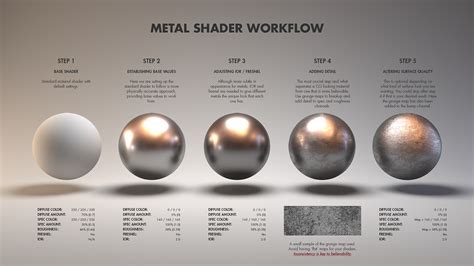
Defining Material Properties: Color, Shine, and Shadow
The "Materials" tab is where you define the surface characteristics of your 3D text. Select all the materials associated with your text object. Here, you can assign colors and adjust how light interacts with these colors.
- Diffuse: This setting controls the main, base color of your object. It's the fundamental hue that you see when the object is evenly lit.
- Specular: This color determines the appearance of highlights and shine on the surface of your text. A brighter specular color will result in sharper, more intense reflections.
- Ambient: This color influences the appearance of shadows. A darker ambient color will create deeper, more pronounced shadows, while a lighter ambient color can help to brighten shadowed areas.
By adjusting these parameters, you can simulate various material types, from matte finishes to highly reflective surfaces. For instance, a low diffuse value with a high specular value can create a metallic look, while a soft diffuse color with minimal specular can emulate a matte plastic.
To further enhance the overall brightness of the scene and influence the shadows, you can also adjust the global ambient light. Locate "Environment" within the 3D list and modify the "Global Ambient" setting to a brighter color. This acts as a general fill light that affects the entire scene, ensuring that even the darkest areas have some discernible detail.
Rendering and Refinement
Once you are satisfied with the arrangement of your text, the lighting, and the material properties, it's time to render your scene. Click the "Render" button. This process calculates the final appearance of your 3D text, taking into account all the settings you've applied, including lighting, shadows, and material reflections. The rendered image will provide a realistic preview of how your 3D text will look.
Should you notice any elements that require adjustment â perhaps the shadows are too harsh, the highlights aren't positioned correctly, or the material color isn't quite right â you don't need to start over. Simply hit the "Escape" key to stop the rendering process. This will return you to the editable 3D environment, allowing you to go back and tweak specific settings. You can adjust the intensity of light sources, refine their direction, or modify the properties of the materials until you achieve the desired outcome. This iterative process of adjusting and rendering is fundamental to achieving professional-looking 3D text effects.
Beyond the Basics: Advanced 3D Text Effects
While the steps outlined above provide a solid foundation for creating basic 3D text effects in Photoshop, mastering more complex or stylized results often requires additional resources. The effort involved in manually crafting intricate 3D designs can be substantial. Fortunately, a variety of pre-made assets and bundles are available to expedite this process and offer sophisticated styles.
For instance, if you're looking for ready-made 3D text effects for Photoshop, several sets offer a range of six distinct options. These can provide a quick and professional solution for projects requiring a specific aesthetic.
Some assets go even further, enabling the creation of unique "double-3D" text effects. These often come with variations, such as softly shaded letters that evoke a rubber-like texture, adding a distinct tactile quality to your typography.
If you're seeking to create the "coolest" 3D text, certain assets are designed to be highly versatile, working effectively not only on text but also on shapes and logos. These files are typically organized with editable layers, making them easy to customize and integrate into your workflow.
When faced with the dilemma of choosing a single 3D effect, high-quality bundles that offer a variety of styles can be invaluable. These collections might feature eight different effects, often incorporating vivid gradients and isometric compositions, which are popular trends in 3D design.
For a simpler yet highly effective approach, some assets provide useful 3D effects suitable for any project that can benefit from the current 3D font trend. These might offer features like five outline styles, with all layers being fully editable, allowing for a degree of customization while maintaining ease of use.
In conclusion, understanding the fundamental tools and techniques within Photoshop for creating 3D text effects is an essential skill. From initial text input and shape manipulation to sophisticated lighting and material adjustments, each step contributes to a compelling final render. While manual creation offers ultimate control, the availability of specialized assets can significantly streamline the process and unlock advanced creative possibilities, demonstrating the evolving landscape of digital design and the accessibility of professional-grade effects.