DaVinci Resolve has emerged as a powerhouse in video editing, particularly for its robust color grading capabilities. At the heart of achieving specific looks and moods lies the effective use of Look-Up Tables, or LUTs. These powerful tools can instantly transform your raw footage, guiding it from a neutral starting point to a desired aesthetic. This tutorial will delve deep into the world of LUTs within DaVinci Resolve, covering installation, application, blending, and best practices for optimal results.
Understanding the Essence of LUTs
Before diving into the practical application, it's crucial to understand what a LUT truly is. Imagine a table containing all the colors present in your footage. A LUT acts as a set of instructions that maps these input colors to new output colors, effectively altering the image's tonal and chromatic characteristics. LUT files typically possess a ".cube" extension, though they are not limited to DaVinci Resolve and can be utilized across various editing software.
LUTs generally fall into two primary categories:
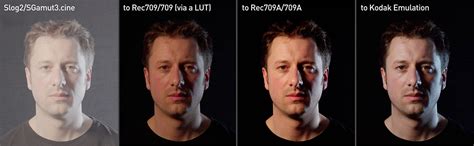
Technical LUTs (Viewing LUTs): These are designed to interpret and properly display camera-specific color profiles, such as Log footage, on a standard display (often referred to as log to Rec.709 LUTs). Log footage, a common format for professional cameras, retains extensive highlight and shadow information and a wide color gamut that surpasses the display capabilities of regular monitors. Shooting in Log format allows for greater flexibility and recovery of data during post-production. While you can directly capture regular footage, Log provides a richer foundation for color grading. Different camera manufacturers have developed their own proprietary Log formats. Technical LUTs help bring this "flat" and dull-looking footage to a more manageable starting point for color grading.
Stylized LUTs: These are pre-configured color profiles that dramatically alter the overall style and mood of your footage. They are designed to impart a specific artistic look, from cinematic and vintage to vibrant and dramatic. These LUTs are configurations that truly change the overall style of the footage.
It's important to note that not all footage will require both a viewing LUT for initial color correction and a stylized LUT for artistic styling. Sometimes, a single LUT might achieve both purposes, or your footage might already be in a suitable format that bypasses the need for a technical LUT.
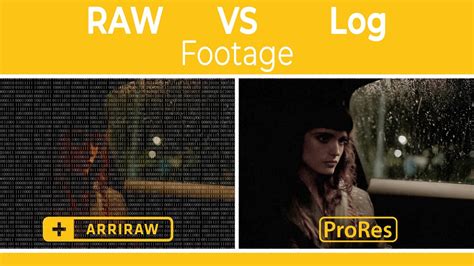
The distinction between Log footage and RAW footage is also worth clarifying. RAW is essentially unprocessed data that requires significant processing before an image can be viewed. Log, on the other hand, is a video format; you can think of it as a filter applied to the footage, which is still saved as a video. However, Log footage is characterized by low contrast and muted colors, which is precisely what grants you more flexibility in post-production.
Installing LUTs in DaVinci Resolve: A Seamless Process
To begin harnessing the power of LUTs, you first need to install them on your system. This process is straightforward and involves a simple copy-and-paste operation into a designated folder within DaVinci Resolve.
Method 1: Custom Location (Manual Installation)
- Source Your LUT Pack: Begin by finding a LUT pack you wish to install. Reputable sources like Motion Array offer a vast library of high-quality LUTs. For this tutorial, we'll use the "Horror Film Color Grades" pack from Motion Array for some edgy looks suitable for a music video, but any LUT pack with
.cubeformatted files will work. - Download and Unzip: Download the chosen LUT pack. Once downloaded, unzip the file to access the individual LUT files.
- Locate the DaVinci Resolve LUT Folder:
- Open DaVinci Resolve and load a project.
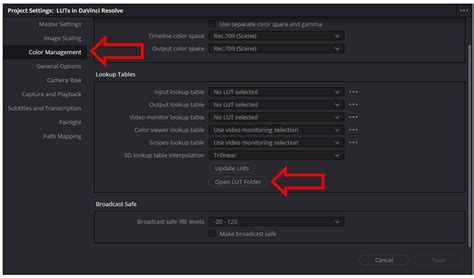
- Navigate to the Project Settings by clicking the gear icon in the bottom right corner of the interface, or by going to File > Project Settings.
- Within the Project Settings window, select the "Color Management" tab.
- Scroll down to the "Lookup Tables" section.
- Click on the "Open LUT Folder" button. This will open the dedicated folder on your system where DaVinci Resolve looks for LUTs.
- Create a New Folder (Recommended): Inside the opened LUT folder, it's good practice to create a new folder for your newly acquired LUTs. Name it descriptively, for instance, "Motion Array Horror Grades."
- Copy .CUBE Files: Copy and paste the unzipped
.cubefiles from your downloaded LUT pack into this newly created folder within the DaVinci Resolve LUT directory. - Update Lists: Return to the "Color Management" tab in DaVinci Resolve's Project Settings. Click the "Update Lists" button. This action prompts DaVinci Resolve to scan the LUT folder and integrate the newly added files into its library.
- Save Settings: Click "Save" in the Project Settings window to confirm your changes.
Your LUTs are now installed and ready to be applied to your projects.
Method 2: Via DaVinci Resolve Settings (Direct Import)
While the custom location method is generally preferred for organization, DaVinci Resolve also offers a more direct import route within its settings.
- Access Project Settings: As described above, open your DaVinci Resolve project and access the Project Settings (gear icon or File > Project Settings).
- Navigate to Color Management: Select the "Color Management" tab.
- Locate LUT Folder: Click "Open LUT Folder."
- Copy Files: Drag and drop the entire downloaded and unzipped folder containing your
.cubefiles directly into the opened LUT Folder. - Update Lists: Back in DaVinci Resolve's "Color Management" tab, click "Update Lists."
- Save: Click "Save" to finalize the process.
Applying LUTs to Your Footage: Bringing Your Vision to Life
Once your LUTs are installed, applying them to your video footage is an intuitive process within DaVinci Resolve's powerful Color page.
- Navigate to the Color Page: Open your DaVinci Resolve project and switch to the "Color" tab, located at the bottom of the software interface.
- Prepare Your Node: You'll typically work with nodes for color grading. If you don't have a node already, create one by right-clicking on an empty area in the Node panel and selecting "Add Serial Node" (or use the keyboard shortcut, often Ctrl+Alt+S or Cmd+Option+S).
- Access the LUT Browser: The LUTs browser panel is usually located in the top-left corner of the Color page. If it's not visible, you can enable it.
- Apply the LUT: There are two primary ways to apply a LUT to your selected node:
- Through the Node Interface: Right-click on the node you wish to apply the LUT to in the Node panel. Navigate to "3D LUT" from the dropdown menu, and then select the desired LUT from the list that appears.
- Through the LUTs Interface: In the LUT browser panel (top-left), locate the folder of the LUT pack you installed (e.g., "Motion Array"). You can then drag and drop a LUT directly onto the node in the Node panel.
Upon applying a LUT, you will immediately see a change in your footage's color and tone, reflecting the chosen look.
How to Use LUTs in DaVinci Resolve (Most People Get This Wrong)
Fine-Tuning and Blending LUTs for Advanced Control
While a LUT can provide a dramatic transformation, it's rare that a single LUT will perfectly suit every shot without any adjustments. Furthermore, the creative possibilities expand significantly when you learn to blend multiple LUTs.
Adjusting LUT Intensity:
Often, a chosen LUT might be too intense, overpowering the image or not achieving the desired subtlety. DaVinci Resolve offers a straightforward way to control the strength of a LUT's effect:
- Select the Node: In the Node panel, ensure the node containing the applied LUT is selected.
- Open the Key Tab: Look for the "Key" tab in the tools bar, usually located at the bottom of the Color page.
- Utilize the Key Output Slider: The "Key Output" slider functions precisely like an opacity control. A value of
1.000represents the full effect of the LUT. Moving this slider closer to0will make the node's effect more transparent, effectively reducing the LUT's intensity. This allows you to dial in the perfect amount of the LUT's influence.
Blending Multiple LUTs:
Blending LUTs opens up a world of unique color grading possibilities, allowing you to combine different styles or refine a look by layering effects.
- Apply the First LUT: Apply your initial LUT to a node (e.g., Node 02).
- Temporarily Disable: To prepare for blending, temporarily disable the first LUT node by clicking on its label (e.g., "02") on the node itself. This hides its effect while you work.
- Find a Second LUT: Re-open the LUT browser and find a second LUT you wish to blend. For instance, if your first LUT is dark and moody, you might look for a second LUT that is brighter or has a contrasting color palette to create an interesting dynamic. "Horror Film Grades 02" can work well here as it might be brighter overall and offer a different enough aesthetic to blend intriguingly.
- Add a Parallel Node: Select the node containing your first LUT (Node 02). Then, add a new node. For blending, a parallel node is often the preferred method. This allows you to combine the effects of two separate nodes. Right-click on Node 02 and select "Add Parallel Node."
- Apply the Second LUT: Apply your chosen second LUT to this new parallel node.
- Adjust Blending: Now you can control how these two nodes (and their respective LUTs) interact. You can use the Key Output slider on each node to adjust the intensity of each LUT individually, thereby controlling the blend. For more sophisticated blending, you can explore the various mixing modes available within DaVinci Resolve's node options.
Split Screen Mode for Previewing Multiple LUTs:
DaVinci Resolve 17 introduced an overhauled Split Screen mode, which is incredibly useful for previewing multiple LUTs simultaneously.
- Open the LUT Browser: Access the LUT browser as usual.
- Select Multiple LUTs: Select several LUTs you wish to preview. You can do this by drag-selecting with your mouse or holding down the Shift key to select a range of items.
- Activate Split Screen Mode: Locate the Split Screen mode option, typically found in the top-left corner of the timeline viewer, alongside Image Wipe and Highlight controls.
- Preview: Activate this mode, and you'll be able to see live previews of how each selected LUT affects your footage side-by-side or in a grid. This is an efficient way to compare different looks and find the best starting point before applying them. The Split Screen mode often works best when previewing a selection of 4, 9, or 12 LUTs.

Beyond Application: Essential Guidelines for Optimal LUT Usage
Simply applying a LUT is only part of the process. To truly elevate your color grading and ensure your film is the best it can be, pay attention to these crucial guidelines:
- White Balance is Paramount: Ensure your white balance is correctly set in-camera or during the initial grading stages. An incorrect white balance will dramatically alter the outcome of any LUT you apply.
- Exposure Matters: Just as with white balance, correct exposure is fundamental. Use your camera's histogram to help achieve proper exposure in-camera, or make necessary adjustments in post-production before applying LUTs.
- Post-LUT Adjustments: It's common, and often necessary, to make additional adjustments after applying a LUT. This might include tweaking exposure, saturation, contrast, or other parameters to fine-tune the look and achieve optimal results based on your creative preferences. Don't make the mistake of simply exporting the footage immediately after applying a LUT.
- Understand Shooting Conditions: Recognize that shooting conditions such as lighting, weather, and location can significantly affect how a LUT appears. Some LUTs will naturally perform better in different scenarios. It's best practice to experiment with various LUTs to discover which ones work best for your specific style and the scenes you're capturing.
- Log Footage Workflow: If you are working with Log footage, remember that LUTs are often used as a starting point. A technical LUT (Viewing LUT) will bring the footage to a more neutral state, and then you can apply a stylized LUT for artistic effect.
Exporting Your Own LUTs
DaVinci Resolve also empowers you to create your own custom LUTs from your graded footage. This is an excellent way to save your unique looks for future projects or to share with collaborators.
- Select Your Clip: In the Media Pool or on the timeline, choose the clip for which you have applied your desired color grade.
- Generate LUT: Right-click on the selected clip and choose "Generate LUT" from the dropdown menu.
- Finalize Export: A menu will appear allowing you to select your desired LUT format (e.g., 1D, 3D). Choose where you'd like to save your LUT file on your system.
- Save: Click "Export," and DaVinci Resolve will generate your custom
.cubefile. This custom LUT can then be installed and used just like any other LUT.
Exploring LUT Resources for DaVinci Resolve
For those seeking pre-made LUTs to quickly achieve specific looks without extensive manual color grading, numerous resources are available. Libraries like Storyblocks offer a wide selection of LUT packs tailored for DaVinci Resolve, including categories like:
- Cinematic Colors LUTs
- Industrial LUTs
- Romantic Vibes LUTs
- Vintage Horror Movie LUTs
By exploring these curated collections, you can find the perfect LUTs to enhance your projects and align with your artistic vision.
DaVinci Resolve: A Comprehensive Post-Production Suite
It's worth reiterating that DaVinci Resolve is far more than just a color grading tool. Its comprehensive feature set makes it a one-stop shop for many post-production needs. Developed by Blackmagic Design, a leading camera company, Resolve is known for its exceptional performance, especially with Blackmagic's own RAW format (BRAW), which integrates seamlessly. The software is praised for its speed, powerful color grading tools used in Hollywood, and its accessibility with a robust free version and a one-time purchase for the full Studio version.
Beyond color grading and LUTs, DaVinci Resolve offers:
- Masking & Tracking: Isolate and enhance specific areas of your video for targeted adjustments, blurring, or effects.
- 3D Titles and Text Animation: Create professional-looking animated text and titles.
- Fusion Effects: A powerful node-based compositing environment for advanced visual effects, green screen keying, and particle systems.
- Speed Ramp & Slow Motion: Smoothly transition between different playback speeds for dynamic motion effects.
- Audio Mixing & Mastering (Fairlight): A full-fledged audio post-production suite for noise reduction, effects, and multi-track mixing.
- Stabilization: Correct shaky footage for a smooth, professional look.
- Multi-Cam Editing: Efficiently edit footage from multiple camera angles simultaneously.
- Sky Replacement: Enhance or dramatically alter the sky in your shots.
- Transitions and Effects: A wide array of built-in transitions and effects, with the ability to create custom ones.
- HDR Grading: Create stunning visuals optimized for HDR displays.
- Frame.io Integration: Seamless collaboration and review workflow.
- Neural Engine Features: AI-powered tools for automatic color matching, intelligent slow-motion, shot classification, and upscaling.
By understanding and effectively utilizing LUTs within DaVinci Resolve, you gain a significant advantage in crafting visually compelling narratives. Experimentation, attention to detail, and a solid workflow are key to unlocking the full potential of your footage and achieving professional-grade results. Remember to always prioritize correct exposure and white balance, and don't hesitate to fine-tune the LUTs to perfectly match your artistic intent.