Adobe InDesign is a powerful tool for creating professional page layouts, and its robust guide system is fundamental to achieving precise and organized designs. Understanding how to effectively use, manage, and even hide guides is crucial for both novice and experienced users. This article delves into the intricacies of InDesign guides, exploring their purpose, creation, manipulation, and visibility controls, drawing upon the wealth of information provided to offer a thorough guide to this essential feature.
The Foundational Role of Guides in Layout Design
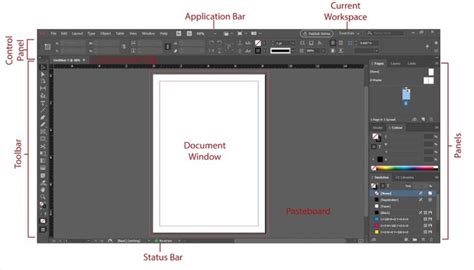
InDesign, like its sibling InCopy, operates on the principle that all text and graphics appear within frames. Guides serve as invisible yet indispensable rulers and alignment tools within these frames and across the entire publication. They are not part of the final output but are critical during the design process for ensuring consistency, accuracy, and visual harmony. From simple horizontal and vertical rulers to more complex grid systems, guides help designers meticulously plan and execute their layouts, ensuring that elements are positioned and aligned precisely where intended.
The concept of "a publication" in InDesign encompasses the entirety of a designed document, which can span multiple pages and spreads. Within this publication, frames can be connected in a sequence, a process known as "threading." This allows text, referred to as an "InCopy story" when linked to an InDesign document, to flow seamlessly from one frame to another. The user always sets up this threading sequence. If a story contains more text than can fit within the assigned frames, the hidden portion is called "overset text," indicating that the layout needs adjustment to accommodate the full content.
Navigating and Customizing Rulers and Measurement Units
InDesign offers flexible ruler systems to accommodate diverse design needs. Both horizontal and vertical rulers are available in the Layout view for measuring layouts with precision. The zero point, which serves as the origin for all measurements, can be changed by moving it. This allows designers to set custom reference points for their layouts. As values are entered, InDesign displays them using the current measurement units, providing immediate visual feedback.
The appearance and behavior of rulers can be extensively customized within the "Units & Increments" section of the Preferences dialog box. Designers can select from various measurement units, such as points, inches, millimeters, or picas. For instance, it's common to use picas for horizontal measurements and vertical text stories in inches, catering to traditional typesetting conventions. Major tick marks appear on a ruler at defined intervals, aiding in quick visual estimations. These tick marks, along with labeled tick marks, provide granular detail for precise placement.
The intersection of the horizontal and vertical rulers, often referred to as the zero point, is typically located at the top left corner of the first page of each spread. However, this can be adjusted. The scope of the horizontal ruler can be set to apply across the entire spread, or for multipage spreads, it can be measured from the center of the spine. Similarly, the zero point for the vertical ruler can be set relative to the top of the page or the pasteboard.
Understanding and Manipulating the Zero Point
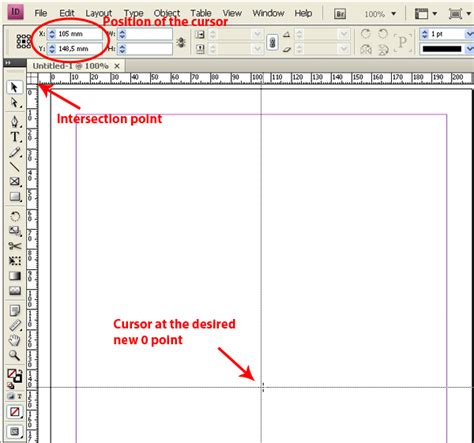
The zero point is a critical element in InDesign's measurement system. By default, it is situated at the top-left corner of the page. However, designers have the flexibility to reposition this origin to suit their workflow. This is particularly useful when working with complex layouts or when specific alignment points are required.
The "Relative To" option in the Guides and Grids preferences further refines how the zero point behaves. It can be set to "Spread," meaning the zero point will be fixed at the same relative location in all spreads. Alternatively, it can be set to "Page," where the zero point is relative to the top-left corner of each individual page in a spread. For multipage spreads, the "Spine" option is available, anchoring the zero point to the center of the spine, which becomes locked at the spine when spreads are created. This offers a consistent reference point across facing pages.
Creating and Managing Guides: From Basic to Advanced
Guides in InDesign can be created in several ways, offering flexibility for different design needs. Basic guides can be dragged directly from the horizontal or vertical rulers onto the page or pasteboard. These guides are invaluable for aligning text frames, image boxes, and other design elements.
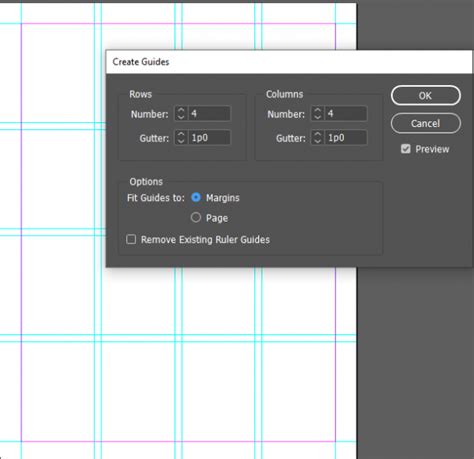
More complex guide arrangements can be generated using the "Layout > Create Guides" command. This dialog box allows designers to create multiple guides simultaneously, specifying the number of rows and columns, gutter (spacing between guides), and margins. Crucially, this command also offers a checkbox to "remove" existing guides, which can be a lifesaver when encountering unwanted guides.
A common scenario that can lead to persistent, unwanted guides is their placement on a master page. Master pages are templates that can be applied to multiple pages in a document, and any guides or objects placed on a master page will appear on all pages that use that master. Therefore, if guides are proving difficult to delete from a regular page, checking the relevant master page is often the first step. The "Pages" panel in InDesign allows users to navigate and edit master pages. Once found on a master page, these guides can either be deleted directly or, in some cases, their visibility can be controlled by the "remove them at the bottom" checkbox mentioned in user feedback, although this checkbox is typically associated with guides created via the "Create Guides" command.
Advanced Guide Systems: Grids and Frame Grids
Beyond simple ruler guides, InDesign provides more sophisticated grid systems for enhanced layout control. These include:
- Document Grid: This is a fundamental grid that can be displayed to help align objects. It can be customized in terms of spacing and appearance.
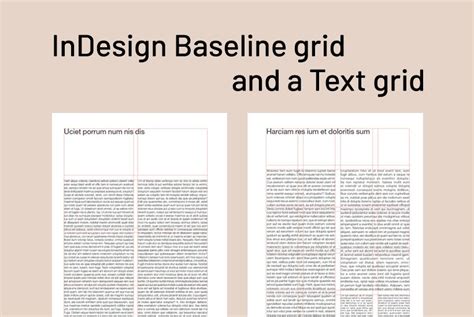
- Layout Grid: This grid is specifically designed for aligning text baselines, ensuring consistent vertical spacing across lines of text. This is often referred to as the "Baseline Grid." The option to "Show/Hide Baseline Grid" is found under the "View > Grids and Guides" menu.
- Frame Grid: This grid is particularly useful when working with text frames, providing a framework for text alignment within those frames. The "Show/Hide Frame Grid" option is also accessible through the "View > Grids and Guides" menu.
These grids can be toggled on and off easily via the "View > Grids and Guides" menu. For instance, "Show/Hide Document Grid" or "Show/Hide Layout Grid" allow designers to quickly visualize or hide these alignment aids. A key setting related to grids is "Grids In Back." When this option is selected (found in the "Grids & Guides" preferences), grid lines appear behind all other objects. Deselecting it means the grid lines will appear in front of objects, which can be useful for certain alignment tasks but can also obscure the artwork.
The "Color" menu within the grid preferences allows users to choose the color of the grid lines, and options like "First grid line" and a value "below which the grid does not appear" offer further customization. It's important to note that while InCopy users can utilize grids within their InCopy assignments, they cannot create them. Grids are an InDesign-specific feature that is then visible within linked InCopy content.
Hiding and Deleting Guides: Mastering Visibility
The ability to hide guides is as important as being able to see them. Guides can be temporarily hidden to get a clearer view of the design by navigating to "View > Grids and Guides" and selecting options like "Hide Guides," "Hide Baseline Grid," "Hide Document Grid," or "Hide Layout Grid." Conversely, selecting the "Show" options will make them visible again.
For permanent removal of guides, the "View > Grids and Guides > Delete all Guides on Spread" command is a powerful tool. As mentioned earlier, if guides persist after using this command, they are likely on the master page. Accessing the Pages panel and deleting them from the master page is the solution in such cases.
It's also worth noting that guides can be locked to prevent accidental movement or deletion. This is done by selecting the guides and then choosing "Object > Lock."
The Role of Layers in Guide Management
While InDesign users can create layers, which act like transparent sheets stacked on top of each other, and manage content on these layers, guides themselves do not reside on standard InDesign layers in the same way as other objects. However, the visibility of guides can be influenced by layer visibility. If a layer is hidden, any guides associated with objects on that layer might also become less prominent or entirely invisible depending on the specific InDesign version and settings.
Parent page objects are typically on a higher layer than page objects, meaning they appear in front. If a layer is hidden, the objects on it are hidden on all pages until you decide to show it again, indicated by an eye icon to the left of the layer name in the Layers panel. While guides aren't directly part of layers, understanding layer management can indirectly affect how one perceives the presence or absence of elements on the page, including guides.
Beyond the Basics: Understanding Frame Behavior and Object Visibility
InDesign's frame-based workflow means that text and graphics are contained within frames. These frames can be rotated or sheared, but only inline graphics frames can be manipulated in this way, not other types of frames. This distinction is important for understanding how objects behave within the layout.
The concept of "pasteboard" refers to the area surrounding the document pages where you can temporarily place objects or work on elements that are not yet on the page. Guides can extend onto the pasteboard, providing a larger working area for alignment.
The visual fidelity of guides can also be adjusted. For example, the "View > Overprint Preview" option can affect how objects and guides appear, especially when dealing with transparency and overprinting settings. Additionally, preferences related to display performance can impact how guides are rendered, particularly at different magnification levels. For instance, "Use Pixel Bounding" can influence how guides and objects are displayed when zoomed in.
The "old tick marks" mentioned in the user's input likely refer to older versions of InDesign or specific display settings that might alter the appearance of the ruler tick marks. Modern InDesign offers clear and customizable tick marks.
To ensure clarity and avoid clutter, InDesign provides a comprehensive set of tools for managing guides. Whether it's creating precise alignment for a complex publication, ensuring consistent baseline grids for text, or simply hiding guides to admire the final design, mastering these features is key to efficient and professional InDesign workflows.