An arrow is a tried-and-true way to get a viewer’s attention, whether you’re using it to point out the date on an invitation or identify a specific detail in an image for a class project. Adding an arrow is sure to make people look where you want them to, and it’s so easy to create one in Photoshop. Whether you want to draw your own arrow or use a preloaded design, there are multiple ways to make one to match any graphic design style. There is never only one way to complete a task in Photoshop. This article will explore various methods for adding arrows to your designs, from simple line tools to custom shapes and brush strokes, ensuring you have the flexibility to achieve any desired visual effect.
The Versatile Line Tool for Direct Arrows
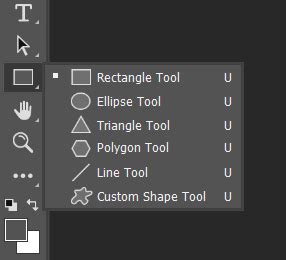
The Line Tool might sound like a simple tool, but don’t be fooled. You can use the Line tool to create a perfectly straight line between two points you set. To access it, just click and hold the Rectangle tool on the toolbar until a menu pops up, then click the Line tool. Did you know you can draw lines and arrows with the line tool? You can make a pixel-based line, or if you want to make a scalable line that you can edit later, you can use the Shape mode and draw a vector line. Follow the steps below to draw either type of line.
To begin, select the Line Tool. You will find it by clicking and holding the Rectangle tool in the toolbar until a menu appears, then selecting the Line tool. Once the Line Tool is active, look to the Options bar at the top of your screen. Here, you will find the "Mode" option. For a scalable vector arrow, set the Mode to "Shape". Ensure your fill is set to transparent, and the stroke is set to 0px if you intend to add arrowheads separately.

If you are aiming to create a line with built-in arrowheads, the process is slightly different. Ensure the Mode is set to "Shape". Then, locate the Cog icon on the right-hand side of the options bar and click it. Here, you will find a section named "Arrowheads." You can choose to add an arrowhead to the "Start" or "End" of your line, or both. You will have to guesstimate how large an arrowhead you need, and declare it in the width and length input boxes. For example, if your line is Width 10 px x Length 50 px and the arrowhead’s dimensions are Width 400 x Length 200 px, enter these values. You can also enter a value in the box beside "Concavity" to adjust the shape of the arrowhead.
To draw the arrow, click on the workspace where you want the start of your arrow to be. Hold the mouse button down and drag your cursor to where you want the end of your arrow to point. As you drag, an outline of the line with an arrowhead will be created. Press Enter to add the arrow to your image as a new layer. Below, you can see an arrow created using the Line Tool.
If you need to add multiple connected line segments to create a multi-angled arrow, you can achieve this by adding multiple segments with the Line tool. For a more free-form arrow, consider using a drawing tablet with the Line Tool for a more natural feel.
Leveraging Custom Shapes for Predefined Arrows
Besides drawing your own arrows using lines and arrowheads, you can also use custom shapes. This method is particularly useful if you need a specific style of arrow quickly.
First, ensure the Custom Shape tool is selected. Find the Custom Shape tool at the top of the window and click it. It might be nested under the Rectangle tool, so click and hold the Rectangle tool to reveal it. Press U on your keyboard to take control of the Shape tool and look in the toolbox on the left side of your screen for the highlighted option. Look for the square-shaped window with a preview of the shape in the Options bar on top of the screen.
Click on the small arrow on the right side of the Shape option's dropdown menu to view different preset arrow shapes. A Shapes dialogue window will pop out. To access a wider variety of arrow shapes, you may need to load legacy assets. Open the Windows menu and click on the Shapes panel. Click on the hamburger menu, which is the icon that looks like 4 horizontal lines in the top-right corner. Click on the “Legacy Shapes and More” option. Open the All Legacy Default Shapes folder and navigate to the "Arrows" set, where you will find a set of custom arrow shapes. Select the arrow shape that you like.
Once you have selected your desired arrow shape, click and drag your mouse on your Photoshop project to add the arrow. You can also check out the video showing how to draw a shape-based line with an arrowhead.
After adding the arrow, you can customize its appearance. Look for the Fill and Stroke options on the left side of the top Options bar. Click on the colored square labeled “Fill” and pick the main color for the inside of your arrow. Click on the colored square labeled “Stroke” and choose the color you want your arrow to be. You can also change the stroke size.
To adjust an arrow's orientation, press Ctrl+T (Command+T on Mac) to open the Transform tool, which forms a bounding box around your arrow. Hover over one of the boxes in the corner of your arrow until you see a curved line with 2 arrows. Click and drag the arrow to spin it around until it’s pointing in the right direction. Then, click on the box and drag if you need to adjust the size again. Press Enter to add the arrow to your image as a new layer.
Yes, the Custom Shape tool allows you to draw a freeform arrow by clicking and dragging along a curve. If you find an arrow preset you particularly like, you can save it for future use. After customizing, open the Arrow Styles panel menu and choose "New Arrow Preset" to save it for later.
Utilizing the Brush Tool for Artistic Arrows
For a more artistic or hand-drawn feel, the Brush Tool offers a flexible approach to creating arrows. This method is where Envato Elements can come in handy, offering a vast library of hand-drawn arrow brushes to download.
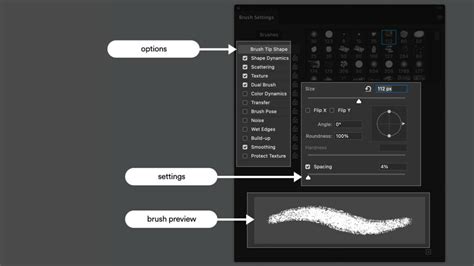
First, select the Brush Tool (B) from your toolbar. Look for the paintbrush icon in the main toolbox on the left side of the screen. Open the Windows menu and click on the Brush Settings panel. Here, you can choose a desired brush shape. Depending on how smooth or rough you want the line to be, select an appropriate brush. Use the slider to adjust the size of the brush.
Before you start drawing, it’s a good practice to create a new layer for your arrow to ensure non-destructive editing. Click on the “Create a New Layer” button, which looks like a blank sheet of paper, in the Layers panel at the bottom right of the screen.
Move your cursor to where you want to start your arrow. Click your mouse and hold the button down to start drawing. Drag the cursor across the screen to draw the main line of your arrow. This method allows for freehand drawing, giving you complete control over the shape and flow of your arrow.
If you need to reposition the arrow, then select the Move tool by pressing V or clicking on the arrow icon at the top of the toolbar.
The Annotation Tool: A Specialized Approach
While less common for general graphic design, the Annotation tool can be used to create arrows, particularly in contexts where adding notes or labels is the primary goal.
To access it, locate the Annotation tool in the toolbar. It may be nested under other tools, so you might need to click and hold to reveal it. Once selected, you can click on the workspace to add an annotation, which can often be styled as an arrow. This tool is more suited for adding directional cues within documents or specific feedback scenarios rather than for broad design elements.
Advanced Customization and Considerations
Drawing arrows in Photoshop can sometimes feel more challenging compared to dedicated vector programs like InDesign, XD, or Illustrator. However, the flexibility offered by Photoshop is undeniable.
One aspect to consider is the "Concavity" setting when using the Line Tool with arrowheads. This parameter allows you to influence the inward or outward curvature of the arrowhead, offering a subtle yet effective way to modify its appearance.
How to make an arrow and curved arrow in Photoshop using Line Tool
When working with shapes, ensure you understand the difference between "Fill" and "Stroke." The "Fill" refers to the interior color of the shape, while the "Stroke" is the outline. For many arrow designs, you might want a solid fill and a defined stroke, or perhaps a transparent fill with a prominent stroke.
If you find that your arrow is not pointing exactly where you want it, or if its size needs adjustment, the Transform tool (Ctrl+T or Command+T on Mac) is your best friend. This tool provides a bounding box around your selection, allowing you to rotate, scale, and skew the arrow to your precise needs.
Ultimately, the best method for adding an arrow in Photoshop depends on your specific requirements. For quick, precise lines with arrowheads, the Line Tool is efficient. For a library of ready-made designs, Custom Shapes are ideal. For a more organic, hand-drawn look, the Brush Tool offers unparalleled artistic freedom. By mastering these techniques, you can confidently add directional elements to any of your Photoshop projects. Congratulations! Now that you know how to draw arrows in Photoshop, feel free to use these techniques in your future projects.