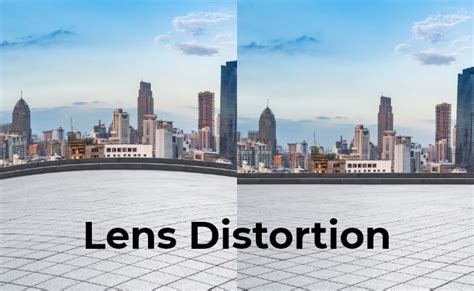
Lens distortion is a pervasive visual artifact encountered in video production, particularly when utilizing wide-angle lenses or specialized equipment like fisheye lenses. This phenomenon causes straight lines within a captured scene to appear curved, leading to a rendition that deviates from reality. While sometimes an intentional creative choice, more often than not, lens distortion detracts from the professional aesthetic and clarity of video content. Fortunately, DaVinci Resolve, a leading video editing software, offers robust tools to address this issue, allowing editors to either remove unwanted distortions or creatively introduce them. This comprehensive guide will delve into the intricacies of lens distortion and provide a detailed tutorial on how to effectively manage it within DaVinci Resolve, covering both the free and Studio versions of the software.
Understanding Lens Distortion: The Fisheye Effect and Beyond
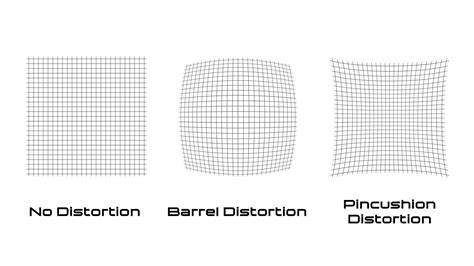
Lens distortion is a fundamental optical characteristic of lenses. It arises from the way light rays are bent as they pass through the lens elements. There are primarily two types of lens distortion: barrel distortion and pincushion distortion. Barrel distortion, most commonly associated with wide-angle lenses and fisheye lenses, causes straight lines to bulge outwards from the center of the frame, making the image appear as if it's being viewed through a barrel. Pincushion distortion, conversely, causes straight lines to bend inwards towards the center, making the image resemble a pincushion.
Fisheye lenses are specifically designed to produce extreme barrel distortion, capturing an exceptionally wide field of view, often close to 180 degrees or more. This deliberate distortion creates a distinctive, spherical look, which can be artistically appealing for certain types of shots, such as establishing shots in expansive landscapes or dynamic action sequences. However, for most conventional videography, this pronounced distortion is undesirable and requires correction to achieve a natural and realistic appearance.
The implications of uncorrected lens distortion extend beyond mere aesthetics. It can lead to the misrepresentation of spatial relationships within a scene, making objects appear closer or further than they are. Crucially, it can obscure or distort critical visual details, hindering the viewer's ability to perceive important elements within the frame. In professional contexts, uncorrected lens distortion is a tell-tale sign of amateurish post-production, diminishing the overall polish and credibility of the final product. Therefore, understanding and correcting lens distortion is an essential skill for any serious video editor aiming to produce professional-grade content.
The Power of DaVinci Resolve's Lens Distortion Tools
DaVinci Resolve offers a powerful and versatile suite of tools for managing lens distortion, catering to both users of the free version and those with the Studio edition. The approach and specific features available can vary slightly between the two, but the core functionality remains accessible.
Correcting Distortion in DaVinci Resolve Studio
For users of DaVinci Resolve Studio, the process of correcting lens distortion is remarkably streamlined and often requires minimal manual intervention. The software boasts an intelligent "Lens Correction" tool that can automatically analyze and rectify common lens distortions.
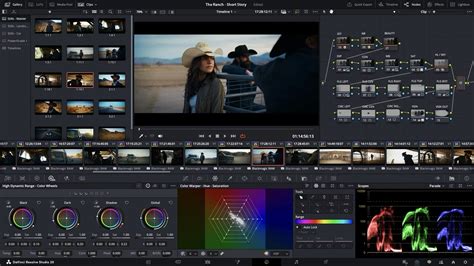
The workflow typically begins by adding your video clip to the DaVinci Resolve Studio Timeline. Ensure you are working within the "Cut" tab for initial clip management. Once the clip is on the Timeline, select it. The key to accessing the correction tools lies within the "Inspector" panel, located in the upper right corner of the Resolve Studio interface. Clicking the "Inspector" button will reveal a sidebar menu.
Within the Inspector's "Video" sidebar, you'll find various transformation and cropping options. Scroll down to locate the "Lens Correction" section. To activate the tool, simply click the radio button next to it, which will turn red, and a dropdown menu will appear. The magic happens when you click the "Analyze" button within this dropdown. DaVinci Resolve Studio will then automatically process the footage, flattening out the image and effectively removing the lens distortion. This automated analysis often requires no further manual adjustments, making it an incredibly efficient solution for salvaging distorted footage.
However, the "Analyze" function is not the only control. The "Distortion" slider, present within the Inspector panel, offers a degree of manual control. By simply clicking and dragging this slider, you can amplify or reduce the effects of the distortion correction. This allows for fine-tuning the correction to achieve the desired level of naturalism or to deliberately reintroduce a controlled amount of distortion for creative purposes. This ability to both automatically correct and manually adjust makes DaVinci Resolve Studio a highly adaptable tool for a wide range of distortion-related tasks.
How to Fix Lens Distortion in Davinci Resolve
Managing Distortion in the Free Version of DaVinci Resolve: The Fusion Page
For users of the free version of DaVinci Resolve, the primary method for adding and removing lens distortion involves leveraging the powerful capabilities of the "Fusion" page. While the Studio version offers a dedicated "Lens Correction" tool on the Edit page, the Fusion page provides a more node-based approach that offers granular control over the distortion process.
To access the lens distortion effect in the free version, you'll need to navigate to the Fusion page. Once there, you can apply the "Lens Distortion" node. This node is found within the effects panel. After applying the node to your clip, you will access its parameters within the "Inspector" panel, typically located on the right side of the Fusion interface.
The "Lens Distortion" node offers a variety of "models." Each model is designed to simulate different types of lens distortion, allowing you to distort or undistort your footage in unique ways. By selecting a specific model, you can achieve distinct visual effects. This node directly influences how your video is stretched or squeezed from left to right, effectively manipulating the perspective and curvature of lines within the image.
The key to applying distortion through this node is to utilize the distortion slider. By adjusting this slider, you can control the intensity of the distortion effect. Pushing the slider in one direction will introduce barrel distortion, while pushing it in the opposite direction can help to counteract existing distortion, effectively performing a correction. This method allows for precise control over the degree of distortion, enabling you to either remove unwanted effects or to creatively add a specific type of lens distortion for artistic impact.
While the Fusion page offers a more hands-on approach, it provides immense flexibility. You can combine multiple nodes, keyframe distortion parameters over time, and integrate the distortion effect within complex visual effects compositions. This makes it a highly functional and scalable feature, even in the free version of DaVinci Resolve, allowing for precise control over distortion parameters and making it a valuable tool for professional video editing and post-production workflows.
Applying the Lens Distortion Effect: A Step-by-Step Approach
Whether you are using DaVinci Resolve Studio or the free version, understanding the application process is crucial for effectively utilizing the lens distortion tools.
For DaVinci Resolve Studio Users:
- Add Clip to Timeline: Launch DaVinci Resolve Studio and open the "Cut" tab. Click the "Media Pool" button in the upper left corner. Drag your desired clip from the Media Pool onto the Timeline, which is located in the lower half of the screen.
- Open the Inspector: With the clip selected on the Timeline, look to the upper right corner of the interface and click the "Inspector" button. This will open the Inspector sidebar menu on the right side of your screen.
- Locate Lens Correction: Within the Inspector's "Video" sidebar, scroll down to find the "Lens Correction" option.
- Activate and Analyze: Click the radio button to activate the Lens Correction tool. It will turn red, and a dropdown will appear. Click "Analyze" to allow Resolve to automatically detect and correct lens distortion.
- Manual Adjustment (Optional): Use the "Distortion" slider to fine-tune the correction or to introduce controlled distortion.
For Free Version Users (Fusion Page):
- Navigate to Fusion: Select your clip on the Edit page and switch to the "Fusion" page.
- Apply Lens Distortion Node: In the effects panel, search for and apply the "Lens Distortion" node to your clip.
- Access Inspector: With the "Lens Distortion" node selected, go to the Inspector panel on the right side of the Fusion interface.
- Choose Model and Adjust: Select a distortion model from the available options. Use the "Distortion" slider to either add or remove lens distortion by stretching or squeezing the video.
Creative Applications of Lens Distortion
While the primary focus is often on removing unwanted lens distortion, DaVinci Resolve's tools also offer exciting creative possibilities.
Creating Fisheye Effects
For filmmakers and content creators looking to achieve a specific artistic style, deliberately adding fisheye distortion can be a powerful technique. This can be achieved using the "Lens Distortion" node in Fusion. By selecting a model that simulates barrel distortion and increasing the intensity of the distortion slider, you can transform a standard shot into one with the characteristic wide-angle, spherical look of a fisheye lens. This can add a dynamic and immersive quality to footage, making it ideal for action sequences, establishing shots of vast landscapes, or even for creating a sense of unease or disorientation.
Enhancing Depth and Realism with 3D Effects
The ability to manipulate lens distortion also ties into broader post-production techniques, such as creating 3D effects. By precisely controlling how elements within a scene are distorted or undistorted, editors can create a sense of depth and dimension that might not have been present in the original footage. This can involve combining different distortion effects, layering distorted elements, or using distortion as part of a compositing workflow. While not a direct 3D creation tool, the granular control over distortion parameters offered by DaVinci Resolve can contribute significantly to the illusion of depth and realism in a video.
Salvaging Imperfect Footage
Perhaps the most practical application of lens distortion correction is its ability to salvage footage that would otherwise be unusable. Many amateur filmmakers, or even professionals working with budget equipment, may encounter significant lens distortion. The automated "Lens Correction" tool in DaVinci Resolve Studio can often rescue these clips, making them appear natural and professional. This capability is invaluable for saving time and resources, ensuring that valuable footage is not lost due to optical imperfections.
Conclusion: A Versatile Tool for Visual Enhancement
Learning to add and use the Lens Distortion effect in DaVinci Resolve is an essential skill that can significantly enhance the visual quality of your videos. Whether you're aiming to correct unwanted distortions and make your videos appear truer to life, keep key details in focus, or simply make your videos look more professional, DaVinci Resolve provides the tools to achieve these goals. The Lens Correction tool in Studio offers an automated, yet controllable, solution, while the Lens Distortion node in Fusion provides a highly flexible and scalable feature for both free and advanced users. This functionality allows for precise control over distortion parameters, making it a valuable tool for professional video editing and post-production workflows. Correcting lens distortion is an element of professional editorsâ workflow; skipping this step, and viewers will take notice. The advantages are clear: itâs easy to correct lens distortion with DaVinci Resolve, and the results can dramatically improve the final output of your video projects.
tags: #davinci #resolve #fisheye #correction