Affecting the alignment and look of your text can be a key factor in making your final Photoshop look good. Adobe Photoshop offers robust tools for controlling text layout, with justification being a crucial element for achieving polished and professional designs. This guide will delve into the specifics of how to justify text in Photoshop, ensuring your typography is precisely aligned and visually appealing.
Understanding Text Types in Photoshop
Before diving into justification, it's essential to differentiate between point type and paragraph type in Photoshop. The text tool, accessed by clicking the 'T' icon in the tool menu or pressing the 'T' shortcut, can be used in two primary ways:
- Point Type: This is created by simply clicking on the canvas and typing. Text will continue on a single line until you manually press Enter. Point type is generally not suitable for justification as it lacks paragraph boundaries.
- Paragraph Type: This is created by clicking and dragging to draw a marquee (a bounding box) on the canvas, and then typing within that area. Text will automatically wrap within this box. Crucially, text justification is enabled only for paragraph text in Adobe Photoshop.
When you create text by clicking and dragging, you are creating a new text layer in the Layers palette in Photoshop. You then type into the marquee you have drawn. If your text is not in a correct paragraph format, you can adjust it by highlighting your text using the paragraph tool. The paragraph tool allows you to edit your text in many ways. The text tool gives only three paragraph layout options, but you can edit your text size, fonts, color, italic, bold and curve your text. The paragraph tool is for paragraphs layout only. To ensure your text is set up for justification, you may need to convert your text layer to paragraph type.
Accessing Justification Controls
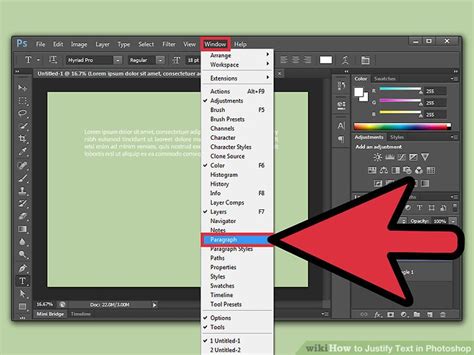
To access the comprehensive text layout options, including justification, you need to open the Paragraph Panel. You can do this by navigating to the "Window" tab in the Photoshop menu bar and selecting "Paragraph." Alternatively, you can toggle the character and paragraph palettes by clicking on the respective icons in the menu bar above your workspace, often found near the options bar when the Type Tool is active.
Once the Paragraph Panel is open, you can begin to modify your text's alignment and justification.
Horizontal Text Alignment
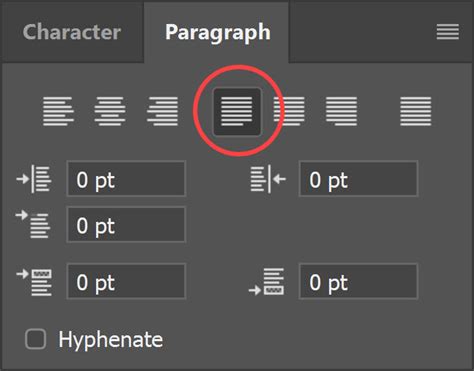
Within the Paragraph Panel, you will find controls for horizontal alignment. You can choose from several options, which dictate how your text is aligned within its bounding box:
- Left Align Text: This aligns the type to the left edge of the paragraph.
- Center Text: This pushes the type to the center of the paragraph, leaving both the left and right edges jagged.
- Right Align Text: This pushes type to the right edge of the paragraph.
- Justify Left: This aligns all lines of text to the left, including the last line.
- Center Text: This centers all lines of text, including the last line.
- Justify Right: This aligns all lines of text to the right, including the last line.
These options allow you to align text to one edge of the paragraph, providing fundamental control over its placement.
Vertical Text Alignment
Affecting the alignment and look of your text can be a key factor in making your final Photoshop look good. The easiest way to control vertical alignment is to choose "Text Frame Options" from the "Object" menu (though this option might be more prominently found under the "Type" menu in newer versions of Photoshop, or directly within the Paragraph panel's flyout menu). From there, look to the Vertical Justification section.
The primary vertical alignment options are:
- Top Align Text: This aligns type to the top of the paragraph bounding box.
- Center Text: This pushes text to the center of the paragraph vertically.
- Bottom Align Text: This aligns text to the bottom of the paragraph bounding box.
- Justify Text: This option distributes the text evenly within the bounding box, adjusting the spacing between lines to fill the entire height.
These vertical controls are particularly useful for aligning text within specific frames or containers, ensuring the text occupies the space as intended.
Understanding Justification Types
Photoshop offers four distinct options for text justification, primarily affecting how the spacing between words is handled to fill the width of the text frame. To apply these, you first need to select the paragraph(s) you want to change. Then, you can either press Command/Ctrl+A to select all of the text in the area or drag the cursor across the text to highlight it. After selecting your text, click on a justify option within the Paragraph Panel.
Here are the four justification types:
Justify All: This option justifies all lines, including the last line of the paragraph. Photoshop will adjust the spacing between words to make each line extend fully from the left to the right edge of the text frame. This can sometimes lead to large gaps between words, especially in narrow text columns.
Justify Last Left: This justifies all lines except the last line, which remains left-aligned. This is a common choice as it avoids the potentially awkward spacing on the final line of a paragraph.
Justify Last Centered: This justifies all lines except the last line, which is centered. This provides a more balanced look for the end of a paragraph.
Justify Last Bottom: This justifies all lines except the last line, which is aligned to the bottom of the text frame. This is less common for standard text justification and more applicable in specific layout scenarios.
Fine-Tuning Spacing with Advanced Controls
For justified text, Photoshop provides advanced controls to fine-tune the spacing between words, letters, and even the scaling of glyphs (characters). These settings are accessible within the Paragraph Panel, often through a flyout menu (accessed by clicking the small icon with lines in the top-right corner of the panel).
- Desired, Minimum, and Maximum Word Spacing: These values define the ideal spacing you want between words, as well as the acceptable range. Photoshop will attempt to achieve the "Desired" spacing. If it can't, it will expand or contract the spacing within the "Minimum" and "Maximum" values to ensure justification.
- Desired, Minimum, and Maximum Letter Spacing: Similar to word spacing, these controls allow you to adjust the space between individual letters. Letter spacing can range from -100% to 500%. You won’t add space between letters if you choose 0%. Fine control over letter spacing can help improve readability and aesthetic appeal, especially in headlines or when dealing with specific fonts.
- Desired, Minimum, and Maximum Glyph Scaling: Glyph scaling refers to the width of characters themselves. You can choose values from 50% to 200%. This is a powerful tool for extremely tight layouts, allowing Photoshop to slightly condense or expand the width of characters to achieve justification without drastically altering word or letter spacing. However, excessive glyph scaling can distort the font and negatively impact readability.

Indentation and Other Paragraph Controls
Beyond justification, the Paragraph Panel offers other essential controls for shaping your text:
- Indent Left Margin: This indents the entire paragraph from the left edge of the text frame.
- Indent Right Margin: This indents the entire paragraph from the right edge of the text frame.
- First Line Indent: This indents only the first line of the paragraph, a traditional typographical convention for marking the beginning of a new paragraph.
- Left and Right Indent for Special Characters: These can be used to indent specific lines or characters within a paragraph.
- Paragraph Spacing (Before and After): These controls add vertical space above or below the selected paragraph, helping to visually separate blocks of text.
To affect all layers with these changes, you would typically select a type layer if you want all layers affected. However, for paragraph-specific settings like indentation and spacing, these are applied to the selected paragraph(s) within a single text layer.
Committing Your Changes
Once you are satisfied with your text justification and layout settings, you need to commit these changes. This is done by clicking the checkmark button located on the options bar at the top of the Photoshop window. This action finalizes the edits to your text layer.
Mastering text justification in Photoshop is an iterative process. Experimenting with the different options and advanced controls will help you achieve the precise typographic control needed for professional and visually compelling designs.