Adding text to an image is a fundamental yet powerful feature in Adobe Photoshop. Whether for design, branding, creating signage, or simply personalizing an image, text plays an indispensable role. This guide will walk you through the essential steps of adding and manipulating text within your Photoshop projects, ensuring you can effectively communicate your message visually.
The Foundation: Adding Text to Your Canvas
Photoshop offers two primary methods for incorporating text into your designs, catering to different needs and layouts. Understanding these methods is the first step to effectively utilizing the Type Tool.
Single Line Text: For Concise Messaging
The most straightforward way to add text is by creating a single line. This method is ideal for short phrases, titles, or single words.
- Select the Horizontal Type Tool: Locate the "T" icon in the toolbar, typically found on the left side of your Photoshop workspace. Alternatively, you can use the keyboard shortcut
T. - Click on the Canvas: Once the Horizontal Type Tool is active, simply click your mouse cursor anywhere on your project's canvas.
- Begin Typing: Photoshop will automatically generate a placeholder text, often "Lorem Ipsum" or similar dummy text, which will be highlighted. You can immediately start typing your desired text, replacing the placeholder.
This method allows for an unlimited amount of text to be typed, as Photoshop will expand the text line as needed.
Text Boxes: For Structured Content
When you need to control the boundaries of your text or fit a larger block of content within a specific area, creating a text box is the preferred approach.
- Select the Horizontal Type Tool: As with single line text, activate the Horizontal Type Tool.
- Click and Drag: Instead of a single click, click your mouse cursor on the canvas and drag it to define the desired width and height of your text box.
- Start Typing: Once you release the mouse button, a text box will be created, and you can begin typing your content within its boundaries. If you paste a large amount of text, it will automatically format itself to fit within the created box.
This method is particularly useful for paragraphs, captions, or any text that needs to be contained within a predefined space.
Customizing Your Text: Unleashing Creative Control
Once your text is in place, Photoshop provides a wealth of options to customize its appearance, ensuring it perfectly complements your design. These options are readily accessible through the Options bar and dedicated panels.
The Options Bar: Immediate Text Adjustments
The Options bar, located at the top of your Photoshop workspace, offers quick access to the most common text formatting controls.
- Font Face: This drop-down menu allows you to select from the wide array of fonts installed on your system.
- Font Size: Adjust the size of your text using this numerical input or the accompanying drop-down slider.
- Color: Click on the color swatch to open the Color Picker and select any color for your text.
- Alignment: Choose between left, center, right, or justified alignment to control how your text is positioned within its bounding box or line.
- Other Options: You may also find options for font style (bold, italic, etc.), leading (space between lines), kerning (space between specific letter pairs), and tracking (overall letter spacing).
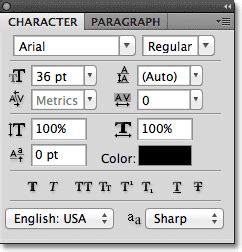
The Character Panel: Deeper Text Exploration
For more advanced text formatting and fine-tuning, the Character panel is an indispensable tool.
- Access the Character Panel: Navigate to
Window > Characterin the Photoshop menu. - Explore Comprehensive Options: Within the Character panel, you will find all the options available in the Options bar, plus a more detailed range of controls. This includes:
- Font Family, Style, Size: Similar to the Options bar, but with a more organized layout.
- Leading: Precisely control the vertical space between lines of text.
- Kerning: Adjust the space between two specific characters to improve visual appeal, especially for headlines.
- Tracking: Uniformly adjust the spacing between all characters in a selected block of text.
- Vertical Scale and Horizontal Scale: Distort or condense text characters.
- Baseline Shift: Move text up or down from its normal baseline.
- Skew: Italicize text programmatically.
- Character and Paragraph Settings: Access additional options for more complex text layouts, including hyphenation and justification controls.
Editing and Refining Your Text
Mistakes happen, and designs evolve. Fortunately, editing text in Photoshop is a simple and intuitive process.
Selecting Text for Editing
There are a couple of efficient ways to select your text for modification:
- Double-Click: The quickest method is to simply double-click directly inside the text box or on the text line itself. This activates the Type Tool and highlights the existing text, making it ready for editing.
- Using the Type Tool and Selection:
- Select the Horizontal Type Tool (or Vertical Type Tool if applicable).
- Click once on the text you wish to edit.
- Press
Control + A(on Windows) orCommand + A(on Mac) to select all the text within that text layer.
Once the text is selected, you can begin typing to replace it, or use the Options bar and Character panel to modify its attributes like font, size, color, and more.
Moving Text Layers
A crucial aspect of design is composition, and being able to reposition your text is key. Since text is always on its own layer in Photoshop, moving it is straightforward.
- Ensure the Text Layer is Selected: In the Layers panel, make sure the layer containing your text is highlighted.
- Use the Move Tool: Select the Move Tool from the toolbar (it looks like a crosshair with arrows, or use the keyboard shortcut
V). - Drag the Text: Click and drag your text to any desired position on the canvas.
Alternatively, you can use the arrow keys on your keyboard for precise nudging of the text layer.
Beyond Horizontal: Exploring Vertical Text
Photoshop also supports vertical text, which can add a unique visual flair to your designs.
- Select the Vertical Type Tool: Locate the Vertical Type Tool in the toolbar. It's usually grouped with the Horizontal Type Tool and is also represented by a "T" icon, but oriented vertically.
- Click and Type: Click on your canvas and begin typing. The text will flow downwards.
Just like horizontal text, vertical text can be fully customized using the Options bar and Character panel, and its position can be adjusted with the Move Tool.
How to Write Vertical Text in Photoshop CC
Advanced Text Manipulation and Considerations
While the core functions of adding and editing text are simple, Photoshop offers more advanced capabilities for those looking to push their creative boundaries.
Text on a Path
For highly stylized text placement, you can have text follow a custom path.
- Create a Path: Use the Pen Tool or Shape Tools to draw a path on your canvas.
- Select the Type Tool: Choose the Horizontal or Vertical Type Tool.
- Hover Over the Path: Move your cursor over the path. It will change to indicate that text can be added along the path.
- Click and Type: Click on the path and start typing. Your text will conform to the shape of the path.
- Customize and Move: You can then edit the text and use the Direct Selection Tool to further manipulate the path, which will in turn alter the text's placement.
Warping Text
Adding a curved or distorted effect to your text can create dynamic and eye-catching results.
- Select the Text Layer: Ensure your text layer is active.
- Access the Warp Text Feature: In the Options bar, you'll find an icon that looks like a "T" with a curved line above it (often labeled "Create warp text"). Click this icon.
- Choose a Style: A drop-down menu will appear with various warp styles like Arc, Arch, Flag, Wave, etc. Select one that suits your needs.
- Adjust Bend and Other Settings: Use the "Bend," "Distort," and other sliders to fine-tune the intensity and direction of the warp effect.
Rasterizing Text
While text layers are inherently editable, there are times when you might want to convert them into pixels, much like a regular image layer. This process is called rasterizing.
- How to Rasterize: Right-click on your text layer in the Layers panel and select "Rasterize Type."
- Implications: Once rasterized, your text can no longer be edited as text. You can apply pixel-based filters and adjustments, but you lose the ability to change the font, size, or spelling. Use this with caution and only when you are certain the text is finalized.
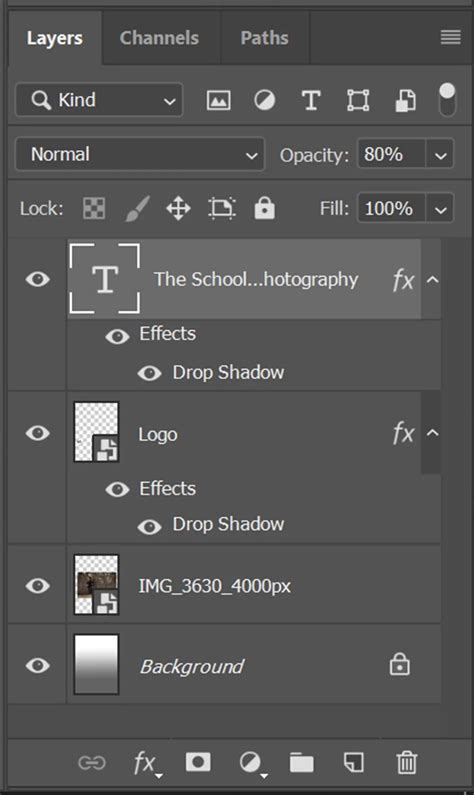
Understanding Layers: The Key to Text Management
The concept of layers is fundamental to working effectively in Photoshop, and it's particularly important for text.
- Text as a Layer: Every time you add text using the Type Tool, Photoshop automatically creates a new, dedicated text layer. This layer contains the text information, allowing for non-destructive editing.
- Layer Properties: Text layers have unique properties that differentiate them from pixel layers. You can change their font, size, color, and content at any time without degrading the underlying image quality.
- Layer Visibility and Organization: You can show or hide text layers by clicking the eye icon next to them in the Layers panel. You can also rename layers (double-click the layer name) and group them to keep your project organized, which is especially helpful when dealing with multiple text elements.
Common Misconceptions and Best Practices
While adding text is simple, understanding some common pitfalls and best practices can significantly improve your workflow and the quality of your designs.
- Over-reliance on Rasterization: Avoid rasterizing text layers prematurely. Keep them as editable text for as long as possible to allow for easy revisions.
- Font Consistency: For branding and professional design, maintain consistency in your font choices. Using too many different fonts can make a design look cluttered and unprofessional.
- Readability: Always consider the readability of your text. Ensure sufficient contrast between the text color and the background, and choose appropriate font sizes and styles for your intended audience and medium.
- Text Boundaries: Be mindful of text box boundaries. If text is cut off, you either need to expand the text box, reduce the font size, or adjust the leading/tracking.
- Accessibility: For digital designs, consider accessibility. Ensure text is large enough to be read comfortably on various screen sizes and that color contrast meets accessibility standards.
By mastering the art of adding and manipulating text in Photoshop, you unlock a powerful tool for communication and creative expression, elevating your designs from simple images to compelling visual narratives.