The Rule of Thirds is a cornerstone of compelling visual design, offering a simple yet powerful framework for creating more balanced, engaging, and aesthetically pleasing images. Whether you're a photographer framing a shot, a graphic designer laying out a page, or a UI/UX professional structuring an interface, understanding and applying this principle can elevate your work from ordinary to extraordinary. At its core, the Rule of Thirds is a compositional guideline that encourages photographers and designers to move beyond centering subjects and instead place key elements along imaginary lines or at their intersections.
The Fundamental Concept: Dividing the Canvas
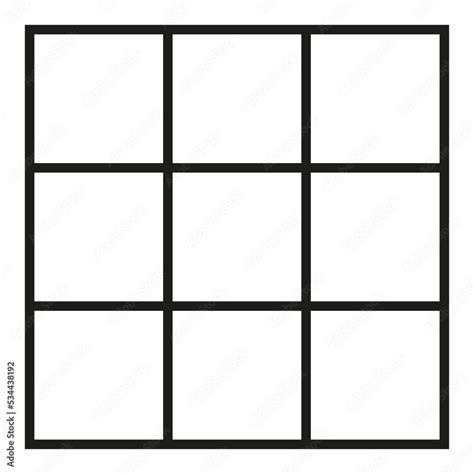
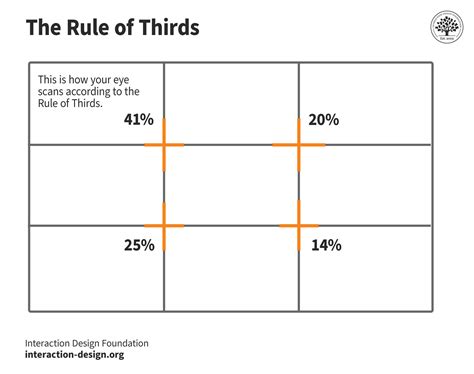
The essence of the Rule of Thirds lies in dividing an image into nine equal parts by two equally spaced horizontal lines and two equally spaced vertical lines. This creates a 3x3 grid, resembling a tic-tac-toe board, with four crucial intersection points. The theory posits that placing points of interest along these lines, or more significantly, at these intersections, leads to a more dynamic and naturally engaging composition. Instead of a static, centered subject, the viewer's eye is guided through the image, interacting with it more organically. This principle applies universally, from the vast expanse of a landscape to the intimate details of a portrait, and even to the abstract arrangements within graphic design and user interfaces.
Enhancing Image Quality Through Composition
How does the Rule of Thirds actually improve an image's quality? It's not about altering pixels or sharpening edges; it's about refining the visual narrative. By consciously positioning the most important elements of your image along these grid lines or at their intersections, you establish a harmonious balance between the subject and its surroundings. This deliberate placement creates a more aesthetically pleasing and professional-looking final product. It helps to avoid the amateurish pitfall of a subject being "smack dab in the center of the frame," which can often feel rigid and uninspired. Instead, off-center placement can create a sense of movement, depth, and visual interest.
Versatility Across Image Types
A significant advantage of the Rule of Thirds is its broad applicability. It can be applied to virtually any type of image, regardless of its content or style. Whether you're working with sweeping landscapes, intimate portraits, dynamic action shots, or even abstract compositions, the Rule of Thirds serves as a valuable guide. For landscapes, aligning horizons with the upper or lower horizontal lines can create a more pleasing sky-to-land ratio. In portraits, placing a subject's eyes along the upper horizontal line or at an intersection can draw the viewer's gaze effectively. Even architectural photography can benefit, by aligning prominent features with the grid lines. However, it's crucial to remember that this is a guideline, not an immutable law. Like any artistic principle, it can be adapted or intentionally broken to suit a specific creative vision.
Applying the Rule of Thirds in Photoshop
Photoshop offers a suite of tools that make applying the Rule of Thirds straightforward, both during the shooting process and in post-production.
Utilizing the Grid Overlay
One of the most intuitive ways to employ the Rule of Thirds in Photoshop is by enabling its grid feature. To do this, you can press Command+' (Mac) or Ctrl+' (Win) to display a grid. Alternatively, navigate to View > Show > Grid. This non-printing grid superimposes the 3x3 division over your image, allowing you to visually align your subject.
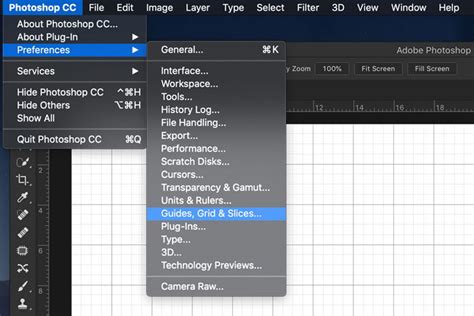
For a more precise application, especially when cropping, you can customize the grid. Go to Edit > Preferences (PC) or Preferences (Mac) and select Guides, Grid & Slices. Here, you can set the "Gridline every" option to 33.3 percent and "Subdivisions" to 1. This effectively creates a perfect Rule of Thirds grid. The color of these gridlines can also be adjusted for better visibility by clicking on the square color swatch.
Cropping with the Rule of Thirds
When you decide to crop an image to adhere to the Rule of Thirds, the process becomes about refinement.
- Open your image: Start by opening the image you wish to enhance in Photoshop.
- Set up your grid: Ensure your Rule of Thirds grid is visible (
View > Show > Grid). - Select the Crop Tool: Activate the Crop Tool by pressing
C. A grid will appear over your image. - Adjust the crop area: Click and drag the handles of the crop area to align the main elements of your image with the grid lines or intersection points. You might need to resize your original image within a new document of your desired final dimensions to achieve the best composition. For instance, if your original photograph had dimensions of 30 x 20 cm with a resolution of 240 ppi, you might create a new document slightly smaller, ensuring the same color mode and resolution. Then, copy your original image into this new document and use the Move tool (
V) to position the focal point onto one of the intersecting points before cropping. - Commit the crop: Once you're satisfied with the composition, press
Enter/Returnto complete the crop.
It's important to note that the default Photoshop grid does not print. If you require a printable grid, you might consider using custom Photoshop actions or pre-made templates. These actions can automate the process of adding guides and can often place the grid lines on separate layers, allowing for further customization of color and position.
The rule of thirds crop overlay
Beyond Photoshop: Rule of Thirds in Other Tools
While Photoshop is a powerful tool, the Rule of Thirds can be applied in various other software and even directly in-camera.
Lightroom
Lightroom, a popular choice for photo editing, also incorporates a Rule of Thirds grid overlay.
- Import your photo into Lightroom.
- Navigate to the
Developmodule. - Click on the
Crop Overlayoption. - Go to
Tool > Crop Guide Overlay > Thirdsto enable the grid.
GIMP
For users of the free and open-source image editor GIMP:
- To enable the grid, go to
View > Show Grid. - Customize grid appearance and spacing by going to
Image < Configure Grid. You can divide the width and height of the image by 3 to calculate the correct values for your grid. - Choose your preferred line style, color, and spacing.
Canva
Canva, a user-friendly graphic design platform, also offers grid capabilities, though often within its Pro subscription:
- Create a custom-sized artboard for your image.
- Add your photo to the artboard.
- Select
Filesin the top-left corner and chooseView Settings. - In
View Settings, selectAdd guides. - Under
Custom, set the number of rows and columns to3x3to create your Rule of Thirds grid.
When to Deviate: Breaking the Rule
While the Rule of Thirds is a robust guideline, it's not an absolute decree. There are instances where deviating from it can yield even more impactful results.
Small Subjects and Frame-Filling Portraits
If your subject is extremely small within the frame, forcing it onto an intersection point might make it insignificant. In such cases, centering the subject might be more effective to highlight it. Similarly, in frame-filling portraits or situations where elements are cut off by the frame, applying the rule strictly might become complicated or less effective. In these scenarios, focusing on the overall impact and narrative is more important.
Symmetry and Centered Subjects
Perfectly symmetrical compositions, or subjects that demand a direct, confrontational presence, can sometimes be more powerful when centered. While symmetry can suggest stasis, it also offers a strong sense of balance. For example, a stately, classical building might benefit from a head-on, symmetrical shot. In portraiture, while placing eyes on an intersection is often recommended, a direct, centered gaze can create a powerful connection with the viewer, especially if the subject's eyes are precisely aligned with the upper horizontal line.
Abstract Patterns and Dynamic Lines
When dealing with abstract patterns or scenes with strong linear elements like roads, rivers, or architectural lines, aligning these with the grid can be highly effective. However, objects with irregular shapes or those that "snake" through a scene, like winding paths or rivers, can also be compelling when elements are aligned diagonally, even if it appears counterintuitive to strict linearity.
The Practice of Composition
Ultimately, mastering the Rule of Thirds, like any skill, comes down to practice. Many photographers and designers find that with consistent application, the grid lines and intersection points become ingrained in their subconscious. Turning on the grid overlay in cameras or editing software serves as a constant reminder and training tool. Taking a "rule of thirds field trip" - intentionally composing multiple shots around this principle - can accelerate this learning process.
The Rule of Thirds is not just about placing a subject; it's about understanding how elements interact within the frame, how negative space can be utilized, and how the viewer's eye is naturally drawn through an image. By internalizing this guideline, you gain a powerful tool to create more deliberate, engaging, and visually resonant compositions, whether you're working with a photograph, a graphic layout, or a digital interface. The goal is to create a sense of harmony and cohesion, guiding the viewer's eye and enhancing their experience with the visual content.