Removing distracting backgrounds in Adobe Photoshop is an essential skill for photographers, graphic designers, and digital artists alike. Whether you're aiming to make your product photography shine, create compelling graphic designs, or simply isolate a subject for a new composition, Photoshop offers a robust suite of tools to achieve seamless background removal. With advancements in artificial intelligence and a variety of manual techniques, Photoshop empowers users to make backgrounds disappear entirely, transform them into transparent canvases, or replace them with entirely new scenes. This guide will explore the multifaceted approaches to background removal in Photoshop, from AI-powered quick actions to precise manual selections, ensuring your subjects take center stage.
Leveraging Artificial Intelligence for Swift Background Removal
Adobe Photoshop has significantly streamlined the background removal process with the integration of artificial intelligence, powered by Adobe Sensei. These intelligent tools can automatically detect and isolate subjects from their backgrounds, dramatically reducing the time and effort required for this task.
The "Remove Background" Quick Action
One of the most straightforward and rapid methods is the "Remove Background" Quick Action. Found within the Properties panel, this AI-driven feature can often achieve impressive results with a single click. To access it, ensure your image is open in Photoshop and that the Layers panel is visible. If your image is a locked "Background" layer, you'll need to unlock it first by clicking the lock icon. Then, navigate to Window > Properties to open the Properties panel. Under the "Quick Actions" subpanel, you'll find the "Remove Background" button. Clicking this button initiates the AI process, which analyzes the image and automatically generates a layer mask to conceal the background.
This AI-powered approach works best on images with a clear distinction and high contrast between the subject and the background. It's a significantly faster alternative to manually erasing backgrounds with traditional tools. Importantly, this method is non-destructive, as it utilizes a layer mask. This means the original background is not permanently deleted but rather hidden, allowing you to reveal it again if needed or make further refinements to the mask.
If the "Remove Background" button isn't immediately visible, it's likely that your image layer is still locked. Unlocking the layer by clicking the padlock icon in the Layers panel will usually make this Quick Action available.
The "Select Subject" Command
Similar to "Remove Background," the "Select Subject" command also leverages Adobe Sensei's AI capabilities to identify and select the main subject within an image. While "Remove Background" directly applies a mask, "Select Subject" creates a selection outline (marching ants) around the detected subject.
To use "Select Subject," open your image, ensure the layer is unlocked, and open the Properties panel (Window > Properties). In the "Quick Actions" subpanel, click "Select Subject." Once the subject is selected, you have several options:
- Create a Layer Mask: With the subject selected, you can click the "Add Layer Mask" icon at the bottom of the Layers panel. This will create a mask that reveals only the selected subject.
- Invert and Delete: Alternatively, you can invert the selection (
Select > Inverse) to select the background, and then press the Delete key to remove it. - Copy and Paste: You can copy the selected subject (
Edit > Copy) and paste it onto a new layer or document.
The "Select Subject" command offers more flexibility than "Remove Background" by first creating a selection that can then be manipulated further. This can be particularly useful when you need to refine the selection before committing to a mask or deletion.
The Remove Tool
A more recent addition, the Remove Tool, offers a versatile approach to eliminating unwanted elements, including backgrounds. This tool uses AI to intelligently fill in the areas where pixels are removed, making it effective for both background removal and object removal.
To use the Remove Tool, select it from the Photoshop toolbar (it might be nested with the Spot Healing Brush or other healing tools). With your image layer selected, simply "paint" over the background you wish to remove. As you paint, Photoshop analyzes the surrounding pixels and attempts to seamlessly fill the gap. You can adjust the brush size using the square bracket keys ([ and ]) for greater control. The Remove Tool is particularly handy for quickly erasing background material in one continuous stroke, and it can also be used to remove specific objects from an image.
Precise Manual Selections for Complex Backgrounds
While AI tools are powerful, they may sometimes struggle with images that have low contrast, intricate details like fine hair, or complex overlapping elements. In such cases, manual selection tools provide the precision and control needed for a perfect result.
The Object Selection Tool
The Object Selection Tool, introduced in Photoshop 2022, combines AI with manual refinement. It allows you to draw a rough rectangle or lasso around an object, and Photoshop will attempt to automatically detect and select it.
To use this tool, select it from the toolbar (often grouped with the Quick Selection Tool). Hover your cursor over your subject; Photoshop will often highlight potential subjects. You can then click to select it, or draw a bounding box around it. Once the subject is selected, you can refine the selection using the "Select and Mask" workspace.
The Quick Selection Tool
The Quick Selection Tool is an intuitive brush-based tool that allows you to "paint" a selection. As you paint over your subject, Photoshop intelligently expands the selection to detect edges.
To use the Quick Selection Tool:
- Select the tool from the toolbar (often grouped with the Magic Wand Tool).
- Click and drag over your subject. Photoshop will automatically add to the selection.
- To subtract from the selection, hold down the
Optionkey (macOS) orAltkey (Windows) and paint over the areas you want to deselect. - Adjust the brush size using the
[and]keys as needed.
This tool is excellent for images with reasonably defined edges and offers a good balance between speed and accuracy.
The Magic Wand Tool
The Magic Wand Tool selects pixels based on color similarity. When you click on a color, the tool selects all adjacent pixels of a similar hue within a specified tolerance.
To use the Magic Wand Tool:
- Select the Magic Wand Tool from the toolbar.
- In the options bar at the top, adjust the "Tolerance" setting. A lower tolerance selects fewer colors, while a higher tolerance selects a broader range.
- Click on the background you want to remove.
- If the selection isn't complete, you can hold
Shiftand click on additional areas of the background to add to the selection. - To remove the selected background, press
Delete.
The Magic Wand is most effective for solid color backgrounds or areas with distinct color differences from the subject.
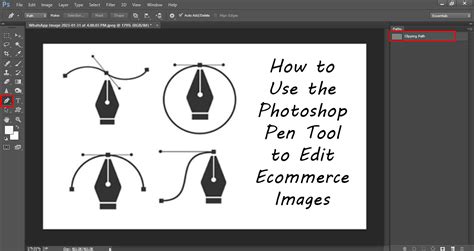
The Pen Tool: For Ultimate Precision
The Pen Tool is the professional's choice for creating highly accurate selections, especially for subjects with intricate or smooth, well-defined edges. It allows you to draw precise paths using anchor points and Bezier curves. While it can be time-consuming, the control it offers is unparalleled.
To use the Pen Tool:
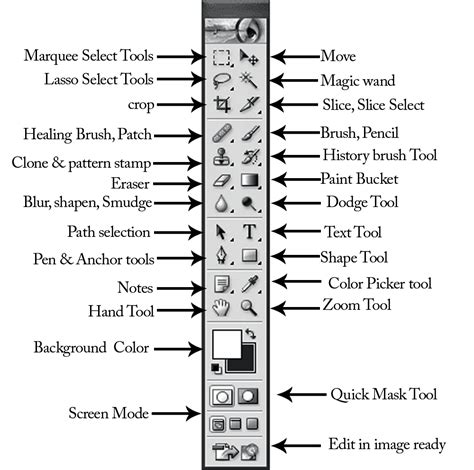
- Select the Pen Tool from the toolbar.
- Click to create anchor points around the edge of your subject.
- For curves, click and drag to create Bezier handles.
- Continue tracing until you have a closed path around your subject.
- Once the path is complete, go to the Paths panel (
Window > Paths). - Right-click on your saved path and select "Make Selection."
- In the "Make Selection" dialog box, you can set a feather radius (usually 0 pixels for sharp edges) and click "OK."
- With the subject selected, invert the selection (
Select > Inverse) to select the background. - Press
Deleteto remove the background.
The Pen Tool requires practice but yields exceptionally clean results, making it ideal for product shots or logos where precision is paramount.
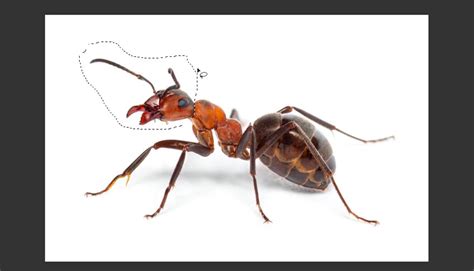
The Lasso Tools (Lasso, Polygonal Lasso, Magnetic Lasso)
The Lasso Tools offer freehand, straight-line, and edge-snapping selection options, respectively.
- Lasso Tool: Allows you to draw a freehand selection outline.
- Polygonal Lasso Tool: Creates selections with straight line segments.
- Magnetic Lasso Tool: Attempts to snap to the edges of your subject as you draw around it.
These tools are generally less precise than the Pen Tool but can be useful for quick selections or in conjunction with other methods for refining edges.
Refining Your Selections: The "Select and Mask" Workspace
Regardless of the selection tool used, achieving a perfect background removal often requires refining the edges of your selection. Photoshop's "Select and Mask" workspace is the dedicated environment for this crucial step.
After making an initial selection, click the "Select and Mask" button in the options bar or go to Select > Select and Mask. Within this workspace, you'll find a suite of tools to fine-tune your selection:
- View Modes: Choose different viewing options (e.g., Onion Skin, Overlay, On Black, On White) to better see the edges of your selection.
- Refine Edge Brush Tool: This brush is specifically designed to improve selections around areas with fine details like hair or fur. Paint over these areas, and Photoshop will intelligently adjust the mask.
- Global Refinements: Sliders for "Smooth," "Feather," "Contrast," and "Shift Edge" allow you to globally adjust the selection's edges.
- Decontaminate Colors: This option helps remove color fringe from the edges of your subject, which can occur when the subject has picked up color from the background.
- Output Settings: Crucially, you can choose to output your refined selection as a "Layer Mask," which is a non-destructive and highly recommended approach.
Working with Layer Masks for Non-Destructive Editing
Layer masks are fundamental to non-destructive editing in Photoshop. When you remove a background using a layer mask, you're not deleting pixels; you're simply hiding them.
- How it Works: A layer mask is a grayscale channel attached to a layer. White areas of the mask reveal the layer content, black areas conceal it, and shades of gray create partial transparency.
- Benefits:
- Reversibility: You can easily adjust the mask at any time to bring back parts of the background or refine the subject's edges without losing any image data.
- Flexibility: Masks can be painted on, edited with selection tools, or even created from paths.
- Organization: They keep your editing workflow clean and organized.
To create a layer mask, select your layer and click the "Add Layer Mask" icon at the bottom of the Layers panel. If you have an active selection, the mask will be created based on that selection (white where selected, black where unselected). You can then paint directly on the mask thumbnail in the Layers panel using black or white to hide or reveal parts of the layer.
Specific Scenarios: White Backgrounds and Logos
Removing White Backgrounds
Removing a white background is often straightforward, especially if the white is a solid, uniform color. The Magic Wand Tool is particularly effective here.
- Open your image.
- Select the Magic Wand Tool.
- Set a moderate Tolerance (e.g., 20-30).
- Click on the white background.
- If there are any remaining white areas, hold
Shiftand click them to add to the selection. - Press
Deleteto remove the background. - Save the image as a PNG to preserve transparency.
If the white background has subtle gradients or shadows, you might need to use the Quick Selection Tool or even the Pen Tool for cleaner results, followed by refinement in "Select and Mask."
Removing Backgrounds from Logos
Logos often have clean, sharp edges, making them ideal candidates for precise selection. The Pen Tool is the preferred method for logo background removal due to its accuracy.
- Open the logo in Photoshop.
- Unlock the background layer and duplicate it.
- Use the Pen Tool to meticulously trace around the logo.
- Save the path and convert it into a selection.
- Invert the selection to select the background.
- Press
Delete. - Save the logo as a PNG file to maintain its transparency.
For simple logos with solid backgrounds, the Magic Wand or Quick Selection Tool might suffice, but always refine the edges for a professional finish.
Batch Processing Background Removal
For projects involving numerous images that require background removal, Photoshop offers scripting capabilities. You can create a script that automates the process of applying background removal actions to a batch of files. This can be accessed via File > Scripts > Browse.... This feature is invaluable for e-commerce sites or large design projects where consistency and efficiency are key.
Using Adobe Express for Simpler Tasks
For users who need quick and easy background removal without the full complexity of Photoshop, Adobe Express (formerly Adobe Spark) offers a free and user-friendly online tool.
- Upload your image to Adobe Express's "Remove Background" tool.
- The AI will automatically process and remove the background.
- Download the resulting image, which will have a transparent background (typically as a PNG).
Adobe Express also provides tools to add new backgrounds, apply filters, or create designs with your transparently cut-out images, making it a versatile option for social media posts, flyers, and more. It's accessible on both desktop and mobile devices.
Considerations for Image File Types
When saving images with transparent backgrounds, it's crucial to use file formats that support alpha transparency. The most common and widely supported format for this purpose is PNG. JPEG files do not support transparency and will typically fill transparent areas with white.
It's also important to note that certain file types, like GIFs, have limitations with transparency. GIFs support only full transparency or no transparency at all; they do not support partial transparency or anti-aliasing, which can lead to jagged edges.
Conclusion
Mastering background removal in Adobe Photoshop opens up a world of creative possibilities. From the lightning-fast AI-powered tools like "Remove Background" and "Select Subject" to the meticulous precision of the Pen Tool, Photoshop provides a solution for every scenario. By understanding the strengths of each tool and utilizing non-destructive techniques like layer masks, you can ensure your subjects stand out and your designs achieve a professional polish. Whether you're a seasoned professional or a beginner, familiarizing yourself with these techniques will undoubtedly enhance your image editing workflow.
tags: #adobe #photoshop #background #remover