Creating clean, flowing lines and curves is a fundamental aspect of digital art, especially when working on line art. While dedicated drawing pads offer a tactile experience, Krita provides a robust set of tools and techniques that allow artists to achieve professional-level results even without one. This article delves into various methods for creating tapered lines, smoothing strokes, and manipulating the canvas to overcome natural drawing limitations, ensuring your line art is both precise and dynamic.
Leveraging Canvas Transformation for Natural Flow
A common challenge for artists is the inherent tendency to draw lines more comfortably in specific directions due to hand-eye coordination and muscle memory. Whether it's a left diagonal, right diagonal, vertical, or horizontal line, most individuals have a preferred orientation. Krita's canvas transformation tools are invaluable for overcoming these limitations, allowing you to adapt the canvas to your strengths.
For instance, drawing a perfectly vertical line from top to bottom might feel more natural than a horizontal one. By rotating the canvas, you can align your preferred drawing direction with the desired line. This simple adjustment can significantly improve fluidity and control, making the creation of long, smooth lines much more achievable.
Rotating the Canvas
Krita offers several intuitive ways to rotate the canvas:
- Middle Mouse Button Method: Hold down the Shift key, then click and drag with the middle mouse button. This provides a fluid rotation of the canvas.
- Spacebar Navigation Technique: Hold down the Spacebar key along with the Shift key. Then, click and drag with the regular left mouse button. This method combines navigation with rotation.
- Keyboard Shortcuts: For those who prefer keyboard-only control, pressing number 4 and number 6 on the keyboard allows for incremental rotation of the canvas. To reset the canvas orientation to its default position, simply press number 5.
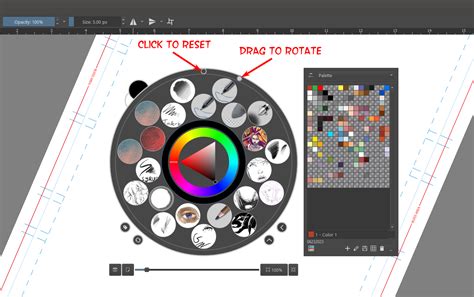
- Pop-Up Palette: While using the brush tool, a right-click will bring up the "pop-up palette." Within this palette, you can drag and rotate the small white circle to precisely adjust the canvas orientation.
- Touch Gestures: If you are using a drawing tablet that supports touch gestures, such as an Android device or a compatible tablet, you can use two fingers to rotate and zoom the canvas simultaneously. This offers a very natural, pen-and-paper-like feel.
Mirroring the Canvas
Mirroring the canvas is another powerful technique that helps in achieving symmetry and identifying issues with line work that might not be apparent in the original orientation. By flipping the canvas horizontally, you can see your drawing as if it were reflected, which often reveals imbalances or awkward curves.
To mirror the canvas in Krita, you can use the following shortcuts:
- Press the M key on your keyboard. This mirrors the canvas at its center.
- Alternatively, press Alt + M. This also mirrors the canvas.
The subtle difference between these two is primarily about the pivot point of the mirroring action, allowing for slight variations in how you perceive your work in reflection.
Enhancing Line Smoothness with Brush Smoothing
Even with canvas rotation, shaky hands or a lack of a drawing pad can sometimes lead to jagged or uneven lines. Krita's brush smoothing feature is designed to counteract this by intelligently interpolating brush strokes, resulting in cleaner and smoother lines. It's important to understand that brush smoothing adds computational load, so it's generally advisable to use it only when necessary.
Krita provides four distinct modes for brush smoothing:
- None: This is the default setting, meaning brush smoothing is entirely disabled. For optimal performance, especially on less powerful machines, keeping this option active is recommended unless you specifically require smoothing.
- Basic: This mode is particularly useful for artists using older drawing tablets that might lack built-in smoothing capabilities. Modern tablets and their drivers often incorporate hardware-level smoothing, so if enabling "Basic" mode doesn't result in a noticeable difference, it's likely your tablet is already handling this feature.
- Weighted: Offering a more pronounced smoothing effect than "Basic," this mode introduces a stronger interpolation of brush strokes. The trade-off is an increased demand on your computer's resources. You might observe a slight delay between your cursor's movement and the brush tip's response, a common characteristic of heavier smoothing.
- Stabilizer: This mode provides the most aggressive smoothing effect, surpassing even "Weighted" mode. Consequently, it places the heaviest burden on your computer's performance. While it yields the smoothest lines, it also requires a more capable system to run without significant lag.
HOW TO USE BRUSH SMOOTHING in Krita - Digital Art Tutorial
The Power of Assistant Tools for Precision
In traditional art, rulers, French curves, and compasses are indispensable for creating perfect straight lines and precise curves. Krita's "Assistant Tools" serve as the digital equivalent of these aids, offering a variety of pre-defined shapes and guides to help you draw complex lines and curves with accuracy.
To utilize these assistants effectively:
- Ensure you have the brush tool selected.
- Locate the "Tool Options" docker.
- Activate the "Snap to Assistants" option.
Once this option is enabled, any stroke you make will intelligently snap to the contours of the active assistant tool. Krita offers several types of assistants, including:
- Assistant: Straight Line: Creates a perfectly straight line. You can adjust its length and angle.
- Assistant: Ellipse: Helps in drawing perfect circles and ellipses.
- Assistant: Circle: Specifically for drawing perfect circles.
- Assistant: Multi-Point: Allows for creating complex, multi-segmented curves.
- Assistant: Perspective: Aids in drawing objects with correct perspective, crucial for backgrounds and environments.
- Assistant: Symmetry: Enables drawing with perfect symmetry along one or more axes.
By selecting the appropriate assistant and enabling "snap to assistants," you can effortlessly create precise geometric shapes, smooth arcs, and perfectly straight lines that would be challenging to achieve freehand, especially without a drawing pad.
Embracing Vector Graphics for Scalable Lines
For the ultimate in line precision and scalability, Krita's vector graphics capabilities are unparalleled. Unlike raster images, which are composed of pixels, vector graphics are based on mathematical equations, meaning they can be scaled infinitely without any loss of quality. This makes them ideal for logos, technical illustrations, and any artwork that might need to be resized.
When a "Vector Layer" is active, most drawing tools will automatically produce vector shapes. The exception, of course, is the brush tool, which creates raster strokes. To create a vector outline:
- Ensure you are on a "Vector Layer."
- Select a vector shape tool, such as the "Bezier Curve Tool" or the "Ellipse Tool."
- In the "Tool Options" docker, set the "Fill" option to "Not filled."
- Set the "Outline" option to "Brush." This will use your foreground color to define the outline of the vector shape. For instance, setting the foreground color to black will result in a black vector outline.
Modifying Vector Shape Appearance
Once a vector shape is created, its appearance can be easily modified:
- Activate the "Select Shape Tool."
- Ensure the desired shape is selected.
- In the "Tool Options" docker, navigate to the "Outline" tab. Here, you can adjust the width, color, and style of the outline.
- You can also modify the shape's transformation, including its scale, rotation, and position, directly within the "Tool Options" docker or by using the transform tools.
Creating Variable Width Outlines with Vector Shapes
Achieving a non-uniform or "tapered" outline thickness with vector shapes requires a clever approach. Instead of directly applying varying thickness to a single vector stroke, you can simulate this effect by adding and subtracting vector shapes:
- To reduce outline area: Add white-filled vector shapes to the area where you want the outline to be thinner or disappear.
- To add outline area: Use black-filled vector shapes.
Example using the Bezier Curve Tool for Variable Width:
- To add to the outline area (making it thicker):
- Select the "Bezier Curve Tool."
- Set the "Fill" option to "Foreground color." Ensure your foreground color is black.
- Set the "Outline" option to "No outline."
- Draw your black vector shape. This will effectively add to the existing outline.
- To reduce the outline area (making it thinner or creating tapering):
- Select the "Bezier Curve Tool."
- Set the "Fill" option to "Background color." Ensure your background color is white.
- Set the "Outline" option to "No outline."
- Draw your white vector shape over the existing black outline. The white area will effectively "erase" parts of the black outline, creating the illusion of tapering or thinning.
Converting Vector Areas to Transparency
A common workflow for creating complex vector outlines, including those with variable widths, involves using white shapes to define transparent areas. If your vector shapes are currently solid white and you need them to be transparent to reveal layers beneath, you can convert these white areas:
- Apply a "Filter Mask" to the vector layer.
- For the filter type, choose "Gradient Map."
- Configure the gradient stops: Ensure the left stop is solid black and the right stop is fully transparent.
- Click "OK." This process will convert the black areas of your mask into opaque parts of the vector shape and the transparent areas into transparency.
This technique allows for intricate control over the final appearance of your vector lines.
Coloring Vector Art
Once you have your vector line art set up, adding color is straightforward. You can easily add color to the drawing by using various methods:
- Colorize Mask: Krita's "Colorize Mask" feature is an advanced yet intuitive way to add color. It allows you to paint areas with specific colors, and Krita intelligently applies those colors to the underlying linework. This feature has been extensively covered in Krita tutorials and documentation.
- Regular Fill Tool: For simpler coloring, you can create a new paint layer beneath your vector layer. Activate the "Fill Tool" (or press F on your keyboard). Choose your desired color, for example, a reddish-orange, and click on the new paint layer to fill it.
By combining these techniquesâcanvas transformation, brush smoothing, assistant tools, and vector graphicsâartists can achieve highly polished and professional line art in Krita, regardless of whether they are using a drawing pad. Each method offers a unique approach to solving common challenges, empowering you to create the precise and expressive lines your artwork demands.