Learning how to make a picture transparent might seem complex and time-consuming, but it’s easier than you might think. Transparency in image editing is a powerful tool, allowing for seamless integration of elements into diverse designs, from social media posts to professional branding. This tutorial will guide you through the process of making an image transparent using Picsart, offering helpful tips and tricks that’ll add a spark to your creations.
Understanding Transparency in Image Editing
A transparent image is a digital picture or graphic that contains transparent areas, allowing whatever is behind it to show through those regions. This capability is fundamental for many design applications. Transparency allows you to remove the background of an image or part of it, making it blend into different backgrounds or layers. This is crucial for creating professional-looking graphics, logos, and collages where elements need to appear as if they naturally belong to the new background.

The concept of transparency relies on an "alpha channel," which is a piece of data that stores information about the opacity of each pixel in an image. A fully opaque pixel has an alpha value of 1, meaning it completely blocks whatever is behind it. A fully transparent pixel has an alpha value of 0, allowing everything behind it to be seen. Values between 0 and 1 represent semi-transparency, creating a fading or blending effect.
When you’re learning how to make a photo transparent, you’ll likely encounter different file formats for your edits. The choice of file format is critical for preserving transparency.
File Formats and Transparency Support
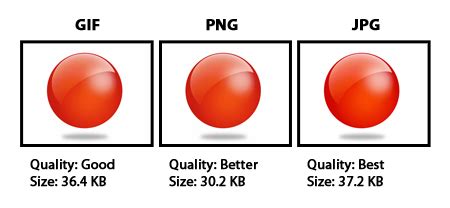
- PNG (Portable Network Graphics): This format is the most widely recognized and supported for images with transparent backgrounds. PNG files support transparency through an alpha channel, allowing for varying levels of opacity in an image. Unlike other formats, PNG uses lossless compression, ensuring high image quality without sacrificing detail. This makes it ideal for graphics, logos, and icons where crispness is paramount.
- JPG (Joint Photographic Experts Group): JPG does not support transparency. Because it lacks an alpha channel, it cannot represent transparent areas. In contrast to PNG, JPG uses lossy compression, which sacrifices some image quality to reduce file size. When a JPG image is saved with transparent areas, those areas will be filled with a solid color, typically white or black, depending on the software.
- GIF (Graphics Interchange Format): GIF supports transparency, but it does so with a single color designated as fully transparent. This means you can only have one specific color fully see-through, which is limiting for complex images. GIF also has a limited color palette compared to PNG.
- WEBP: Developed by Google, WEBP is a modern image format that supports both lossless and lossy compression, as well as transparency. It often offers smaller file sizes than PNG while maintaining good quality and transparency support.
- TIFF (Tagged Image File Format): Often used in professional settings, TIFF supports transparency and can be uncompressed or use lossless compression. However, TIFF files usually result in significantly larger file sizes compared to PNG or WEBP.
The Versatility of Transparent Images
Transparent images are incredibly versatile thanks to their unique ability to seamlessly integrate into different backgrounds. This characteristic opens up a wide array of creative and practical applications.
Applications of Transparent Images
- Social Media Posts and Profile Pictures: Adding a transparent background to your social media posts and profile pictures can help you stand out from the crowd. You can place your subject onto a vibrant background, create engaging collages, or design eye-catching graphics that capture attention.
- Graphic Design and Branding: Designers frequently use transparent images, especially PNGs, for logos, icons, and branding materials. A transparent logo can be placed on any color background, on websites, merchandise, or marketing collateral without a distracting solid block of color behind it, ensuring brand consistency and a professional look.
- Presentations and Reports: Professionals use transparent images in presentations or reports to enhance visual appeal. Whether it's an icon, a chart element, or a product image, transparency allows these visuals to blend smoothly with the slide's background, making the overall presentation more polished and impactful.
- Web Development and eCommerce: In web design, transparent images are essential for product listings, icons, and user interface elements. They ensure that website designs remain consistent across different themes and backgrounds. For eCommerce, product photos with transparent backgrounds allow customers to view products clearly without distractions.
- Collages and Digital Art: For digital artists and hobbyists, transparent images are building blocks for creating intricate collages and unique digital artwork. They enable the layering of multiple elements to create complex and imaginative scenes.

Creating Transparency with Picsart
While many advanced editing tools offer multiple ways to create transparency, Picsart stands out as a beginner-friendly and efficient option. The platform leverages AI to simplify complex tasks, making background removal accessible to everyone.
Using Picsart's Background Remover Tool
Picsart’s AI-powered Background Remover is designed to automatically detect and remove the background of an image, leaving only the main subject as its focus. This process can often be completed in just a few steps.
- Open the Picsart App: Launch the Picsart application on your mobile device or access the web editor on your desktop.
- Initiate a New Project: Tap the
+icon at the bottom of the screen to start a new project. - Upload Your Image: Select the photo you wish to edit from your device's gallery or explore the
#FreeToEditphoto library. - Utilize the Background Remover:
- AI Removal: Once your image is uploaded, navigate to the
Toolssection and selectRemove BGorBackground Remover. Picsart's AI will automatically detect and remove the background. - Manual Refinement: If the AI isn't perfect, you can use the
Erasertool to manually remove any remaining background areas or theRestoretool to bring back parts of the image that were accidentally removed. ThePersonicon within the background removal options can also help isolate human subjects more effectively.
- AI Removal: Once your image is uploaded, navigate to the
- Save Your Transparent Image: After you've achieved the desired result, tap the
checkmarkin the top right corner to confirm your edits. Then, tapApplyand proceed to save your image.
How to Remove a Background in Picsart (2025)
When saving, it is crucial to select the correct file format. Ensure you save your image as a PNG to preserve the transparency. If you save it as a JPG, the transparent areas will be filled with a solid color.
Making a Transparent Logo with Picsart
Creating a transparent logo is essential for maintaining brand consistency across various platforms. The process is identical to removing the background from any other image.
- Upload Your Logo: Open Picsart and upload your logo file.
- Use the Background Remover: Apply the
Background Removertool. The AI will automatically isolate your logo from its background. - Refine if Necessary: Use the
EraserandRestoretools for any fine-tuning. - Save as PNG: Export your logo as a PNG file.
A transparent logo eliminates the background, allowing it to seamlessly blend with different backgrounds, colors, or textures. This not only enhances its aesthetic appeal but also reinforces brand recognition and professionalism.
Saving Images with Transparent Backgrounds Correctly
A common pitfall when working with transparent images is improper saving, leading to the loss of transparency. Understanding how to save your edits is as important as the editing process itself.
The Crucial Role of File Formats
- Select the Proper File Format: As discussed earlier, PNG, WEBP, and TIFF are the primary formats that support transparency. JPG does not. If you attempt to save a transparent image as a JPG, the software will fill the transparent areas with a solid color, often white or black.
- Choose Transparency-Supported Formats During Export: When saving or exporting your image from Picsart or any other editing software, ensure you explicitly select PNG, WEBP, or TIFF.
- For Picsart Creative APIs users: If you are using Picsart's APIs for automated image processing, specify the desired output format (e.g.,
output_format: "png"oroutput_format: "webp") in your API parameters.
- For Picsart Creative APIs users: If you are using Picsart's APIs for automated image processing, specify the desired output format (e.g.,
- Verify Export Settings: Double-check that your export settings or API parameters are configured correctly to preserve transparency. Avoid settings that might force a solid background color.
Common Saving Errors and Solutions
- Using JPG: The most frequent mistake is saving a transparent image as a JPG. Always opt for PNG or WEBP.
- Incorrect Export Settings: Ensure your software's export options are set to maintain transparency. For instance, in desktop software, when choosing "Save As" or "Export," you'll typically find options to select the file type and sometimes specific settings related to transparency.
- Accidental White/Black Backgrounds: If you've saved an image as a JPG and it now has a solid background, you'll need to re-open the original file (or a higher-resolution version if available) and save it correctly as a PNG. If you've accidentally saved a transparent image with a solid background, you can often use Picsart's Background Remover tool again to re-isolate your subject and save it as a PNG.
Alternative Tools for Transparent Backgrounds
While Picsart is a powerful and accessible tool, other applications also offer features for creating transparent backgrounds. Understanding these alternatives can be beneficial for users with specific needs or preferences.
Wondershare Pixcut
Wondershare Pixcut is an AI-powered tool designed for quick and automatic background removal.
- Visit Wondershare Pixcut: Go to the Wondershare Pixcut website.
- Upload Image: Click on 'upload' to select your image.
- Automatic Removal: The app will automatically remove the background.
- Download: Click 'download' to save the resulting transparent image.
Canva
Canva is a popular graphic design platform that also offers background removal capabilities, particularly for its Pro subscribers.
- Start a New Project: Go to the Canva website and start a new design project.
- Upload Your Image: Upload your logo or image.
- Remove Background: Select the image and use the
Edit Photo>BG Removertool. - Adjust Transparency (Optional): Canva also offers a transparency slider to adjust the overall opacity of an element if needed, separate from background removal.
- Download: Download the image, ensuring you select a format that supports transparency (like PNG).
Wondershare Filmora
Wondershare Filmora is a video editing software that can also be used for creating transparent logos, especially when integrating them into video projects.
- Import Media: Open Filmora and import your logo and any video footage.
- Timeline Placement: Drag and drop both the video and the logo onto the timeline simultaneously.
- Chroma Key: Right-click on the logo on the timeline. If the logo has a solid color background (like green), you can use the Chroma Key effect to make that color transparent. Enable the Chroma key, and select the background color to make it disappear.
- Export: Export your project. If you only need the transparent logo, you can export just that element, ensuring it's saved in a format like PNG.
Apowersoft Background Eraser
This mobile application is known for its ease of use on both iOS and Android platforms.
- Open the App: Launch Apowersoft Background Eraser.
- Select Image: Choose the photo you want to edit.
- Automatic or Manual Removal: The app uses AI for automatic removal, or you can use manual tools for precision.
- Save: Save the resulting transparent image.
Lunapic
Lunapic is a free online photo editor that allows for transparent background creation.
- Upload Image: Go to Lunapic.com and upload your image.
- Edit Menu: Navigate to the
Editmenu. - Transparent Background: Select
Transparent Background. - Click Background: Click on the color you want to make transparent.
- Save: Save the image, typically as a PNG.
Adobe Photoshop
While more advanced, Adobe Photoshop offers robust tools for creating transparency.
- Open Image: Open your image in Photoshop.
- Add Transparent Layer: Go to
Layer>New>Layer. This adds a transparent layer. - Select Subject: Use tools like the
Magic Wand,Quick Selection, orObject Selectiontool (often found underSelect>Subject) to select your main subject. - Remove Background: With the background selected (or by inverting the selection to select the subject), press the
Deletekey. Ensure your layer is not locked. If it is, double-click the layer to convert it to a regular layer. - Save as PNG: Go to
File>Save AsorExportand choose PNG as the file format.
Picsart's Remove Background API
For developers and users looking to automate image editing workflows, Picsart offers a powerful Remove Background API. This API allows for programmatic background removal, making it efficient to process large batches of images or integrate transparency creation into applications.
Key API Parameters for Transparency
output_type: "cutout": This is the primary parameter to ensure the API performs background removal. Setting it to"cutout"instructs the API to isolate the main subject.- Avoid
bg_Parameters: To maintain transparency, it is crucial to not use parameters likebg_image_urlorbg_color. These parameters are used to replace the background with a solid color or another image, which would negate the transparency effect. - Specify Output Format: Ensure you select an output format that supports transparency. The most common and recommended formats are PNG and WEBP. You would specify this in your API request, for example,
output_format: "png".
Making a Test Call
Before implementing the API on a large scale, it's essential to make a test call with a sample image. Verify that the background is properly removed and that the output file is indeed in PNG or WEBP format, confirming that transparency has been preserved.
Picsart Stickers: Transparent Images as Reusable Elements
Picsart empowers users to turn their transparent background images into custom stickers. These stickers can then be easily added to other photos, creating unique and personalized edits.
Creating a Sticker from a Transparent Image
- Remove Background: Use Picsart's Background Remover tool to create a transparent image of your desired subject.
- Save as Sticker: Once the background is removed and you're happy with the result, save the image. Picsart often prompts you to save it as a "Sticker," which inherently means it will be stored with a transparent background.
- Access Your Stickers: In the Picsart Photo Editor, tap the
Photoicon in the bottom menu, then selectStickersfrom the left-hand editing toolbar. Your custom stickers will be available underMy Stickersor a similar category.
Using Custom Stickers in Edits
- Open Target Image: Open the photo you want to add your sticker to in the Picsart Photo Editor.
- Add Sticker: Go to
Stickers, selectMy Stickers, and tap on your desired transparent background image. - Position and Resize: Place and resize the sticker as needed on your photo.
- Save Final Image: Save your composite image.
The Cutout Tool for Sticker Creation
Picsart also offers a dedicated Cutout Tool which is specifically designed for creating custom stickers.
- Open Image: Start a new project and upload your image.
- Select Cutout Tool: Tap to open the
Cutout Tool. - AI or Manual Selection: Choose one of the AI-powered segmentation options (like
Person,Face,Hair) or manually draw around the area you want to keep. The tool will then remove the background. - Save as PNG Sticker: Tap
SaveandNext, then save the cutout as a PNG sticker.
Discovering Free Transparent Background Photos on Picsart
Beyond creating your own, Picsart hosts millions of free, community-generated stickers and transparent background photos.
- Search for Stickers: In the Editor, tap the
Sticker Tooland use the search bar to find transparent images based on keywords. - Explore Discover Page: Navigate to the
Discoverpage, enter your search query, and tap on relevant hashtags. SelectStickerto filter results. - Save and Use: Double-tap a sticker to save it to your collection or tap
Applyto add it directly to your current photo.
By mastering the art of transparent backgrounds with Picsart, you unlock a world of creative possibilities, enabling your designs to stand out with professional polish and unique flair.
tags: #picsart #transparent #background