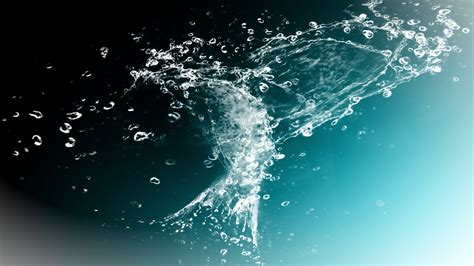
Water, a fundamental element of life, also holds a captivating allure in the realm of digital art and design. Mimicking its dynamic and diverse forms digitally, however, is no small feat. For those looking to infuse their projects with the fluidity of water, from subtle droplets to powerful splashes and serene surfaces, Photoshop offers a robust toolkit. This article serves as a comprehensive guide, a treasure trove of techniques, and a curated collection of resources designed to empower designers, illustrators, and artists of all levels to create an array of realistic water effects. Whether you're a seasoned professional or a beginner exploring new creative avenues, you'll find invaluable insights and practical methods to elevate your designs.
Advanced Water Effect Tutorials: Precision and Control
For those who require meticulous control over their designs and are willing to invest a bit more time, advanced water effect tutorials offer unparalleled results. These methods go beyond the built-in filters, allowing for precise placement and customization.
One such intricate tutorial guides users through the process of adding a single, well-placed ripple to an image. This level of specificity is particularly beneficial for product photography, where a subtle, targeted water effect can significantly enhance visual appeal. The tutorial walks users through the exact steps needed to achieve this precise effect.
Another complex tutorial focuses on creating a realistic water reflection. This detailed guide takes designers through the essential steps of constructing a convincing water surface and then seamlessly integrating a reflection onto it. The outcome is a sophisticated and believable watery scene.
For photographers aiming to achieve the ethereal look of a long-exposure waterfall, a specialized tutorial addresses this specific need. It provides the techniques necessary to transform a standard waterfall image into a flowing, dreamlike depiction, capturing the essence of motion blur.
Streamlining Water Effects with Mockups and Actions
When time is a constraint, but the desired water effect is crucial, pre-designed solutions offer an efficient alternative. Water effect mockups and Photoshop actions can deliver impressive results with minimal effort.
A particularly useful water effect mockup allows for the quick addition of a reflection with accompanying ripples beneath an image. These mockups are designed for ease of use, and clear instructions are provided for setting them up within Photoshop. A significant advantage of some of these freebies is the inclusion of three distinct, high-quality effects, offering a variety of options for different projects.
Similarly, Photoshop actions can automate the process of applying water effects, enabling users to achieve ultra-fast results without compromising on detail. These actions are ideal for situations where speed and efficiency are paramount.
Harnessing the Power of Water Brushes
Water brushes represent one of the most versatile and controllable methods for incorporating water elements into designs. They provide granular control over the placement, quantity, and type of water added, making them exceptionally useful for complex or challenging projects.
A free download might offer a set of scatter brush presets, providing just the right amount of rain or droplets to enhance a scene. These brushes are invaluable for subtle additions or for building up more elaborate weather effects.
Another pack might feature 15 water splash brushes, each offering a unique variation on the dynamic burst of water. These can be used to add immediate impact and realism to compositions.
For those needing to introduce movement to a water scene, a free water brush can be the perfect solution, adding just the right touch of fluidity.
The availability of extensive brush packs is a boon for designers. For instance, one collection might offer an additional 15 brushes, complementing existing sets and expanding creative possibilities.
Realistic waterfall brushes are also available, allowing users to create clean, flowing waterfalls with just a few clicks, simplifying the process of depicting natural water features.
Exploring Diverse Water Brush Collections
The world of Photoshop brushes for water effects is vast, with numerous options catering to specific needs and aesthetic preferences.
A substantial collection of 45 high-resolution water splatter brushes, each up to 5000 pixels, can bring incredibly realistic water textures to digital creations. These are ideal for adding energetic splashes and dynamic textures.
High-resolution 3D water splash Photoshop brushes offer a dynamic visual experience, adding depth and a sense of volume to water elements.
For creating subtle yet impactful surface disturbances, 45 Water Ripple Stamp Photoshop Brushes provide high-resolution textures perfect for photo overlays, digital manipulation, and visual effects.
A professional set of Water Splash-Flow-Bubble-Line Brushes for Photoshop includes three high-resolution types, with sizes ranging from 1500px to 5000px, offering a comprehensive toolkit for various water-related effects.
The ’50 Water Drops Photoshop Stamp Brushes’ collection is compatible with any Photoshop version and offers 50 high-resolution brushes up to 2500 pixels, providing a wide array of droplet styles.
A diverse collection of water effect brushes for Photoshop, ranging from splashes to waves, is designed for detailed background creation. These high-resolution brushes are compatible with Photoshop CS2 and later versions.
Furthermore, a pack featuring 15 premium water surface Photoshop brushes, each over 2500 pixels in size, can be used to create realistic and detailed water surfaces.
Another set includes 11 high-resolution water splash Photoshop brushes, offering dynamic and energetic splash elements.
A set of 10 high-quality water brushes for Photoshop CS6 and CS2 provides sizes up to 5000px for CS6 and 2500px for CS2, ensuring versatility for various creative needs.
Finally, a distinctive Photoshop brush set captures the ethereal beauty of ink merging with water, creating patterns reminiscent of smoke. These brushes are excellent for abstract and artistic water effects.
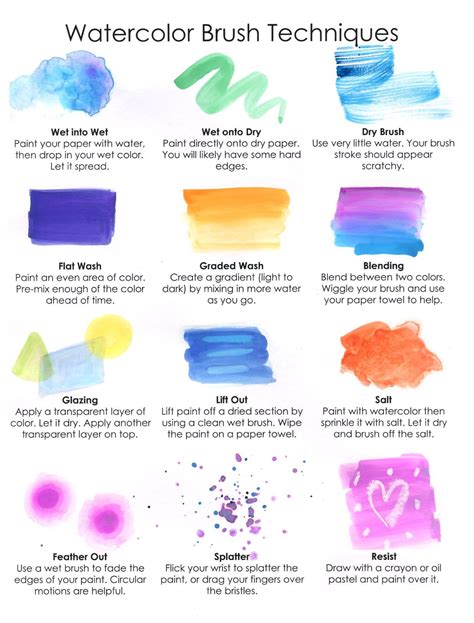
Crafting Realistic Water Effects: Step-by-Step Techniques
Beyond pre-made assets, understanding the underlying techniques for creating realistic water effects in Photoshop is crucial for achieving professional results.
Creating Realistic Water Surfaces and Reflections
Creating a realistic water surface often involves a multi-layered approach, focusing on light, color, and subtle disturbances. A common method begins with a canvas of any size and lays down a base color, such as a deep blue-green (#425847), using a Solid Color fill layer. The goal is to ensure the water stretches across the canvas width. A Layer Mask is then applied to the water surface layer, and a semi-hard round brush is used to mask out the sky. Similarly, a medium-soft round brush can be employed to mask out the image's original ground.
The sky is then placed as a new layer below the water surface layer. When selecting a sky image, it's important to consider the mood and color palette of the water to ensure a cohesive feel. The focus should be on lighting and general shapes rather than the specific content of the sky image.
To unify the scene, lighting effects are added to both the water and the sky. Using a pale golden orange color (#ffe6bb) for the brush, a New Layer set to Overlay is placed above the base color fill. Two additional New Layers are clipped to the water surface, one set to Screen and the other to Overlay, to enhance highlights and reflections. These layers are sized to cover the desired area.
When incorporating a subject into the water scene, layer masks are essential to create a clean split at the waterline. The layers and effects from the bottom portion of the water can be copied and applied to the bottom half of the subject, ensuring a seamless integration.
Simulating Splashes and Droplets
Creating splash water effects in Photoshop often involves importing a group of water splashes, ideally as Smart Objects to maintain their resolution. By duplicating the water splash layer, deleting the Layer Mask, and then selecting and masking a new splash, users can isolate individual splash elements. This process, when applied to multiple splashes, ensures they remain copies of the original smart object and are never rasterized, allowing for resizing and reshaping without loss of quality.
These water splashes are then strategically placed around an object, paying close attention to the object's shape and the natural flow of the water.
For creating wet edges and highlights, a hard wet edge brush can be crafted using specific brush settings. Setting the foreground color to black and painting tiny lines of white reflections can simulate the wetness. The Eraser tool is then used to taper these highlights, ensuring they are not too harsh. Falling water splashes can be created using a similar method.
The key to realistic water, whether it's surfaces, splashes, or droplets, lies in the lighting and highlights. They should be bright but not so sharp that they appear artificial. It’s important to remember that water itself is clear; what we perceive as color and form are actually the reflections of light and surrounding elements.
Advanced Techniques: Displacement Maps and Text Effects
For more advanced users, the Displace filter offers a powerful way to simulate the fluidity of water. This involves creating a displacement map that uses image brightness to distort other layers, effectively mimicking the way water warps reflections and surfaces.
Crafting stunning water-text effects often requires a blend of different software. One comprehensive guide details a process starting with handwriting text in Illustrator, transforming it into a three-dimensional model in Cinema 4D, and then bringing it into Photoshop for further refinement and integration into a water-themed design.
Creating Custom Brushes from Watercolor Stains
A unique approach to generating water effects involves converting real-world watercolor stains into custom Photoshop brushes. The first step is to digitize these stains by scanning them at a very high resolution (greater than 700 dpi) to preserve detail. A base document in Photoshop should be created at the maximum resolution supported for brushes (2500x2500 px).
Using the Lasso tool, select the desired watercolor stain. Copy the selected stain to the base document. To prepare the stain for brush creation, clean it by using the Levels option in Layer Settings. Adjust the black and white levels to blur the edges, and use the Eraser tool to refine the shape. Once satisfied, go to Edit > Define Brush Preset to create the custom brush.
Fruit Water Splash Effect in Photoshop | Photoshop Tutorial
Tutorials for Specific Water Scenarios
Beyond general techniques, numerous tutorials address specific water-related scenarios, catering to a wide range of creative needs.
For creating a lifelike rain effect, a detailed tutorial guides users through the process, offering step-by-step instructions. Another tutorial explores an alternative approach to crafting realistic rain, providing an easy-to-follow method.
To immerse viewers in aquatic environments, a guide on creating a mesmerizing underwater landscape in Photoshop CS5 allows users to build serene deep-sea scenes by layering colors, effects, and custom shapes.
Mastering the creation of a silky smooth waterfall effect is achievable through a dedicated tutorial.
For those looking to add realistic water drops to their images, a Photoshop tutorial walks through each step, from image selection to using the Elliptical Marquee and Gradient tools. A video tutorial by Marty further demonstrates the process of shaping drops, adding shadows and highlights for dimension, and adjusting their size and form.
Specialized Photoshop Actions and Filters
Photoshop actions and filters offer quick and effective ways to achieve specific water effects.
A water Photoshop action can be the answer for those needing to create a water effect ultra-fast.
For text-based water effects, a Water Ripples text add-on ensures that no watery details are lost.
Dreamy underwater scenes can be created with a dedicated underwater Photoshop action, compatible with Photoshop CS3 or higher.
Advanced Applications and Related Techniques
While focusing on water effects, it's also beneficial to be aware of related Photoshop functionalities that can enhance or complement these techniques. For instance, understanding how to use experimental Multi Image Content-Aware Fill can be crucial for seamlessly removing unwanted elements from photos, which can be important when compositing water elements. Similarly, knowing how to find and utilize missing tools in Camera Raw can provide greater control over image adjustments, which is vital for fine-tuning the lighting and color of water effects.
The process of creating water effects in Photoshop is multifaceted, encompassing a wide range of techniques from subtle ripples to dramatic splashes. By leveraging advanced tutorials, specialized brushes, and a deep understanding of Photoshop's tools, designers can bring the captivating beauty of water to life in their digital creations. Whether aiming for photorealism or stylized interpretations, the resources and methods discussed here provide a solid foundation for mastering water effects.