For students and educators in higher education, the world of 3D artistry has become significantly more accessible. Adobe Substance 3D Collection apps, including the powerful Substance Painter, are now available for free to qualifying individuals. This guide aims to demystify the process of obtaining and utilizing these tools, with a particular focus on Substance Painter, a cornerstone application for anyone looking to elevate their 3D creations through professional texturing.
Accessing Your Free Substance 3D Collection License
The first crucial step for students and teachers in higher education is to secure their free license. This process begins with creating or utilizing an existing Adobe Account. This account serves as the gateway to your redemption code, which is essential for accessing the Substance 3D applications.
Step 1: Create Your Adobe Account
If you don't already have an Adobe Account, you'll need to create one. This is a straightforward process that involves providing basic personal information. Once your account is established, you can proceed to the next step. For those who already possess an Adobe Account, you can simply log in and move forward.
Step 2: Obtain and Redeem Your Code
After creating or logging into your Adobe Account, you will be guided through the process of obtaining your redemption code. This code is unique to your educational status and grants you access to the Substance 3D applications. Once you have your redemption code, the next phase involves downloading and installing the software.
Step 3: Install Substance 3D Apps
With your redemption code in hand, you can now download and install the Substance 3D applications. The entire Substance 3D Collection, encompassing powerful tools like Substance 3D Designer, Substance 3D Modeler, Substance 3D Painter, Substance 3D Sampler, and Substance 3D Stager, will become available to you.
Understanding the Substance 3D Student and Teacher License
It's important to understand the specifics of this educational license to maximize its benefits and adhere to its terms.
Eligibility and Duration
The free Substance 3D for Students and Teachers license is exclusively intended for students and teachers enrolled in higher education institutions. This means that individuals in high school are not eligible for this particular license. The license is valid for a period of 12 months. Crucially, if you remain eligible at the end of this 12-month period, you can renew your license by following the same redemption process. It is vital to note that each account should only redeem one code per 12-month period. Adobe reserves the right to modify or cancel subscriptions that do not comply with this requirement.
Included Applications and Services
The free Substance 3D Students and Teachers license provides access to the following core applications:
- Substance 3D Designer: A powerful node-based texturing tool for creating procedural materials.
- Substance 3D Modeler: A versatile application for creating 3D models using a VR-first or traditional desktop workflow.
- Substance 3D Painter: The industry-standard software for texture painting on 3D models.
- Substance 3D Sampler: An application that transforms real-world images into PBR materials.
- Substance 3D Stager: A staging application for composing, lighting, and rendering 3D scenes.
While the license grants access to these essential applications, it does not include the monthly download credits for the Substance 3D Assets subscription service. However, your Adobe Account still provides access to the vast and free Substance 3D Community Assets.
Activation and Usage
The activation of your free Substance 3D for Students and Teachers license is managed through the Creative Cloud Desktop application. Once activated, you can install and use the software on both Windows and Mac operating systems.
Commercial Use and Portfolio Display
A key point to remember is that these educational licenses are strictly for personal and educational purposes. Assets and content created using a free Substance 3D for Students and Teachers license cannot be sold or utilized for commercial work. However, you are permitted to display work created as a student or teacher with this license in your professional portfolio. This allows you to showcase your skills and projects effectively to potential employers or collaborators.
Embarking on Your Texturing Journey with Substance Painter
For aspiring 3D artists, particularly those interested in character modeling or any form of 3D asset creation, mastering texturing is a critical skill. Substance Painter stands out as a premier tool for this purpose, enabling you to bring your 3D models to life with realistic and imaginative surface details. Even if you're new to texturing, this guide will lay the groundwork for your exploration of Substance Painter.
What is Substance Painter?
Substance Painter is a sophisticated 3D texturing software that empowers digital artists and game developers to enhance their 3D creations. It facilitates the rapid generation and editing of high-quality textures and materials for 3D models. Its user-friendly interface makes it accessible even to individuals without prior experience in 3D texturing, making it an ideal starting point for beginners.
Getting Started: Preparing Your System
Before diving into Substance Painter, it's essential to ensure your system meets the software's requirements. Substance Painter is available for Windows, Mac, and Linux operating systems. It requires a minimum of 8GB of RAM and a graphics card with DirectX 11 capability. Meeting these specifications will ensure a smooth and efficient texturing workflow.
Importing Your 3D Model
The first step within Substance Painter is to import your 3D model. The software supports a variety of common file formats, including OBJ, FBX, and COLLADA. You can typically import your model by dragging and dropping the file directly onto the Substance Painter interface.
Navigating the Substance Painter Interface
The Substance Painter interface, while potentially appearing complex at first glance, is designed to be intuitive. A solid understanding of its basic layout will significantly ease your learning curve.
- Menu Bar: Located at the top of the screen, this bar contains essential options for opening and saving projects, as well as accessing various tools and application settings.
- Viewport: Positioned below the menu bar, the viewport is where your 3D model is displayed. It allows for interactive manipulation, including rotation and zooming, enabling you to inspect your model from all angles.
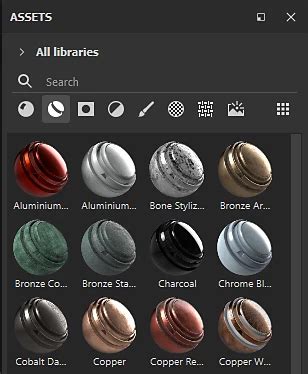
- Shelf: Situated to the left of the viewport, the shelf is your central hub for all assets. Here you will find a wide array of materials, brushes, alphas, and other elements that you can apply to your model's textures.
- Layers Panel: Found on the right side of the interface, the layers panel is where you will manage your texture work. It allows you to create, organize, and blend different layers of textures and materials, akin to image editing software like Photoshop.
The Art of Texturing Your Model
Once your model is imported and you've familiarized yourself with the interface, the creative process of texturing can begin.
Creating Layers
The foundation of texturing in Substance Painter lies in its layer system. To start, create a new layer by clicking the "Add Fill Layer" button within the layers panel. Fill layers are versatile and can be used to apply base colors, materials, or masks.
Applying Materials
With a new layer created, you'll want to select a material to apply. Substance Painter comes equipped with a comprehensive library of built-in materials. You can also import your own custom materials. To apply a material, simply click on its icon in the shelf and drag it onto your newly created layer in the layers panel.
Painting and Detailing
Substance Painter offers a diverse range of brushes and tools to sculpt intricate textures and effects. You can access these tools by navigating to the "Brushes" tab within the shelf. Experimenting with different brush settings, such as size, flow, and hardness, is key to achieving desired results.
Leveraging Smart Materials
A particularly powerful feature in Substance Painter is the "smart material" functionality. Smart materials are pre-designed, complex material setups that can be applied to your model with a single click. They often include intricate layering, masks, and procedural effects, offering a significant shortcut to professional-looking results. To explore these, click on the "Smart Materials" tab in the shelf.

Building Complexity with Layer Stacking
The true power of Substance Painter emerges when you begin to stack multiple layers. Each layer can be blended with the layers beneath it using various blending modes. These modes, adjusted within the layers panel, allow for sophisticated interactions between different textures and materials, enabling you to build up intricate surface details like wear, dirt, grime, and subtle color variations.
Exporting Your Textures
Upon completing your texturing work, the next logical step is to export your generated textures. Substance Painter supports a wide array of export formats, including PNG, TGA, and JPEG, catering to various workflows and game engines. To initiate the export process, click the "Export Textures" button, typically found in the menu bar.
Within the export window, you have granular control over which textures you wish to export, along with their desired format and resolution. Substance Painter also provides numerous pre-set configurations optimized for popular game engines and software such as Unity and Unreal Engine, streamlining the integration of your textured models into these platforms.
Expanding Your Skills and Resources
Substance Painter is a tool that rewards continuous learning and exploration. While this guide provides a foundational understanding, the software's capabilities extend far beyond these introductory concepts.
Community and Learning Resources
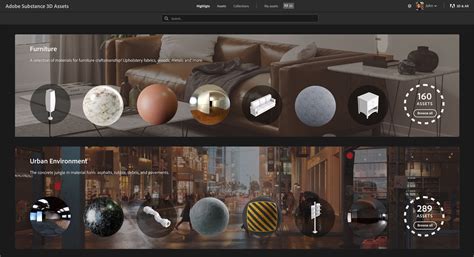
Adobe actively fosters a vibrant community around its Substance 3D applications. The Substance 3D Community Assets offer a treasure trove of materials, models, and generators created by users worldwide, providing endless inspiration and practical content to enhance your projects. You can browse these assets for free and integrate them into your workflow.
Furthermore, Adobe provides a wealth of Substance 3D Tutorials designed to help you master the various applications. These courses and tutorials cover everything from fundamental techniques to advanced workflows, offering insights into Modeler, Stager, Painter, Designer, and Sampler. Engaging with these resources is an excellent way to deepen your understanding and refine your skills.
The Substance 3D Community itself is a dynamic space for inspiration. By exploring artworks shared by users across diverse industries â including video games, VFX, fashion, product design, automotive, and architecture â you can gain insights into current trends and discover innovative approaches to 3D texturing.
Further Education and Professional Development
For those seeking a more structured learning path, enrolling in dedicated online courses can be highly beneficial. Courses focused on "Texturing with Substance Painter" are widely available and can provide a comprehensive professional experience, guiding you through best practices and advanced techniques.
Addressing Common Questions
Substance Painter vs. ZBrush vs. 3D-Coat: While ZBrush and 3D-Coat are exceptional for 3D modeling and sculpting, Substance Painter is unparalleled for texturing. If your primary focus is on creating detailed models, ZBrush or 3D-Coat might be your starting point. However, for bringing those models to life with rich surface detail, Substance Painter is the industry standard. 3D-Coat Textura offers a specialized texturing environment within the 3D-Coat suite.
UV Mapping in Substance Painter: UV mapping is a fundamental requirement for applying textures accurately to 3D models in Substance Painter. UV mapping essentially creates a 2D representation of your model's 3D surface, allowing textures to be applied without distortion. While Substance Painter offers tools to assist with UV unwrapping, having a well-unwrapped model from your modeling software is generally recommended for optimal results. Projection painting is a feature within Substance Painter that can sometimes alleviate the need for extensive manual UV manipulation for certain effects.
Leather Smart Materials: The availability of specialized smart materials, such as those for leather, suede, and nubuck, significantly enhances the realism and efficiency of texturing. These pre-made materials, often including dozens of variations, allow for highly detailed and accurate surface representations with just a few clicks.
Learning Resources: Beyond Adobe's official tutorials, numerous third-party resources, including texture packs and custom brush sets, can further enhance your workflow and artistic output. Online certificate courses, such as those offered by platforms focusing on 3D art, can provide structured learning and professional guidance.
The Necessity of Texture Art for 3D Modelers: While not strictly mandatory for all 3D modelers to become texture artists themselves, understanding texture art is immensely beneficial. It deepens a modeler's appreciation for how textures define the visual appeal of a model and can lead to better collaboration with dedicated texture artists. By understanding the language and techniques of texture art, 3D modelers can communicate more effectively with texture artists, leading to a more cohesive and visually striking final product. Learning texture art empowers 3D modelers to better visualize and conceptualize the final look of their creations.