In the dynamic world of motion design, the pursuit of photorealistic and engaging 3D assets is a continuous journey. While many motion designers are adept with the primary tools of their chosen software, such as Cinema 4D (C4D), a powerful and transformative application often remains unexplored: Substance Painter. This tutorial aims to demystify Substance Painter, demonstrating how it can significantly enhance your 3D material workflow, allowing for the creation of highly detailed and lifelike textures that elevate your renders. We will guide you through the process from preparing your model in C4D to exporting your finished, textured asset back into your 3D environment.
What is Substance Painter?
At its core, Substance Painter can be conceptualized as a "Photoshop for 3D models." It provides an intuitive environment where you can directly paint onto your 3D assets, much like you would on a 2D canvas. This hands-on approach is complemented by a suite of powerful procedural tools, enabling the creation of sophisticated effects such as realistic edge wear, grime, and other forms of surface degradation.
A common challenge faced across various render engines is the disparate methods required to achieve similar material effects. Substance Painter addresses this by acting as a universal material editor. It allows you to author complex materials and effects that will render identically across different render engines, including Octane, Standard Render, Redshift, and even game engines like Unreal Engine. This versatility means an incredible material created for one application can be seamlessly transferred to another, saving significant time and effort.
Substance Painter automates the often tedious and technical process of converting textures for different software packages, liberating you to concentrate on the creative aspects of your work. This allows for an unprecedented level of artistic freedom and efficiency in your 3D material workflow.
It is important to note that Substance Painter, like most 3D texturing applications, requires your models to be UV unwrapped. UV unwrapping is the process of flattening a 3D model's surface into a 2D representation, which then serves as a map for applying textures. If you are unfamiliar with this crucial step, numerous tutorials exist to guide you through the process. For the purpose of this tutorial, we have provided a pre-UV unwrapped 3D model, allowing you to focus directly on the Substance Painter workflow.
Every UV Unwrapping Concept Explained, in 3D
Preparing Your Model in Cinema 4D
Before diving into Substance Painter, the initial preparation of your model within Cinema 4D is a critical step that can streamline the entire texturing process. The key here is to leverage vertex colors to define different material zones or properties on your model. This technique significantly reduces the need for complex material setups within Substance Painter and ensures a more organized workflow.
Begin by creating a new material for your object. For this tutorial, we'll be using an object named "SOM Pyramids." Applying a single material to the entire object at this stage is a time-saving strategy. Once the material is assigned, select your object and enter Polygon mode.
Utilize the "Fill Selection Tool" (often accessed via a shortcut like U+F) to select individual components of your model. For instance, you can select each pyramid. After selecting a pyramid, hold down the Shift key and switch to "Points" mode. This action allows you to assign a vertex color to the selected geometry. To do this efficiently, bring up the Commander (Shift+C) and type "Vertex." This command will apply a default color, typically black, to the selected points.
The next step involves defining specific colors for different parts of your model that you intend to texture uniquely. You can use the "Color Picker" to sample colors from a reference image or define your own color scheme. For this tutorial, we'll sample colors from the "School of Motion Logo" to ensure color accuracy. Select a pyramid, use the eyedropper tool to sample the desired color, and then apply it. Repeat this process for all pyramids, assigning distinct colors to each if you wish to have separate material assignments later. This process of assigning vertex colors is fundamental to how Substance Painter will interpret your model's different regions for texturing.
Exporting Your Model from Cinema 4D
Once your model is prepared with vertex colors in Cinema 4D, the next crucial step is to export it in a format that Substance Painter can readily import and interpret. The FBX file format is the industry standard for this purpose, as it preserves essential data like UV coordinates and vertex colors.
Ensure that your model has a UV tag applied. This tag contains all the necessary UV mapping information that Substance Painter will use to apply textures correctly. Navigate to File > Export > FBX. In the FBX export window, it is imperative to select the "Vertex Colors" option. This ensures that the color information you meticulously assigned in Cinema 4D is carried over into Substance Painter.
After configuring the export settings, click "OK," choose a location to save your FBX file, and then you are ready to proceed to Substance Painter.
Importing and Baking Meshes in Substance Painter
With your FBX file exported, you can now import it into Substance Painter. Open Substance Painter and select "File > New." Drag your exported FBX file into the project window. Crucially, ensure that "Auto-Unwrap" is deactivated, as you have already UV unwrapped your model in Cinema 4D. Set the "Template" to "Metallic Roughness," which is a widely compatible and effective shader model for PBR (Physically Based Rendering) workflows. Click "OK."
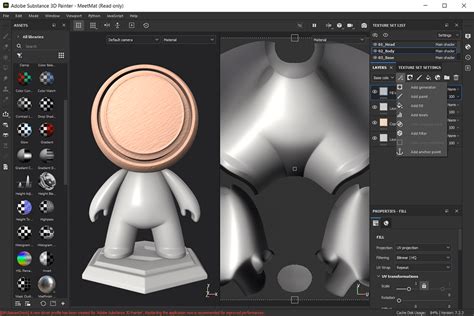
You will now see your model loaded within the Substance Painter viewport, along with its corresponding UV map. To verify that the import was successful, you can try drawing directly on the model. The markings should be reflected accurately on the UV map, confirming that the UV coordinates are correctly interpreted.
Before you can begin texturing, the process of "baking mesh maps" is essential. This process generates a suite of texture maps that provide crucial information about the model's surface geometry, such as ambient occlusion, normals, and curvature. These maps are vital for procedural texturing techniques and for achieving realistic wear and tear effects.
Navigate to the "Texture Set Settings" panel, usually found on the right-hand side of the interface. Scroll down to find the "Bake Mesh Maps" option and click it. A small window will appear. Typically, this is where you would import a high-polygon mesh (e.g., from ZBrush) to bake its details onto a lower-polygon model. However, for this tutorial, we will be utilizing the vertex colors.
In the "Bake Mesh Maps" window, locate the "ID" section and change the color source to "Vertex Color." This tells Substance Painter to use the colors you painted in Cinema 4D to define different material IDs on your model. Under the "Common" tab, you can adjust the "Output Size" for your baked maps. For this tutorial, we'll set it to 2K (2048x2048 pixels). Finally, click "Bake Selected Textures."
These baked maps, such as Normal, Ambient Occlusion, and Curvature, are essentially utility passes that provide Surface data. They are indispensable for generators and masks, enabling effects like edge wear and subtle surface imperfections that mimic real-world materials.
Utilizing Masks and Generators for Realistic Textures
With the mesh maps baked, you can now leverage the power of masks and generators to create sophisticated and realistic material details. In the "Project" tab of your textures, you will find the UV map that you colored in Cinema 4D has been imported as an "ID Map." If you drag these colors into the "Fill" option of a layer, Substance Painter will use these IDs to mask that layer's effect.
Let's begin by exploring the "Shelf," where you can find a wide array of pre-made materials. We will use two materials to demonstrate how to blend them. For the "SOM Logo," we envision a base material of plastic with a metallic surface on top.
Drag a plastic material onto your object. You might notice that it overrides the vertex colors you applied. To prevent this, deselect the "Color" channel on that layer. This ensures that the layer affects the material properties (like roughness and metallic values) but respects the underlying color information from your C4D setup. The object will now retain its color scheme while adopting the properties of the plastic material.
Next, drag an aluminum material onto another layer. This adds a metallic sheen and texture, giving the object more visual interest.
Now, the goal is to isolate the metallic effect to the edges of the object, as a uniform metallic look might not be realistic. To achieve this, we'll create a "Black Mask." Right-click on the aluminum layer and select "Add Black Mask." A black mask completely hides the layer's effects. You can then "paint away" the black areas to reveal the aluminum material, similar to how you would use masks in Photoshop.
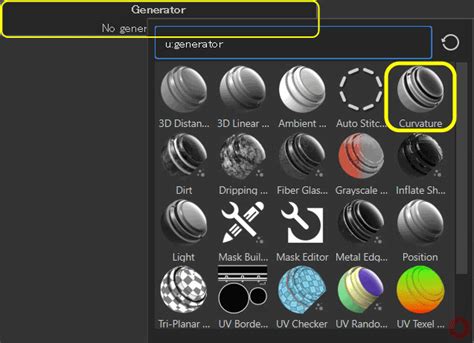
With the black mask selected, click the "Wand" icon within the mask's properties and choose "Add Generator." This opens up a selection of procedural generators. Select a generator called "Metal Edge Wear."
Instantly, you will see the aluminum material appear on the edges of your object, creating a convincing "worn metal" effect. This is where the baked mesh maps become indispensable. Generators like "Metal Edge Wear" rely on the data from these maps (such as curvature and ambient occlusion) to procedurally generate these effects. Without the baked maps, these generators would not be able to produce such clean and impressive results.
You can now fine-tune the parameters of the generator to achieve your desired look, adjusting the intensity, grunge, and other properties to perfection. This iterative process of layering, masking, and applying generators allows for the creation of incredibly complex and realistic materials.
Exporting Textures Back to Cinema 4D
Once you are satisfied with the texturing of your model in Substance Painter, it's time to export the generated textures back into Cinema 4D. Navigate to File > Export Textures. This action will display all the texture maps that Substance Painter has created, including Base Color, Normal, Metallic, Roughness, and Height. While you may not need all of these for your specific render engine, it's generally safe to export them all.
Select your desired file destination for the exported textures. Set the "Texture" preset to "Metallic Roughness," as this is a highly compatible format that works well with C4D's material system. If you are using renderers like Redshift or Octane, they often have their own optimized presets, but "Metallic Roughness" serves as a robust default. For standard C4D materials, the default preset is usually sufficient. Click "Export."
Building Shaders in Cinema 4D
With your textures exported, you can now import them back into Cinema 4D and set up your shader to utilize these detailed materials. Open Cinema 4D and select the material you initially created at the beginning of this workflow.
In the material's Basic tab, you'll find options for creating shaders. While it's possible to achieve many effects within the Reflectance channel, we will focus on the Color channel for this demonstration. Activate the "Normal" channel, as we will need this for our Bump Map, and also enable "Displacement."
Under the "Color" channel, within the "Texture" section, drag and drop the "Base Color" texture map that you exported from Substance Painter. You should immediately see the colors you defined in C4D reappear on your model.
Now, navigate to the "Reflectance" channel. Remove the default specular layer and add a new layer, selecting the "GGX" type, which provides a physically plausible specular reflection.
Scroll down to the "Roughness" channel. Under its "Textures" section, drag and drop the "Roughness Map" exported from Substance Painter. This map dictates how sharp or blurred the reflections will be.
For the "Reflection Strength," drag and drop the "Metallic Map" into the appropriate slot. This map will define which parts of the material are metallic and which are not.
At this point, your material is looking significantly more interesting. However, if you were to render now, you would primarily see the reflections and rough spots. To integrate the color information fully, go back to the "Color" channel, and drag the "Base Color" texture into the "Texture" slot under "Layer Color."
Next, move to the "Normal" tab. Drag and drop your exported "Normal Map" into the designated slot. This map will add fine surface detail and bumps without altering the actual geometry.
Finally, address the "Displacement" channel. Add your exported "Height Map" here. This map will add actual geometric displacement to your model, creating real depth and relief. It is crucial to set the "Height" value conservatively at first, as excessively high values can lead to distorted geometry. Ensure that "Sub Polygon Displacement" is activated. This feature subdivides your model during rendering, providing more polygons for the displacement information to affect, resulting in a smoother and more accurate displacement effect.
With your model added to an environment, some basic lighting set up, and rendering initiated, you will observe how remarkably well your Substance Painter textures have transferred over. The details, the wear, and the material properties will be faithfully represented, breathing life into your 3D asset.
This comprehensive workflow, from C4D preparation to Substance Painter texturing and back into C4D for shader construction, empowers motion designers to create professional-grade, highly detailed 3D assets. By embracing the capabilities of Substance Painter, you can significantly elevate the visual fidelity and artistic impact of your projects.