Photoshop's Magic Wand Tool is a fundamental selection utility that, despite its seemingly simple name, offers a powerful and versatile approach to isolating specific areas within an image. You've undoubtedly heard of it, and depending on your daily engagement with Photoshop, you may have even utilized its capabilities. This tutorial delves into what the Magic Wand Tool is, how to effectively select and mask with it, and ultimately transform you into a proficient user in a remarkably short time.
Understanding the Magic Wand Tool: What It Is and How It Works
The Magic Wand Tool operates on the principle of color and tonal similarity. When you click on a pixel within an image, the tool identifies and selects that pixel along with adjacent pixels that share a similar color and tone. This inherent ability to group similar pixels makes it an exceptionally quick and straightforward method for selecting and masking specific portions of an image. The primary advantage of this selective capability is the power it grants you to alter one part of your image while leaving other areas completely untouched.
One of the most prevalent applications of the Magic Wand Tool is in the realm of product photography. It excels at swapping out or entirely removing the background of a product image, thereby isolating the subject and allowing it to stand out. This is particularly crucial for e-commerce platforms like Amazon or eBay, which often impose stringent product photo requirements, including specific guidelines for approved backgrounds. By using the Magic Wand Tool, you can efficiently prepare your product images to meet these marketplace standards, displaying your products in various settings or ensuring they possess a clean, uncluttered presentation.
The Magic Wand Tool is also a go-to utility when you wish to display a product in diverse environments by showcasing it against different backgrounds, or when the objective is to remove a background altogether so that your product commands attention on its own.
Key Options and Parameters of the Magic Wand Tool
When the Magic Wand Tool is active, a set of options becomes available in the Options Bar at the top of the Photoshop interface. Understanding these parameters is key to harnessing the tool's full potential.
Tolerance: This is arguably the most critical setting. Tolerance dictates the range of color and tonal similarity that the Magic Wand will consider when making a selection. A lower tolerance value means the tool will select only pixels that are very close in color to the pixel you clicked. Conversely, a higher tolerance value allows the tool to encompass a wider range of colors and tones that are similar to the initial click point. You can think of tolerance as the allowed color difference. For instance, if you have an image with subtle variations in a particular color, a higher tolerance might be necessary to capture all those nuances. However, setting the tolerance too high can lead to unintended selections of adjacent, dissimilar areas. The tolerance can be set to a value from 0 to 255. A tolerance of 0 will select only pixels that are identical in color to the clicked pixel, while a tolerance of 255 will, in most cases, select the entire image if it's on a single layer. Experimenting with this value is crucial for achieving optimal results.
Contiguous: This option determines whether the Magic Wand selects only pixels that are touching (contiguous) the initially clicked pixel, or if it selects all pixels of similar color throughout the entire layer. When "Contiguous" is checked, the tool adheres to the boundaries of adjacent similar pixels. If unchecked, it will select all pixels of similar color across the entire active layer, regardless of their spatial relationship to the clicked pixel. This is particularly useful when dealing with elements that are the same color but are separated by other colors, such as selecting multiple objects of the same hue scattered across an image.
Anti-aliasing: This setting helps to smooth out the edges of your selection. When anti-aliasing is enabled, Photoshop applies a subtle blurring effect to the selection boundary, creating a softer transition between selected and unselected pixels. This prevents the jagged, stair-step appearance that can sometimes result from pixel-based selections, leading to more natural-looking results, especially when dealing with curved or diagonal lines.
Sample All Layers: By default, the Magic Wand Tool operates on the currently active layer. However, if this option is checked, the tool will sample color and tonal information from all visible layers when making a selection. This can be beneficial when you want to make a selection based on elements spread across multiple layers, but it's important to be aware of its behavior to avoid unexpected outcomes. Generally, for precise selections on a single element, it's advisable to keep this unchecked unless specifically needed.
Adding to and Subtracting from Selections
Like other selection tools in Photoshop, the Magic Wand Tool offers the functionality to modify existing selections.
Add to Selection: To add more areas to your current selection, you can hold down the SHIFT key while using the Magic Wand Tool. Clicking on new areas will append them to the active selection. This is invaluable when an initial click doesn't capture the entire desired area, allowing you to incrementally build your selection.
Subtract from Selection: To remove areas from your current selection, hold down the ALT (or Option on Mac) key. Clicking on areas you wish to deselect will subtract them from the active selection. This is useful for refining your selection by removing unwanted portions that might have been inadvertently included.
Intersect with Selection: While less commonly used with the Magic Wand, this function (typically accessed with Shift + Alt + Ctrl on Windows or Shift + Option + Command on Mac) would retain only the area that overlaps with both the existing selection and the new click.
Step-by-Step Tutorial: Removing a Background with the Magic Wand Tool
This tutorial will guide you through the process of removing the background from an image using the Magic Wand Tool, using a photo of a soccer player as our example. The goal is to isolate the player so they can be placed into different scenes.
Step 1: Prepare Your Layers
Before you can effectively use the Magic Wand Tool, ensuring your layers are correctly set up is essential.
- Locate the Layers Panel: By default, this panel is situated in the lower right-hand corner of Photoshop's application window. If you cannot find it, navigate to the top menu bar and select "Window" > "Layers."
- Unlock the Background Layer: In the Layers panel, you will likely see a layer named "Background," often depicted with a lock icon. Double-click on this layer. A pop-up window titled "New Layer" will appear, prompting you to rename the layer. You can accept the default name "Layer 0" or provide a custom name. Click "OK." This action unlocks the layer, making it editable.
Step 2: Select the Magic Wand Tool and Initial Background Selection
Now, it's time to activate the Magic Wand Tool and begin the selection process.
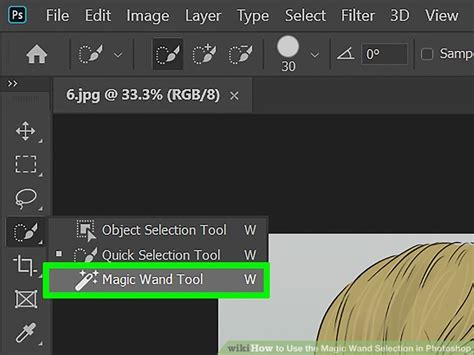
- Find the Magic Wand Tool: Within the default Toolbar (usually on the left side of the application window), locate the Magic Wand Tool. It might be nested with other selection tools like the Object Selection Tool or Quick Selection Tool. To access hidden tools, click and hold the visible tool, and a fly-out menu will appear, allowing you to select the Magic Wand Tool.
- Set Tolerance: In the Options Bar at the top of the screen, you'll find the "Tolerance" setting. For this initial background selection, we'll start with a Tolerance of 10.
- Click on the Background: With the Magic Wand Tool selected, click on a portion of the background you wish to remove. The tool will then select the clicked pixel and all adjacent pixels of a similar color.
As you'll likely observe, the Magic Wand Tool might not select the entire background in one go, especially if there are subtle variations in color or if parts of the background are obscured by the subject. For instance, areas between the player's legs or under their arm might remain unselected.
- Add to the Selection: To include these missed areas, hold down the SHIFT key. Then, click on each of the unselected background portions. Holding SHIFT allows you to add to your existing selection without deselecting anything.
Step 3: Refining the Selection and Handling Complex Areas
Sometimes, the background isn't a perfectly solid color. In our example, the ground is composed of varying shades of green.
- Adjust Tolerance for Complex Areas: To select an area with a range of colors, like the grassy ground, you'll need to adjust the Tolerance to a higher value. For this example, let's set the Tolerance to 50. Click on the grassy area.
- Observe Results and Adjust: You'll notice that with a higher tolerance, more of the green ground is selected. However, setting the tolerance too high might cause the tool to accidentally select parts of the player's legs. This highlights the iterative nature of selection: you adjust parameters, observe the results, and refine as needed.
- Smooth the Selection: To soften any harsh edges that may have resulted from the selection process, go to "Select" > "Modify" > "Smoothâ¦" from the dropdown menu. In the dialog box that appears, set a "Sample Radius" (e.g., 5 pixels). This value should be large enough to smooth the edges but small enough to preserve the integrity of the outline. Click "OK."
Step 4: Invert the Selection and Create a Mask
At this point, you've likely selected the background. To isolate the subject, you need to invert the selection.
- Inverse Selection: Go to "Select" > "Inverse" from the dropdown menu, or use the keyboard shortcut SHIFT + CTRL + I (SHIFT + COMMAND + I on a Mac). Now, your subject (the soccer player) is selected, and the background is no longer selected.
- Contract Selection (Optional but Recommended): To ensure cleaner edges and to compensate for any subtle artifacts introduced during the smoothing process, it's often beneficial to slightly contract the selection. Go to "Select" > "Modify" > "Contractâ¦". Enter a small value, such as 1 or 2 pixels, and click "OK."
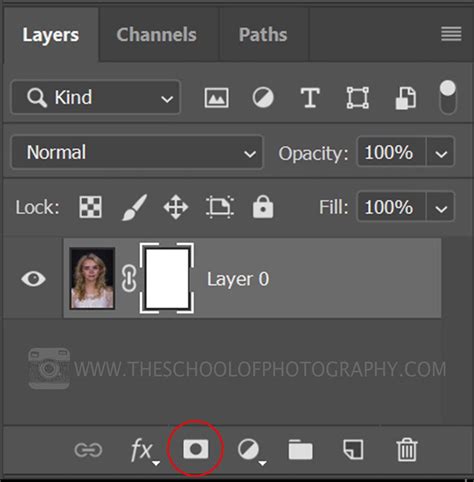
- Create a Layer Mask: With your subject now selected, return to the Layers panel. At the bottom of the panel, you'll find a row of icons. Click on the icon that looks like a black rectangle with a white circle inside â this is the "Add layer mask" icon. With "Layer 0" (your unlocked background layer) selected, clicking this icon will create a mask. Your subject will now appear isolated against a transparent background.
Step 5: Fine-Tuning the Mask with the Brush Tool
While Photoshop's tools are advanced, the human eye and hand often provide the final touch for perfect selections.
- Select the Mask: In the Layers panel, ensure that the mask thumbnail (the black and white thumbnail next to your layer thumbnail) is selected. You'll see a thin black outline around it, indicating it's active.
- Activate the Brush Tool: Select the Brush Tool from the Toolbar.
- Adjust Brush Settings: In the Options Bar, you can set the "Size" and "Hardness" of your brush. For detailed work, a smaller, harder brush might be appropriate, while for larger areas, a softer, larger brush can be more efficient.
- Painting with Black and White: When a layer mask is selected, your Foreground and Background colors in the Toolbar should be set to black and white.
- Painting with White: If white is your Foreground color, painting on the mask will "paint back" or reveal portions of your image that may have been masked out. This is useful for bringing back areas of your subject that were accidentally removed, such as parts of the player's sleeves.
- Painting with Black: If black is your Foreground color, painting on the mask will "paint over" or hide portions of your image, effectively masking them out. This is used to clean up any stray background elements that remain visible.
- Refine Edges: Switch between black and white paint colors as needed, adjusting your brush size and hardness to meticulously clean up any remaining imperfections around the edges of your subject. This step is crucial for achieving a professional-looking result.
Alternative Method: Using the "Select and Mask" Workspace
Photoshop also offers a dedicated workspace for refining selections, which can be a more intuitive approach for many users.
- Initiate "Select and Mask": With any selection tool active (including the Magic Wand), you can access this workspace by clicking "Select and Maskâ¦" in the Options Bar at the top of the screen.
- "Select Subject" Feature: Within the "Select and Mask" workspace, you'll find a "Select Subject" button at the top. Clicking this prompts Photoshop to automatically analyze your image and attempt to identify and select the primary subject. While often remarkably accurate, it may still require manual refinement.
- Refinement Tools: The left-hand side of the "Select and Mask" workspace presents a suite of tools for further refining your selection:
- Quick Selection Tool: Allows you to "paint" over areas to add them to the selection.
- Refine Edge Tool: Specifically designed to improve the selection around complex edges like hair or fur.
- Brush Tool: Functions similarly to the standard Brush Tool, allowing you to paint on the mask to add or subtract from the selection.
- Object Selection Tool: Attempts to intelligently detect distinct objects within your image.
- Lasso Tools: Provide freehand selection capabilities.
- Hand Tool and Zoom Tool: For navigating around your image.
- Adjust Properties: On the right-hand side of the workspace, you can fine-tune parameters like "Smooth," "Feather," "Contrast," and "Shift Edge" to further perfect your selection.
- Output Settings: Once you're satisfied with the selection, click "OK." You'll then proceed to create a layer mask as described in Step 4 of the previous method.
5 Pro Photoshop Masking Tricks You Don't Know (Probably)
Beyond Background Removal: Versatile Applications of the Magic Wand Tool
Learning to select and mask effectively in Photoshop with the Magic Wand Tool is a transferable skill applicable to a wide array of photographic genres, including sports, product shots, e-commerce imagery, portraits, and headshots. Here are a few scenarios where its utility shines:
Showcasing Subjects in Diverse Environments: By isolating your subject, you can seamlessly place them into various backgrounds. This allows you to connect with your audience emotionally by presenting your subject in aesthetically pleasing or relatable settings. It also enables you to tailor images for different target demographics by selecting backgrounds that resonate more strongly with specific audiences.
Independent Subject Adjustments: You can select your subject to modify its size or color without affecting the background it was originally photographed against. This is incredibly useful for product photography, allowing you to display different color variants of a product without the need to reshoot it multiple times.
Creating Standalone Subjects: Removing the background from a photo ensures your subject stands out prominently, drawing all attention to itself.
Generating White Background Images: For listing products on third-party marketplaces like Amazon or eBay, creating an image with a pure white background is often a requirement. The Magic Wand Tool, combined with careful masking, facilitates this process efficiently.
Color Adjustments and Enhancements: The Magic Wand Tool is excellent for selecting specific color ranges within an image. Once selected, you can apply adjustment layers (like Hue/Saturation) to alter the color of specific elements. For instance, you could change the color of a shoe or the hue of a product to create variations without needing multiple original photographs.
Considerations and Limitations
While the Magic Wand Tool is a powerful asset, it's important to acknowledge its limitations. It performs best on images with clear contrasts and distinct color differences between the subject and the background. Images with fine details like wispy hair, fur, or areas of low contrast might prove challenging for the Magic Wand to select accurately in a single pass. In such cases, it's often necessary to combine the Magic Wand with other selection tools (like the Quick Selection Tool or Lasso Tools) and extensive use of the "Select and Mask" workspace for optimal results.
For beginners, it's advisable to start with images that exhibit strong tonal and color separation. As your proficiency grows, you'll develop a better intuition for adjusting the Tolerance and Contiguous settings to tackle more complex scenarios.
Conclusion: Empowering Your Photoshop Workflow
The Magic Wand Tool, when understood and applied correctly, is an indispensable utility in the Photoshop arsenal. It streamlines the process of selection and masking, saving valuable time and enabling creative flexibility. Whether you're a professional designer, a product photographer, or a hobbyist looking to enhance your images, mastering the Magic Wand Tool will undoubtedly elevate your Photoshop workflow and unlock new creative possibilities. Remember to practice, experiment with the settings, and combine it with other tools to achieve the most polished and professional results.
For those seeking to delve deeper into advanced Photoshop techniques, exploring courses on selection, masking, and compositing can further enhance your skills. The journey of learning Photoshop is continuous, and tools like the Magic Wand are foundational stepping stones to greater creative mastery.