The checkerboard pattern, a timeless design element, finds its way into a myriad of creative applications, from digital art and graphic design to textile prints and even architectural motifs. Its simple yet striking visual appeal makes it a versatile tool for designers. Adobe Photoshop, a powerhouse for image manipulation, offers several intuitive methods for creating this iconic pattern. This guide will walk you through various techniques, ranging from fundamental step-by-step instructions to more advanced approaches, ensuring you can generate a seamless checkerboard pattern tailored to your specific needs.
Setting Up Your Checker Pattern Canvas
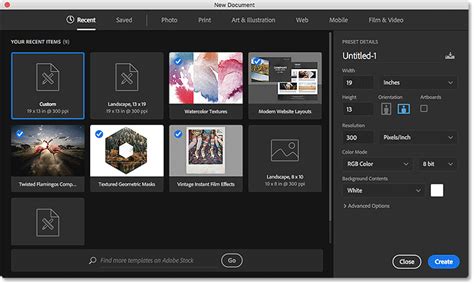
To begin crafting your checkerboard pattern in Photoshop, the first step is to establish a new document with appropriate dimensions and settings. Open Photoshop and navigate to "File" > "New" or use the keyboard shortcut "Ctrl+N" (Windows) or "Cmd+N" (Mac). For this tutorial, we will utilize dimensions of 400 x 400 pixels. It is recommended to set the resolution to 300 DPI for print-quality output, maintain the RGB color mode for digital use, and ensure the background is set to "Transparent." A transparent background is crucial for defining patterns that can be seamlessly applied over other elements without introducing unwanted solid color backgrounds.
Method 1: The Rectangular Marquee Tool Approach
This method focuses on building the checkerboard pattern from individual squares, offering a clear understanding of the underlying structure.
Creating the Initial Square
The foundation of our checkerboard is a simple square. We will use the "Rectangular Marquee Tool" for this purpose. Select the "Rectangular Marquee Tool" from the toolbar, or press "M" on your keyboard. In the top menu bar, under the "Style" option, select "Fixed Size." For our initial square, enter dimensions of 200 pixels for both width and height.
Click anywhere on your transparent canvas. This action will create a selection exactly 200x200 pixels in size. Now, we need to fill this selection with a color. The default foreground color in Photoshop is typically black, and the background color is white. If your colors are not set to these defaults, press "D" on your keyboard to revert them. To fill the selected area with the foreground color (black), press "Alt+Backspace" (Windows) or "Opt+Delete" (Mac). After filling, deselect the area by pressing "Ctrl+D" (Windows) or "Cmd+D" (Mac).
Positioning and Duplicating Squares
With our first black square created, we need to position it precisely. Select the "Move Tool" (V) from the toolbar. Drag the black square to the upper-left corner of your canvas. For more accurate alignment, you can select the black square layer, then press "Ctrl+A" (Windows) or "Cmd+A" (Mac) to select all. With the "Move Tool" still active, look at the top options bar. You will find "Align" tools. Click on "Align Top Edges" and then "Align Left Edges" to perfectly position the square in the top-left corner.
Next, duplicate this black square layer. Right-click on the layer in the "Layers" panel and select "Duplicate Layer," or use the keyboard shortcut "Ctrl+J" (Windows) or "Cmd+J" (Mac). With the newly duplicated square still selected (all pixels are selected if you just duplicated), and with the "Move Tool" active, use the "Align" tools again. This time, click on "Align Bottom Edges" and "Align Right Edges." This action will precisely position the second black square in the bottom-right corner of the canvas.
Now that both black squares are correctly positioned, deselect the area by pressing "Ctrl+D" (Windows) or "Cmd+D" (Mac). You should now have two black squares, one in the top-left and one in the bottom-right of your 400x400 pixel canvas.
Creating the Checkerboard Effect
To complete the checkerboard, we need to introduce the white squares. Select the top-left black square layer. Use the "Rectangular Marquee Tool" again, this time setting the "Fixed Size" to 200x200 pixels. Click on the canvas to create the selection. Now, change your foreground color to white (press "X" to swap foreground and background if black is foreground, then "Alt+Backspace" or "Opt+Delete" to fill). Press "Ctrl+D" (Windows) or "Cmd+D" (Mac) to deselect. You should now have a white square in the top-left.
Repeat this process for the bottom-right quadrant. Select the bottom-right black square layer. Create a 200x200 pixel selection using the "Rectangular Marquee Tool." Ensure your foreground color is set to white and fill the selection. Deselect.
At this stage, you should have a perfect 2x2 checkerboard pattern on your 400x400 pixel canvas, with alternating black and white squares.
Method 2: Utilizing Grids and Transformations
This approach leverages Photoshop's grid system and transformation tools for a more dynamic pattern creation process.
Enabling and Configuring the Grid
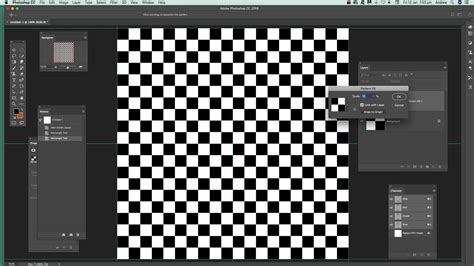
For this method, it's beneficial to have a visible grid to guide your selections and placements. Go to "View" > "Show" > "Grid." If the grid spacing isn't to your liking, you can adjust it. However, a more direct way to control grid-like spacing, especially when dealing with pattern creation, is by manipulating the document's DPI. Open the "Image Size" panel ("Image" > "Image Size"). Turn off "Resample" and change the "Resolution" (DPI). Increasing the DPI effectively makes the grid squares smaller on your canvas without altering the pixel dimensions.
Creating and Arranging Rectangles
With your grid set up, use the "Rectangular Marquee Tool" to make selections that snap to the grid lines. Create a black square by filling a selected area with black. Copy this layer ("Ctrl+J" or "Cmd+J"). Use the "Move Tool" (V) to shift this copied layer to the next adjacent grid position. If you are working with a grid of, for example, 8x8 units on your canvas, you would shift it by one unit.
Merge the first two layers (select both in the Layers panel and press "Ctrl+E" or "Cmd+E"). Make a copy of this merged layer. Shift this copied layer to the next grid position. Repeat this process. You can continue this until you have a complete row of eight squares on a single layer. Then, repeat the entire process vertically, copying and shifting entire rows until you have an 8x8 square arrangement on your canvas.

Further Pattern Manipulation
Once you have your desired arrangement of squares, you have several options:
- Define as a Pattern: You can select the entire arrangement ("Ctrl+A" or "Cmd+A") and then go to "Edit" > "Define Pattern." This allows you to use this arrangement as a repeatable tile in other documents.
- Free Transform: You can use "Edit" > "Free Transform" ("Ctrl+T" or "Cmd+T") to scale down your checkerboard to a smaller size, making it suitable for intricate details.
- Convert to Shape: If you convert your pixel-based checkerboard into a vector shape layer, you can scale it up significantly without losing quality, which is particularly useful for large-format print projects.
While this method might sound time-consuming, the use of grid snapping and transformation tools makes it remarkably quick once you're familiar with the workflow. For those who frequently create complex arrays of objects, Photoshop's "Transform Again" feature (which can be triggered by "Ctrl+Shift+Alt+T" or "Cmd+Shift+Alt+T" after a transform) can automate repetitive transformations. Alternatively, for more advanced users, custom scripts or third-party panels can automate array creation.
Method 3: The Rectangle Tool and Shape Builder
This technique is particularly effective for creating intricate or stylized checkerboard patterns and is often favored by users familiar with vector-based design principles.
Drawing and Arranging Rectangles
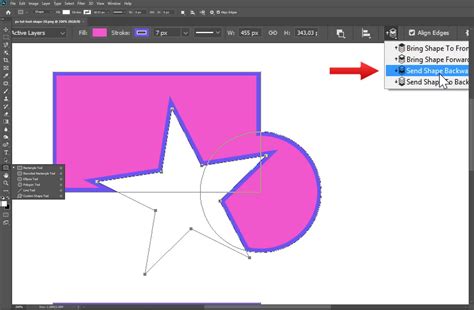
Begin by selecting the "Rectangle Tool" from the toolbar. Ensure that the tool is set to "Shape" mode in the options bar, not "Path" or "Pixels." Draw a perfect square by holding down the "Shift" key while dragging. The size of this square will determine the fundamental unit of your checkerboard.
To ensure precise spacing and alignment, it's highly recommended to enable "Smart Guides" ("View" > "Show" > "Smart Guides"). Smart Guides will provide visual cues as you move and align objects, snapping them into place relative to other objects or guides. Place your first square. Then, draw another square and position it adjacent to the first, using Smart Guides to ensure they touch perfectly.
Continue creating and placing squares, alternating colors. You can achieve this by either creating separate black and white squares or by creating a single row of squares and then using the "Shape Builder Tool" to combine and subtract shapes. A common workflow is to create a row of alternating black and white squares.
Utilizing Symbols and Transformations
Once you have a complete row of alternating squares, you can convert this row into a "Symbol." To do this, select all the squares in the row and drag them into the "Symbols" panel ("Window" > "Symbols"). This allows you to easily duplicate and manipulate instances of this row without duplicating individual layers.
Place instances of this symbol row, stacking them vertically. Again, Smart Guides will be invaluable for precise alignment. You can then duplicate these rows and arrange them to form your checkerboard.
Applying Shearing and Reflection for Advanced Effects
For more complex or three-dimensional-looking checkerboard effects, you can employ tools like the "Shear Tool" and "Reflect Tool."
- Create a Stripe: Construct a stripe of alternating rectangles as described above.
- Shear the Stripe: Select the "Shear Tool" (often grouped with the Scale Tool). Double-click the Shear Tool icon to open its options. Set the "Angle" to a specific degree, for instance, 30 degrees, and ensure it's applied vertically. This will slant your rectangles.
- Reflect and Combine: Go to "Object" > "Transform" > "Reflect." Choose "Vertical" to create a mirrored copy of your sheared stripe. Place this reflected stripe adjacent to the original.
- Recolor: To ensure proper alternating colors between the two stripes, use "Edit" > "Edit Colors" > "Recolor Artwork." This feature allows you to intelligently swap colors across selected artwork. Adjust the color balance to achieve the desired black and white alternation.
While this specific example demonstrates a theoretical approach to a more complex checkered effect, it highlights how Photoshop's transformation tools can be combined to achieve sophisticated patterns that go beyond a simple flat checkerboard. Further refinement with the "Warp" tool or "Mesh Transformation" would be necessary to precisely mimic intricate sample images.
Method 4: The Pattern Fill Layer and Adjustment Layers
Once you have created a fundamental checkerboard pattern, Photoshop's "Pattern Fill Layer" and "Adjustment Layers" offer the most flexible and non-destructive way to apply, scale, rotate, and recolor your pattern.
Defining Your Pattern
After creating your checkerboard in any of the methods above (e.g., the 400x400px document from Method 1), you need to define it as a reusable pattern. Select all the elements of your checkerboard (if they are on separate layers, you might want to group them or merge them temporarily for this step). Go to "Edit" > "Define Pattern." Give your pattern a descriptive name (e.g., "My Checkerboard"). Click "OK."
Testing and Applying Your Pattern
To test your newly defined pattern, open a new document. A common size for digital scrapbook paper is 3600 x 3600 pixels at 300 DPI with a transparent background.
In the "Layers" panel, click the "Create new fill or adjustment layer" icon at the bottom (it looks like a half-filled circle). Select "Pattern…" from the dropdown menu. A "Pattern Fill" dialogue box will appear. In the "Pattern" dropdown menu, your newly created checkerboard pattern should be listed. Select it.
Fill Layer with Solid Color / Gradient / Pattern [Photoshop Tutorial for Beginners]
The dialogue box provides options to "Scale" your pattern (from 1% to 1000% or more) and "Rotate" it. You can also reposition the pattern by clicking and dragging directly on your canvas. If you make changes and want to revert to the original placement, click the "Back to Origin" button.
Non-Destructive Color Changes
One of the most powerful aspects of using a "Pattern Fill Layer" is the ease with which you can change the colors of your checkerboard.
- Add a Color Fill Layer: Below your "Pattern Fill Layer" in the "Layers" panel, create a new "Solid Color" adjustment layer ("Layer" > "New Fill Layer" > "Solid Color"). Choose your desired background color for the checkerboard.
- Add a Hue/Saturation Adjustment Layer: Above the "Pattern Fill Layer," create a "Hue/Saturation" adjustment layer ("Layer" > "New Adjustment Layer" > "Hue/Saturation").
- Create a Clipping Mask: Right-click on the "Hue/Saturation" adjustment layer and select "Create Clipping Mask." This ensures that the adjustment layer only affects the layer directly below it â your "Pattern Fill Layer."
- Adjust Colors: With the "Hue/Saturation" layer selected, you can now adjust the "Hue," "Saturation," and "Lightness" sliders to completely change the colors of your checkerboard pattern. For instance, to change black to red and white to blue, you would experiment with the sliders until you achieve the desired effect. You can even check the "Colorize" option for more dramatic color shifts.
This clipping mask technique allows for endless color variations without altering the original pattern definition. You can add multiple clipping-masked "Hue/Saturation" layers to achieve complex color schemes.
Exporting and Saving Your Checker Pattern
Once you are satisfied with your checkerboard pattern and its application, you'll want to save it appropriately.
Saving as Digital Scrapbook Paper
If you created your pattern on a large canvas (like the 3600x3600px example for digital scrapbook paper), you can save it as a high-resolution image. Go to "File" > "Save a Copy." Choose a suitable file format like JPEG (for solid backgrounds) or PNG (for transparent backgrounds, though for scrapbook paper, a solid background is more common). Ensure the resolution and quality settings are appropriate for your intended use.
Saving the Pattern Definition
To reuse your defined pattern in other Photoshop projects, it's stored within Photoshop's preferences. However, you can also export your custom patterns. Go to "Edit" > "Presets" > "Export/Import Presets." Select "Patterns" from the dropdown and choose to export your pattern. This will save your pattern as an .pat file, which can be easily re-imported into Photoshop on any computer.
Applications and Considerations
Checkerboard patterns are incredibly versatile. They are commonly used in:
- Digital Art and Graphics: As backgrounds, textures, or design elements in posters, websites, and social media graphics.
- Textile Design: For fabrics, clothing, and home decor items.
- Game Design: For textures on game environments and characters.
- Web Design: For tiling backgrounds or creating visual interest.
- Print Projects: In brochures, flyers, and packaging.
Avoiding Clichés and Misconceptions
While the checkerboard is a classic, its overuse can sometimes lead to a lack of originality. Consider how you can put a unique spin on it:
- Beyond Black and White: Experiment with a wide spectrum of color combinations.
- Distorted or Warped Effects: Use Photoshop's warp tools to create curved or distorted checkerboards for a more dynamic feel.
- Varying Square Sizes: Create patterns with irregularly sized squares for a more abstract look.
- Combining with Other Textures: Overlay your checkerboard with grunge textures, gradients, or photographic elements to add depth and complexity.
A common misconception is that creating a checkerboard must be a rigid, pixel-perfect process. However, as demonstrated by the various methods, Photoshop offers flexibility. Whether you prefer the precise control of the marquee tool, the visual guidance of grids, or the dynamic nature of shape tools, you can achieve your desired outcome.
Conclusion
Mastering the creation of checkerboard patterns in Photoshop opens up a world of design possibilities. From the fundamental building blocks of squares and rectangles to the sophisticated application of pattern fill layers and adjustment layers, Photoshop provides a robust toolkit. Whether you're a beginner looking to create a simple pattern for a one-off project or an experienced designer aiming for complex, customizable textile designs, understanding these techniques will empower you to bring your checkerboard visions to life with precision and creativity. The ability to easily scale, rotate, and recolor these patterns non-destructively ensures that your designs remain adaptable and professional.
tags: #checkerboard #pattern #photoshop